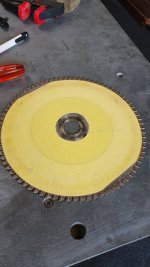
They don't make sanding disks for chop saws, but they do for table saws. So, I use a table saw sanding disk on my chop saw, same 5/8" arbor mount.
You are using an out of date browser. It may not display this or other websites correctly.
You should upgrade or use an alternative browser.
You should upgrade or use an alternative browser.
Corner pocket miter angles
- Thread starter realkingcobra
- Start date
Oh man, I've been searching for those miter saw sanding disks on the interwebs for a few days nowThey don't make sanding disks for chop saws, but they do for table saws. So, I use a table saw sanding disk on my chop saw, same 5/8" arbor mount.
") Thanks for the info RKC!
Thanks for the info RKC!On a different note this time, today was a very good day. I went to a local big tool etc. hardware store, and got blank stares when mentioning sanding disks for a table saw. So I glued 80 grit sandpaper to my miter saw blade, did some tests and verified angles, made my peace and went with it.
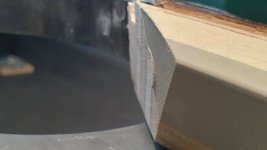
I mean, look at it. LOOK AT IT! It is outrageously, deliciously sharp, clean, crisp and nice! Who would have thought a schmuck like me could produce that? Not me, that's for damn sure.
This sanding disk method is the dog's bollocks, I tell you. Thanks to Glen and everyone who gave me advice on this project so far. Today I'm off to a shop where I might get 5mm shore 65 neoprene for facings. It should not be too hard I don't think, and while 5mm is very slightly thicker than the 3/16" you guys keep raving about, it should be ok. Fingers crossed.
Attachments
Thanks, yeah we went with the basic rubbers that are grey. They are like USD85 a pop, while the fancy pants red Artemis cushions would've been USD250. The rails didn't have those super duper cushions to begin with, and everyone thought the cushions played real nice so we went with the same ones. Fresh Simonis 760 green cloth instead of the red(!) it came with. I've been levelling the table for days on end now, being the keen but clumsy amateur that I am, however slowly but surely it's all coming togethernice good job...
I did notice your cushion material is different than mine (grey vs red). Not sure but I'm willing to bet they have different characteristics. Could be why you experienced such problems with tear out and I didn't
")
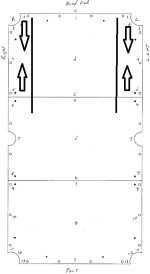
Anyone have a solution / ideas to fix this: the head slate measures high as shown in the picture, when measured with machinist level alone. The arrows are pointing to where the slate is HIGH.
- both sides read level from head to foot when measuring with carpenter's level + machinist level + razor blades at measuring points per RKC's slate levelling instructions
- the lines in the picture show measuring points to the previous slate, reading is good
- both seams are superglued and good
- when I start to fine tune the head slate, the machinist level (0,02mm per m) goes all bonkers on me.
For the life of me I can't understand what is going on. Can the slate just be slightly bent? There are no slate screws on the sides on the high points that I could just tighten.
Attachments
Did you put the machinists level on top of the carpenters level? If you did what did you get for readings on the machinist level?? Its possible (even likely) that the carpenters level is not accurate enough to pick up on the degree of unevenness (I don't think unlevelness is a word but if it was that's the word I would have use) (out of levelness??) (unplumb with the horizon?)(there must be a proper word to use, Im sure someone will correct me)Anyone have a solution / ideas to fix this: the head slate measures high as shown in the picture, when measured with machinist level alone. The arrows are pointing to where the slate is HIGH.
- both sides read level from head to foot when measuring with carpenter's level + machinist level + razor blades at measuring points per RKC's slate levelling instructions
- the lines in the picture show measuring points to the previous slate, reading is good
- both seams are superglued and good
- when I start to fine tune the head slate, the machinist level (0,02mm per m) goes all bonkers on me.
For the life of me I can't understand what is going on. Can the slate just be slightly bent? There are no slate screws on the sides on the high points that I could just tighten.
Yes, I used the carpenter's level + machinist level combo on each slate levelling the table end to end on both sides, and the table is level side to side too. I am in the process of fine tuning the slates with only the machinist level as explained in RKC's levelling instructions. This means using only the machinist level, and shimming the slates between the slate screws if needed. The arrows in the picture show the position of the machinist level, and which way it reads high.
I dont think the levels are at fault here. They show consistent readings irrespective which way I use them, and I check the machinist level for accuracy each day before use, and calibrate if needed.
I dont think the levels are at fault here. They show consistent readings irrespective which way I use them, and I check the machinist level for accuracy each day before use, and calibrate if needed.
Last edited:
It's possible that piece of slate is crowned. A straight edge, or possibly your long level might reveal that. I just did a table where the opposite was true, the foot piece of slate had a belly in it.Anyone have a solution / ideas to fix this: the head slate measures high as shown in the picture, when measured with machinist level alone. The arrows are pointing to where the slate is HIGH.
- both sides read level from head to foot when measuring with carpenter's level + machinist level + razor blades at measuring points per RKC's slate levelling instructions
- the lines in the picture show measuring points to the previous slate, reading is good
- both seams are superglued and good
- when I start to fine tune the head slate, the machinist level (0,02mm per m) goes all bonkers on me.
For the life of me I can't understand what is going on. Can the slate just be slightly bent? There are no slate screws on the sides on the high points that I could just tighten.
I don't have a straight edge, but the longer level is of good quality and has machined faces, so it might just be enough. I'll see tomorrow, thanks for the tip!It's possible that piece of slate is crowned. A straight edge, or possibly your long level might reveal that. I just did a table where the opposite was true, the foot piece of slate had a belly in it.
It could be that the issue isn't actually that bad, because;
1. my machinist level is so sensitive it's not even funny. One graduation in the vial equals 0.0002" per 10". Even the slightest elevation is registered, so the "problem" might not actually be a problem at all. I really need to get me a level better suited for the work.
2. when tightened, the rails on both sides of the problem slate could just flatten the high spot right out.
Fingers crossed
Yeah, not the right tool. It can be made to work, but it's not fun.One graduation in the vial equals 0.0002" per 10"
This seller has one left, I got the one that's pictured and it cleaned up real nice. I did lap the base and take everything apart to clean it.

Starrett 98-8 Machinists Level w/ Ground & Graduated Vial 8" Base Moderate Wear | eBay
Find many great new & used options and get the best deals for Starrett 98-8 Machinists Level w/ Ground & Graduated Vial 8" Base Moderate Wear at the best online prices at eBay! Free shipping for many products!
www.ebay.com
Another one for a real decent price, no pic of the base though.

Starrett No. 98 Machinist Level w/Box | eBay
Find many great new & used options and get the best deals for Starrett No. 98 Machinist Level w/Box at the best online prices at eBay! Free shipping for many products!
www.ebay.com
Last edited:
Yeah you're right. The thing is that I'm located in Finland, so I'd have to pay international shipping, VAT and local shipping as well. Which I guess would double the price for me easily. And we're not even talking about a fragile parcel. Oh well, maybe I'll try to find one from some European ebay, cutting the costs down...Yeah, not the right tool. It can be made to work, but it's not fun.
This seller has one left, I got the one that's pictured and it cleaned up real nice. I did lap the base and take everything apart to clean it.
Starrett 98-8 Machinists Level w/ Ground & Graduated Vial 8" Base Moderate Wear | eBay
Find many great new & used options and get the best deals for Starrett 98-8 Machinists Level w/ Ground & Graduated Vial 8" Base Moderate Wear at the best online prices at eBay! Free shipping for many products!www.ebay.com
Another one for a real decent price, no pic of the base though.
Starrett No. 98 Machinist Level w/Box | eBay
Find many great new & used options and get the best deals for Starrett No. 98 Machinist Level w/Box at the best online prices at eBay! Free shipping for many products!www.ebay.com
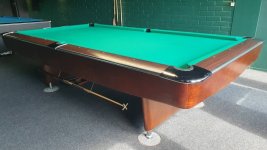
The table is done. Thanks to Glen and others for all the advice you gave me  The rails work very nicely and the balls seem to roll forever on the fresh Simonis 760.
The rails work very nicely and the balls seem to roll forever on the fresh Simonis 760.Attachments


It gets easier after you do a few more tables, good jobThe table is done. Thanks to Glen and others for all the advice you gave me

Looks good! Nice work.The table is done. Thanks to Glen and others for all the advice you gave me
The corners were cut at 140° and sides at 100°. Corners are close to 4.1" and sides 4.6", downangle at 14-15°, can't remember which but all are the same. For some reason the picture shows the corner pocket facings very parallel, but they are not I can assure. I'll take another pic later and post it, hopefully it shows the angles as they are.Looks good! Were you going for 135° pockets in the corners?
I gotta say, you can go full blast into those corners going down the rail, and the pocket just accepts those shots no problem. You've got to be precise though, can't flirt with the long rail. No rattling, nothing. Happy as a clam, I am
Sounds like it plays as it should! Good job.The corners were cut at 140° and sides at 100°. Corners are close to 4.1" and sides 4.6", downangle at 14-15°, can't remember which but all are the same. For some reason the picture shows the corner pocket facings very parallel, but they are not I can assure. I'll take another pic later and post it, hopefully it shows the angles as they are.
I gotta say, you can go full blast into those corners going down the rail, and the pocket just accepts those shots no problem. You've got to be precise though, can't flirt with the long rail. No rattling, nothing. Happy as a clam, I am
Last edited:
PowerStroke
Member
The table is done. Thanks to Glen and others for all the advice you gave meThe rails work very nicely and the balls seem to roll forever on the fresh Simonis 760.
 The rails work very nicely and the balls seem to roll forever on the fresh Simonis 760.
Corners look a little weird. No?
Sent from my iPad using AzBilliards Forums