Custom Prather Full-Spliced Cue In Progress

JoshStodola

My stroke is garbage
Silver Member
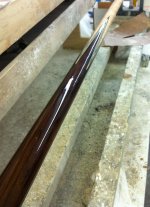
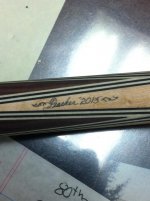
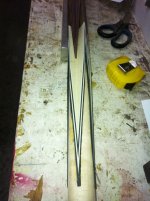
I am having a custom full-spliced cue made for me from the folks at Prather in Mooreland, OK. Very nice people! This will be modeled after their 1915 series, a classic four-point four-veneered cue which has a nice old school look and feel to it:

1915_Sneak_Preview.jpg


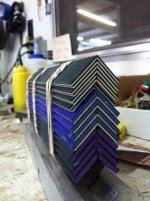
I've heard nothing but great things about the blanks from Prather, so I jumped on an opportunity to have one made out of Rosewood and birdseye with black/white/black/white veneers and trim rings.

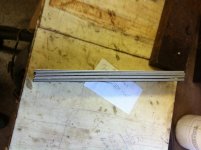
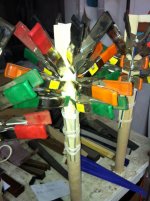
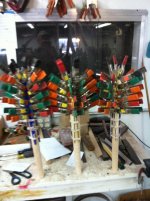
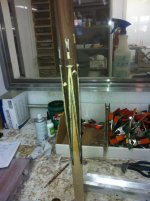
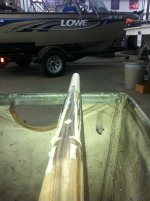
The best part of this transaction so far has been that Jeff has been sending me "live update" text messages with pics of the progress of the build! How cool is that? I thought it would be worthwhile to create a thread and share the pics with people, as I have found it to be pretty fascinating.

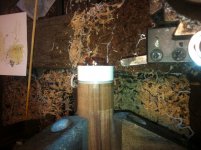
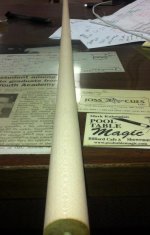
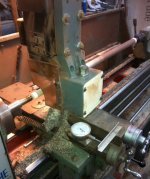
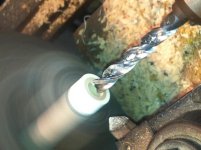
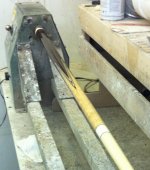
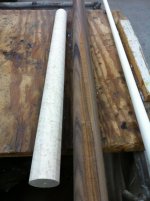
Here are the four pics I have thus far, will be adding to this post as the work continues. Thanks again to Jeff and all the folks at Prather, keep up the great work!
 

Attachments

  • photo 1.jpg
    photo 1.jpg
    95.2 KB · Views: 2,596
  • photo 2.jpg
    photo 2.jpg
    93.3 KB · Views: 2,558
  • photo 3.jpg
    photo 3.jpg
    97.9 KB · Views: 2,654
  • photo 4.jpg
    photo 4.jpg
    98.2 KB · Views: 2,593
Last edited:
Prather makes one hell of a blank. They made me one, a purpleheart/straight maple with titlist veneers and Mr. Leon Sly finished it up for me. Came out to be one hell of a cue! Finished product linked in my sig. Gl with yours :)
 
Update

First three pics are of the veneers glued down. Last pic is after the first pass, do these points look great or what?! Thanks for looking.
 

Attachments

  • photo 1.jpg
    photo 1.jpg
    95.2 KB · Views: 2,260
  • photo 2.jpg
    photo 2.jpg
    93.9 KB · Views: 2,282
  • photo 4.jpg
    photo 4.jpg
    95.1 KB · Views: 2,261
  • photo 5.jpg
    photo 5.jpg
    94 KB · Views: 2,299
Update #2

I received some more pics from Jeff today :D 
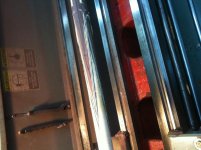
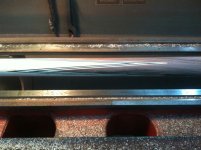
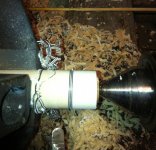
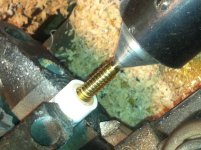
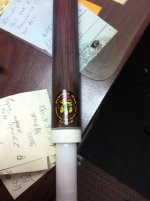
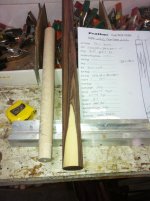
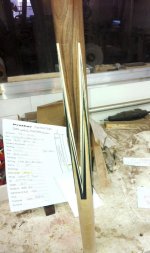
I asked for for the cue to have white phenolic joint collars and butt cap, with fiber trim rings to match the veneers on the points. It's looking pretty good! Jeff said he will probably work on the shaft tomorrow.
 

Attachments

  • photo 1.jpg
    photo 1.jpg
    97.1 KB · Views: 2,045
  • photo 2.jpg
    photo 2.jpg
    89.6 KB · Views: 2,109
  • photo 3.jpg
    photo 3.jpg
    105 KB · Views: 2,188
Last edited:
Update #3

Jeff found an old dark/heavy shaft to use on this cue, and added the matching trim rings
 

Attachments

  • photo 1.jpg
    photo 1.jpg
    94.6 KB · Views: 1,984
  • photo 2.jpg
    photo 2.jpg
    92 KB · Views: 2,057
talk

Now see, THIS is what cuebuilding needs to be!! I have been labeled as being impatient, BUT with communication like this, it wouldn't matter how long it took...I know it is being accomplished!!!!! Very nice cue sir, I'm sure you will enjoy it! Jeff
 
Update #4

Not much to see here, but Jeff took another pass on it yesterday
 

Attachments

  • photo.jpg
    photo.jpg
    91.2 KB · Views: 1,781
Update #5

Installing the joint pin. Jeff's going to try to get the cue into the paint room today for finishing. The end is near!
 

Attachments

  • photo 1.jpg
    photo 1.jpg
    94.7 KB · Views: 1,616
  • photo 2.jpg
    photo 2.jpg
    97.7 KB · Views: 1,624
Update #6

First pic the cue is ready for sanding! Next two pics in the paint room after the under coat, which really brings out the birdseye
 

Attachments

  • 1.jpg
    1.jpg
    43.1 KB · Views: 1,516
  • 3.jpg
    3.jpg
    95.8 KB · Views: 1,560
  • 4.jpg
    4.jpg
    94.1 KB · Views: 1,527
Update #7

Jeff signed the forearm between the points and put on the classic 1916 sticker which is reminiscent of the old Brunswick labels. I hope it similiarly fades over time. Last pic is of the cue after the first clear coat.
 

Attachments

  • 1.jpg
    1.jpg
    95.8 KB · Views: 738
  • 2.jpg
    2.jpg
    91.8 KB · Views: 695
  • 3.jpg
    3.jpg
    88.5 KB · Views: 714
Update #8

As you can see in the pic, one of the points was chipped during the sanding/finishing. This does not meet the Prather quality standards as he insisted on building me a new one. I have newfound respect for the craft of cue making, it must be rough working on something for months and then having to scrap it and start over, but I guess it's the right thing to do.
 
As you can see in the pic, one of the points was chipped during the sanding/finishing. This does not meet the Prather quality standards as he insisted on building me a new one. I have newfound respect for the craft of cue making, it must be rough working on something for months and then having to scrap it and start over, but I guess it's the right thing to do.

That's a dam shame . It looks to dam sweet .. Ok on the other hand it can to turn a it to a break cue , Hmmm
 
Update #9

Jeff is working on another cue for me, since he was not pleased with how the last one turned out. Here are some more pics :thumbup:

Pic #1 is the veneers being glued together
Pic #2 is my black/white/black/white veneers after gluing
Pic #3 is the birdseye maple and rosewood used to make this cue
Pic #4 is the rosewood after being turned
 

Attachments

  • photo 1.jpg
    photo 1.jpg
    92.6 KB · Views: 577
  • photo 2.jpg
    photo 2.jpg
    91.8 KB · Views: 582
  • photo 3.jpg
    photo 3.jpg
    92 KB · Views: 565
  • photo 7.jpg
    photo 7.jpg
    97 KB · Views: 582
Update #10

A few more pics...

Pic #1 is my veneers and a couple others
Pic #2 is a lot of clamps!
Pic #3 is even more clamps!
 

Attachments

  • photo 4.jpg
    photo 4.jpg
    93.1 KB · Views: 571
  • photo 5.jpg
    photo 5.jpg
    93.1 KB · Views: 578
  • photo 6.jpg
    photo 6.jpg
    93.6 KB · Views: 571
Back
Top