Designing and building ball roundness tester

kling&allen

AzB Gold Member
Gold Member
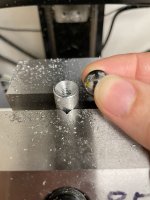
Thanks. No, the white base is 3D printed. I drew it up last night to be able to bolt it to the indicator stand that was delivered and try a few balls. I was excited to try it. It works surprisingly well. I can repeat to about .0002". It deforms I press hard into it, but if I'm gentle when I spin the ball, it works really well. The real one would be metal, either aluminum or steel, and have steel ball bearings epoxied into it.

It's interesting the printed base works so well. I would have assumed the ridges between layers would have produced significant error (let alone the lack of concentricity on the printed dome).
 

DaveK

Still crazy after all these years
Silver Member
Yeah, very similar. The last time I was at my optician I had him show me his lens curvature measuring tool. His was 2D only, not 3D. It had two contact points, with the plunger of the indicator between them. What is the scale you are working in? Will your device be something like the size of a hand, the size of a foot, or bigger still?
Mine will be sized for measuring a 6" mirror for a telescope. The triangle base will be 2 - 3 inches on a side. I have a tenths-reading 0.200" range Starrett dial indicator to set in the middle. But now that I have discovered this pool ball checking thread I may add some closer contact points, maybe 1" on a side (can always use a gage block on the surface plate to set "0" at 0+0.1500" or whatever to suit the curvature to be measured).

Dave
 

iusedtoberich

AzB Silver Member
Silver Member
The rest of my Ebay parts came! I was smiling all day. USA, Germany, Japan, Switzerland, and Brazil (new magnetic base) represented.

IMG_1596.jpeg


IMG_1597.jpeg

Reads to .000050" (50 millionths of one inch, or 50 micro-inches). Made in Germany, probably from the 70's.

IMG_1598.jpeg

This was a set. The stand is probably older, from the USA. It has a rack and pinion. Its a hunny.


IMG_1599.jpeg

Next we move to Japan, and into the 90s, and into the electronic era. I was thinking I'd use this to measure ball diameter, instead of the micrometers. To do it quickly. Upon further thought, it would not work. There would be no way to insure the plunger is perpendicular to the platen to get a true diameter reading.

IMG_1600.jpeg


I will make a platen for this one too. The round disk comes off and I can 3D print another one using the mounting hole provisions it has.
 

claymont

JADE
Gold Member
Silver Member
The rest of my Ebay parts came! I was smiling all day. USA, Germany, Japan, Switzerland, and Brazil (new magnetic base) represented.

View attachment 626698


View attachment 626699
Reads to .000050" (50 millionths of one inch, or 50 micro-inches). Made in Germany, probably from the 70's.

View attachment 626700
This was a set. The stand is probably older, from the USA. It has a rack and pinion. Its a hunny.


View attachment 626701
Next we move to Japan, and into the 90s, and into the electronic era. I was thinking I'd use this to measure ball diameter, instead of the micrometers. To do it quickly. Upon further thought, it would not work. There would be no way to insure the plunger is perpendicular to the platen to get a true diameter reading.

View attachment 626702

I will make a platen for this one too. The round disk comes off and I can 3D print another one using the mounting hole provisions it has.
Try a hole, about 3/8" with a 1/16" chamfer in the platen to set the ball on. The chamfer was lapped to give a true surface. My indicator read to .0005"; I was happy with the results. Worked pretty good as a comparator for diameters too.
 

iusedtoberich

AzB Silver Member
Silver Member
I printed a platen for the Mitutoyo stand.


IMG_1602.jpeg


IMG_1603.jpeg

I used 3/4" diameter balls instead of 1" diameter balls I used on the other one. 3/4" are cheaper (for the actual ball bearings), and I wanted to see if it made any difference.


IMG_1604.jpeg


On the other stand, I moved the magnetic base to the base of the indicator stand, rather than the top of the column. The indicator stand base is cast iron with paint on top, so the magnetic base was rocking. That's why on an earlier post I had it way at the top of the column. This back left corner was flat enough to work without rocking. (under the 3D printed platen, the base is precision ground).


I ordered more steel ball bearings, and a few different types and size tips for the indicators. The ones from ebay had noticeable wear on them. The printed balls work surpassingly well, but there is definitely stick-slip going on and it makes the needle jump around when rotating the pool ball.
 

pw98

Registered
I'm working on a ball sphericity (roundness) tester for fun. Below are a couple of pictures, and a YouTube video link describing the process. I'll update as I go.

My motivation is to see how different ball sets and brands compare both when new, and when worn. Also because I like making things.

View attachment 556942

View attachment 556943

Youtube video with a lot more detail. Part 1:
Try using a high resolution camera and AI Convolutional neural Network. You just need a bunch of round and non-round balls for training data and its super easy to do. You put them on turn table maybe from a record player for a while taking pictures while they spin slowly at maybe like 16 rpm. This is definitely the cheapest and simplest method. Sure yoy won't know how unround they are nut you will know if they are as round as the training set whatever balls you choose for that.

You could even make an app for a phone that does it.
 
Last edited:

iusedtoberich

AzB Silver Member
Silver Member
I made some improvements and am trying to bring the cost down. The plate is laser cut steel. The ball bearings are smaller, and sit on off-the-shelf standoffs that I chamfered the top and epoxied in a ball bearing. With the 3D printed version, I discovered if there was room under the ball, it would be easier for your fingers to turn the ball. That's why I switched to standoffs. It also means the plate can be much simpler. All the parts are metal, the 3D printing concept is gone. The stability is super good. There is no chatter when spinning the ball.

Would any of you ball nuts be interested in buying a finalized version? (not this one, it still needs a few iterations to bring the price lower). I'm thinking the price point would be about $250 including a .0001" indicator. I'm trying to make it as cheap as possible. I know there might only be 10 people in the world that might want to buy one, ha ha. If so, I can make a run of 5 or 10 in one shot.


IMG_2289.jpeg


IMG_2288.jpeg


IMG_2204.jpeg
 

Attachments

  • IMG_2204.jpeg
    IMG_2204.jpeg
    339.3 KB · Views: 66
Last edited:
Top