Dreaming of and designing my own pool table

at this moment, I am thinking of something like this:
View attachment 614862

I like the idea that all slate pieces are equally supported and also for the slate levellers to be placed in a way symmetrical on both axis.
I drew the dimensions of the outside of that frame to be exactly 100" by 50" (254cmx127cm)
So the levellers on the side would be directly beneath the border of the playing field. I see no reason to put levellers on the complete outside of the slates, the wider they are put apart, the more possibility of bending. (theory of airy points)
I'm now thinking of 8 levellers for each slate, with an extra one in the middle for a total of 27 levellers.
Just a reminder for everyone: I'm designing with one word in mind = overkill.
Hats off to you sir! I have and am currently lurkin on this! GOOD LUCK TO YOU ! :)

TFT
 
It's been a while since I've posted. Last month less designing, more buying ...
I've started purchasing materials and accessories I'll be needing in this project.

Wood: 18mm (11/16") rubberwood and 28 (1 1/16")mm oak
I've got almost all the pieces for all the legs, the frame and the rails. Just had a good deal to buy now, prices still going up...
IMG_20211205_095839.jpeg
IMG_20211205_095826.jpeg


The pocketliners from manufacturer Gabriëls (similar to Clash model)
For those holes plugs are included. Plugs with an inside thread to fasten from below through the rail

IMG_20211205_095155.jpeg
IMG_20211205_095221.jpeg

Some bubble levels
First I had the round one, quite a fun toy to play with, but not really on the accuracy level as a real machinist level. Got it secondhad for a fraction of new price. Happy with it.
IMG_20211205_094635.jpeg
IMG_20211205_095043.jpeg


and some hardware
Some fasteners to thighten two rails together
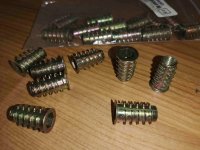
Some screw-in nuts that I'll use for attaching frame to legs (not weight bearing ) and for rails to slate.
IMG_20211205_103241.jpeg
IMG_20211205_094950.jpeg

Woodglue
I've bought half a gallon at this point, will be needing more.
rectarectd4750gr-rectan-750.jpg


As I am going forward in these small steps it's looking good for a financial point of view.
The deal on my wood was 35% cheaper than normal... once in a lifetime, right
 
My sketchbook is getting full... I spend a lot of time figuring out how to build.
Especially the special things like cutting the pocket angles and cushion angles.
For the pockets I've got it figured out: I'll build 2 custom mitre box saws with the right angles.
This will make sure that each type of pocket is identical to the others. I have confidence in this method.
For the cushions angles I'm not yet there...
When making the rails, they'll be cut first to the full rail width (i chose 18cm, that's about 7 inches). Then I can cut the rebates on top and bottom for the cloth and do the slot for the feather strip. The ends with be cut at 45°/135° for the rail assembly with inner dimensions of 100" by 50". Then I can cut each rail on the inside with an angle of about 20° to fit the cushions.
In this method I'm not yet confident.
Well, I'm not there yet... I'm patient and not rushing anything.
 

Attachments

  • IMG_20211205_094950.jpeg
    IMG_20211205_094950.jpeg
    187.3 KB · Views: 132
"Some screw-in nuts that I'll use for attaching frame to legs (not weight bearing ) and for rails to slate."

Are you planning on using these to attach rails? IMO, you should rethink that, Stafast makes a much better hardwood insert. https://shop.stafast.com/threaded-inserts/inserts-for-hard-wood/screw-in/sk-insert

I cant wait to see your outcome, I love what you are doing!

TFT
I know those and found them locally ... they're kind of the same.
But a 300% price difference
 
My sketchbook is getting full... I spend a lot of time figuring out how to build.
Especially the special things like cutting the pocket angles and cushion angles.
For the pockets I've got it figured out: I'll build 2 custom mitre box saws with the right angles.
This will make sure that each type of pocket is identical to the others. I have confidence in this method.
For the cushions angles I'm not yet there...
When making the rails, they'll be cut first to the full rail width (i chose 18cm, that's about 7 inches). Then I can cut the rebates on top and bottom for the cloth and do the slot for the feather strip. The ends with be cut at 45°/135° for the rail assembly with inner dimensions of 100" by 50". Then I can cut each rail on the inside with an angle of about 20° to fit the cushions.
In this method I'm not yet confident.
Well, I'm not there yet... I'm patient and not rushing anything.
Save some room in that sketchbook to redesign your wedge system for leveling the slates, as it is mechanically flawed and will probably lock up with the 1st rotation of the screw.
 
I know those and found them locally ... they're kind of the same.
But a 300% price difference
kind of the same?? no, they are nothing alike. if you want your project to PLAY well. those SOFT wood inserts VS the stafast HARDWOOD inserts. Spend the money :)
I am on your side here!

TFT
 
kind of the same?? no, they are nothing alike. if you want your project to PLAY well. those SOFT wood inserts VS the stafast HARDWOOD inserts. Spend the money :)
I am on your side here!

TFT
I posted some questions about these on my favorite local Facebook woodworking group and got some very clear explanations on the different types of these screws. Those and your answers make me think of going back to using just plain old bolts and nuts.
Why make it harder, just keep it simple...
 
I posted some questions about these on my favorite local Facebook woodworking group and got some very clear explanations on the different types of these screws. Those and your answers make me think of going back to using just plain old bolts and nuts.
Why make it harder, just keep it simple..

Screws?? Nuts and bolts? I have no idea what you are talking about. I was talking about those soft wood inserts you showed that you are plannin on using to attach the rails to your project table( used on GC3 to anchor the pocket castings and happen to pull out of the wood...stafast hardwood insert is the perm fix for that)
Diamond happens to used the stafast hardwood insert to attach their rails to their tables.
Sounds like maybe I should just say: good luck to you sir!

TFT
 
There is a bunch of interesting stuff about building pool tables on Pinterest. Many of them are pretty rudimentary but there are a few real nice builds.
 
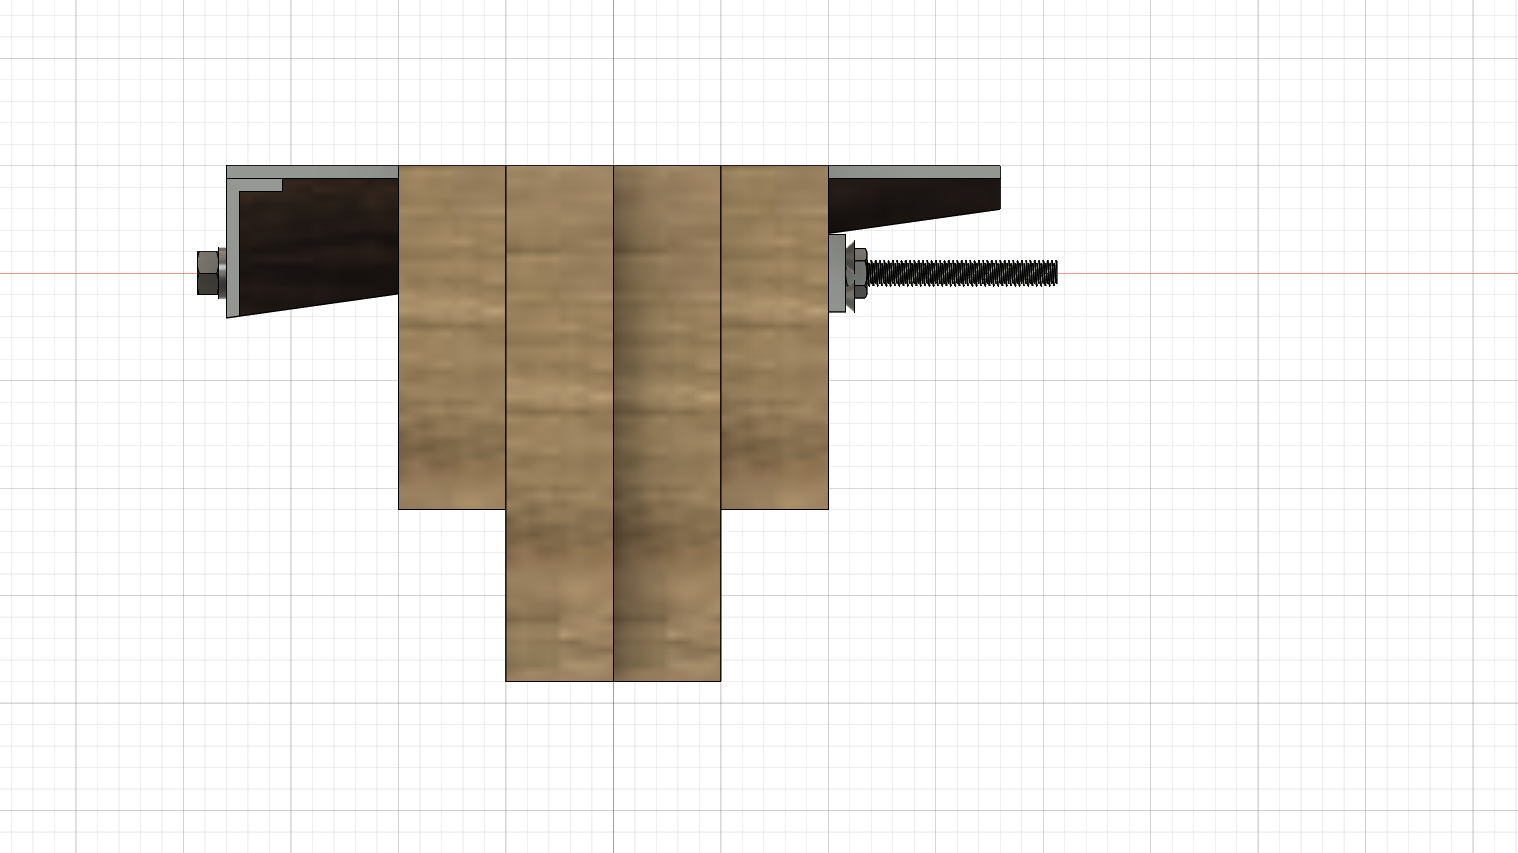
I commented a couple of days ago that this leveling ramp design is mechanically flawed, only fastone371 appeared to get my comment, so I'll explain why I said that. No intention of slamming the op's ideas or desire to do this, just pointing out a problem to him before he gets too far.

The draw screw, which when rotated is designed to raise and lower the leveling block along the incline along the angle in the frame rails, which makes sense, however the fact that the draw screw itself is on a horizontal plane which opposes the incline angle insures interference as soon as the screw is turned. The leveling block cannot move to raise or lower the block up or down along the incline because any effort to move the block up or down the incline will immediately apply side pressure on the sides of the draw screw on the sides of the hole.

dsls-desain-slate-leveling-system-v5-11.png
 
Last edited:
Screws?? Nuts and bolts? I have no idea what you are talking about. I was talking about those soft wood inserts you showed that you are plannin on using to attach the rails to your project table( used on GC3 to anchor the pocket castings and happen to pull out of the wood...stafast hardwood insert is the perm fix for that)
Diamond happens to used the stafast hardwood insert to attach their rails to their tables.
Sounds like maybe I should just say: good luck to you sir!

TFT
Thx for the input, but ...

Sorry, I ment to write screw-in nut ...
Here's a picture to clarify the purpose of my question

leg-frame.PNG

This is not a weight bearing situation, the frame will be resting on part of the leg. This is just to keep the legs in place.

A lot of comments in the Facebook woodworking group talked about coloration, corrosion, chemical reaction with the wood, ... all things that might happen and which I can avoid with just using bolts, washers and nuts.
Keeping it simple is key here ...

But I have no solution yet for attaching the rails to the slate: do you recommend the before mentioned screw-in nuts or do I use one of these solutions:
heavy-duty-pool-table-leg-leveler-t-nuts-moneymachines.com.jpg
slab-base-rail-t-nuts-for-valley-other-coin-op-pool-tables-moneymachines.com.jpg
s-l400.jpg
s-l300.jpg

I like the idea of a small metal plate with a welded nut.

A penny for your thoughts ...

thx
 
Last edited:
Thx for the input, but ...

Sorry, I ment to write screw-in nut ...
Here's a picture to clarify the purpose of my question

View attachment 619278
This is not a weight bearing situation, the frame will be resting on part of the leg. This is just to keep the legs in place.

A lot of comments in the Facebook woodworking group talked about coloration, corrosion, chemical reaction with the wood, ... all things that might happen and which I can avoid with just using bolts, washers and nuts.
Keeping it simple is key here ...

But I have no solution yet for attaching the rails to the slate: do you recommend the before mentioned screw-in nuts or do I use one of these solutions:
View attachment 619281View attachment 619282View attachment 619283View attachment 619284
I like the idea of a small metal plate with a welded nut.

A penny for your thoughts ...

thx
the stafast inserts are what diamond uses now, the last round nut plate you showed was what diamond USED to use.
I suggest the stafast inserts over all of those. $0.01 given~
TFT
 
Thx for the input, but ...

Sorry, I ment to write screw-in nut ...
Here's a picture to clarify the purpose of my question

View attachment 619278
This is not a weight bearing situation, the frame will be resting on part of the leg. This is just to keep the legs in place.

A lot of comments in the Facebook woodworking group talked about coloration, corrosion, chemical reaction with the wood, ... all things that might happen and which I can avoid with just using bolts, washers and nuts.
Keeping it simple is key here ...

But I have no solution yet for attaching the rails to the slate: do you recommend the before mentioned screw-in nuts or do I use one of these solutions:
View attachment 619281View attachment 619282View attachment 619283View attachment 619284
I like the idea of a small metal plate with a welded nut.

A penny for your thoughts ...

thx
The nut plates are what early Gold Crowns originally used and often fail. They are typically replaced even if in working condition when rails are modified. I believe they use Stafast nuts now.
If there is a reaction between the Stafast inserts and the wood it seems that there may also be a reaction between nuts/bolts and wood.
Take everything I say with a grain of salt, I am neither a table mechanic nor a woodworker, I think pool table frames should be made of steel. Steel doesn't warp, its structurally very strong, its not affected by temps/moisture, and its readily available.
 
The draw screw, which when rotated is designed to raise and lower the leveling block along the incline along the angle in the frame rails, which makes sense, however the fact that the draw screw itself is on a horizontal plane which opposes the incline angle insures interference as soon as the screw is turned. The leveling block cannot move to raise or lower the block up or down along the incline because any effort to move the block up or down the incline will immediately apply side pressure on the sides of the draw screw on the sides of the hole.

I pointed that out in post #26.
Familiar consideration, since i sometimes fit, scrape, adjust, or make machine tool tapered gibs. :)

2.) Re: screw actuation - once again, it is to be hoped that very little displacement of that size potential shim would never be necessary.
2.a.) feeding the shim along the screw as shown will gradually bend it.
(My) conclusion: will probably work since it is unlikely to ever be displaced significantly from installed flush height.
However, using a slotted nut, in a slot in the end of the metal shim, would allow the nut to pull the shim as well as push it. The slot in the shim would allow rise & fall as necessary with shim displacement.
 
I commented a couple of days ago that this leveling ramp design is mechanically flawed, only fastone371 appeared to get my comment,
I pointed that out in post #26.
Ya, I got it as well, and noticed the flaw. The screw needs to be allowed to pivot. Usually you'll see a short chunk of rod drill/tapped perpendicular to it's length, that also seats in a groove that allows the pivot but retains it's position. Tried to find a pic, but couldn't

Edit: Ha found it. Google "barrel nut"
knoidjoiJFSDCKSOCJL.png


Usually on the driven end, there will also be a washer of sorts that allows a pivot.
 
Last edited:
Take inserts like these one full threaded in stainless at good price, tap-thread the holes in rail,
glue in epoxy and add a solid washer over with 3 or 4 screws to make like a flanged insert, that will make a top job.
https://www.aliexpress.com/item/1005002536541784.html?spm=a2g0o.productlist.0.0.7f2f3f5b34NEaA&algo_pvid=e1d1d6c8-d710-474f-9c18-96a5a20cd240&algo_exp_id=e1d1d6c8-d710-474f-9c18-96a5a20cd240-22&pdp_ext_f={"sku_id"%3A"12000021046256503"%7D&pdp_pi=-1%3B3.54%3B-1%3B-1%400%3BCAD%3Bsearch-mainSearch


picture is just example of flanged insert.

Fanged.jpg
 
Take inserts like these one full threaded in stainless at good price, tap-thread the holes in rail,
glue in epoxy and add a solid washer over with 3 or 4 screws to make like a flanged insert, that will make a top job.
https://www.aliexpress.com/item/1005002536541784.html?spm=a2g0o.productlist.0.0.7f2f3f5b34NEaA&algo_pvid=e1d1d6c8-d710-474f-9c18-96a5a20cd240&algo_exp_id=e1d1d6c8-d710-474f-9c18-96a5a20cd240-22&pdp_ext_f={"sku_id"%3A"12000021046256503"%7D&pdp_pi=-1%3B3.54%3B-1%3B-1%400%3BCAD%3Bsearch-mainSearch


picture is just example of flanged insert.

View attachment 621156
I like your DIY way of thinking ...
 
Back
Top