Your build is looking great, hope it gives you many hours of satisfaction when it's done.This just got serious. I'm way ahead of any schedule I did not have in mind ;-)
Tomorrow at noon I will be enjoying some 3cushion at the club. In the evening I'll be playing some one pocket in my friends mancave.
You are using an out of date browser. It may not display this or other websites correctly.
You should upgrade or use an alternative browser.
You should upgrade or use an alternative browser.
Dreaming of and designing my own pool table
- Thread starter MamboFats
- Start date
JeanSaisrien
New member
Hi,
I'm sorry if it's not the place to ask please delete if not allowed.
I'm trying to make a drawing for a 1:2 scaled miniature table and i'm trying to find references for the play surface: the dimensions, proportions, hole sizes, ramps and hole angles, etc..
I've found some drawings and stuff here and there but it sometimes contradicting one another...
I'm losing my mind...
I'm not begging for your drawings but, could you tell me a good reference site or source?
Thank you very much / Merci beaucoup!
MamboFats
Active member
Hi Jean,
the most basic information to design my pooltable are the dimensions of the slate and the recommended equipment specifications from the WPA
This technical drawing of a 9' slate can be found on Dynamic Billiards Germany. Dimensions in mm.

I don't think that slates of other manufacturers will be a big difference.
Normal playing area is 100" by 50", total slate lenght is 107" = 2718mm
enjoy
the most basic information to design my pooltable are the dimensions of the slate and the recommended equipment specifications from the WPA
This technical drawing of a 9' slate can be found on Dynamic Billiards Germany. Dimensions in mm.
I don't think that slates of other manufacturers will be a big difference.
Normal playing area is 100" by 50", total slate lenght is 107" = 2718mm
enjoy
Hi,
I'm sorry if it's not the place to ask please delete if not allowed.
I'm trying to make a drawing for a 1:2 scaled miniature table and i'm trying to find references for the play surface: the dimensions, proportions, hole sizes, ramps and hole angles, etc..
I've found some drawings and stuff here and there but it sometimes contradicting one another...
I'm losing my mind...
I'm not begging for your drawings but, could you tell me a good reference site or source?
Thank you very much / Merci beaucoup!
View attachment 664608
Last edited:
JeanSaisrien
New member
Thank you very much!
I'll start from scratch once more!
To be honest, I didn't realize how complex it was in the beginning.
Have a very nice day sir,
I'll start from scratch once more!
To be honest, I didn't realize how complex it was in the beginning.
Have a very nice day sir,
Are you still dreaming, or are you awake yet? What have you actually got built so far? Is the frame assembled yet? Got any real pictures yet, or are you still playing around on the computer?Being a player for 25 years and loving the game, I find myself in a position I can no longer frequent any poolhall on a regular basis. So, I want a table of my own...
I've played on Diamonds my first years, then to Gabriels and the last years the popular brand in my area is Clash (BTW I'm located in Belgium). All very competent tables, I enjoyed them all. In all those years I've helped the hired pool table mechanics with almost every maintenance and changing of the cloth. So I've learned a lot about the built of a pooltable. I should also mention I'm skilled as a furniture maker. Because of 100's of reasons I'm not able to put down the money in one purschase: my preference to buy is not so cheap, not even secondhand. But I can spread the money over a longer period when building myself. So ... that's what I'll do
I've searched the internet for pictures, manuals, how-to's, technical specs and info, ...
I have read the Talk To A Mechanic forum for most part, 300+ pages in this thread, skipping the bs to read the interesting ones of course. A lot of knowledge is written down my multiple mechanics on this forum: people as RKC, trentfromtoledo, Bradshaw and many others have given me a lot of things to think about and figure out a workable way to achieve this on my own table. I've learned a lot and in my head I'm dreaming of my dream table.
I've been drawing some ideas:
the first one inspired by the Riley Ray pooltable (UK manufacturer), no skirts
View attachment 603041
the second one inspired by the Nest Olympic Stadium, no rails and skirts
View attachment 603042
I've drawn the feet of the Diamond Pro-Am to understand the inside structure:
View attachment 603046
These are just some ideas ... I have plenty on a lot parts of a pool table.
I will share them with you all on this thread.
MamboFats
Active member
Hi Glenn,Are you still dreaming, or are you awake yet? What have you actually got built so far? Is the frame assembled yet? Got any real pictures yet, or are you still playing around on the computer?
thanks for taking an interest.
The dream is still alive
The year 2022 was not a productive year.
Some health issues and a lack of time and facilities have played a big role in the stand still of this project. Also I spend over 10,000$ in house and garden renovations to have the space to put that table and I spend a week on holiday (first one in 10 or 11 years) playing one pocket in Den Hague - First European MOT of onepocket.org ever.
In 2 weeks I get my gastric bypass and not before summer I will have some time off of work to proceed in this project.
The only thing I have done in the last half year, was writing down step-by-step how to manufacture the rails. I purchased tools and parts that I'll probably need next year.
But that's all part of keeping the dream alive.
Not more than once in 2 or 3 weeks I can find the time to spend playing pool.
But I'm looking forward to a future where my table will be waiting for me to get home from work.
I'll keep posting when I have news to tell.
BTW - glad to have you back on this forum.
Followed you on Facebook and Youtube
Love you for sharing all that knowledge
Well buddy, keep chasing the dream, God knows I've chased many of them. Here's some advice for you with your leveling system. Makes sure all points of lift are in line with each rail bolt, not off to the left or right.Hi Glenn,
thanks for taking an interest.
The dream is still alive
The year 2022 was not a productive year.
Some health issues and a lack of time and facilities have played a big role in the stand still of this project. Also I spend over 10,000$ in house and garden renovations to have the space to put that table and I spend a week on holiday (first one in 10 or 11 years) playing one pocket in Den Hague - First European MOT of onepocket.org ever.
In 2 weeks I get my gastric bypass and not before summer I will have some time off of work to proceed in this project.
The only thing I have done in the last half year, was writing down step-by-step how to manufacture the rails. I purchased tools and parts that I'll probably need next year.
But that's all part of keeping the dream alive.
Not more than once in 2 or 3 weeks I can find the time to spend playing pool.
But I'm looking forward to a future where my table will be waiting for me to get home from work.
I'll keep posting when I have news to tell.
BTW - glad to have you back on this forum.
Followed you on Facebook and Youtube
Love you for sharing all that knowledge
And you can't screw the slate to the frame, if you still expect to adjust the level of the slate after it settles in place. Mounting the slate to the frame cancels out that ability.
MamboFats
Active member
It's been over a year since my last post on this topic ... but this dream has never gone away
A lot has happened: right now I'm in the middle of recovery after a gastric bypass (I had a BMI of about 50) and have not really been able to do all the stuff I like and love. Last year I participated in the first European OnePocket.ORG MOT in Den Hague, but have declined playing this year.
The last six months playing pool has never been so poor. I only manage a maximum of once a month.
And working on my pooltable has been nil for over a year. Mind you, that doesn't mean nothing happened. By now I purchased everything for my table except slate and cloth. Everything else is already in my possession.
Today I had some time of and access to some equipment.
Here is what I did or planned to do ...
I cleaned up the rails I glued last year, so I could plane one side

This worked out okay, but I seem to forgot to take pictures of the planed surface.
Next I would use this milling machine to make some cuts for attaching the skirts, for the featherstrip and underneath for stapling the rail cloth. Here, I'm not showing the safety shield I put up when using ... but eventually the feeder malfunctioned and this part of the job didn't get done.

In the past year I figured out how to make the top of the rails curved, like in this picture

I purchased a new router and baseplate (was needing a replacement for my ol equipment and have other projects lined up too)


and then I built this jig for routing a curved rail top:

The baseplate wil be equiped with 2 ball bearings on each short side and will ride on top of the curved inner edges. The rails will be put in between the two blanks (only the left one is permanently fixed to the jig, the right one will have 2 adjusting bolts to fit the width of the rail perfectly.
With a flattening bit I will be able to follow the curved line of the rail on the picture.

So, since I have no idea when the feeder of that milling machine will be fixed, I have no idea when the next step will be taken.
But this step has been done and it was really a fullfilling moment.
At least I had a fun afternoon, doing stuff I like and getting closer to a future I cherish ...
Enjoy ...
A lot has happened: right now I'm in the middle of recovery after a gastric bypass (I had a BMI of about 50) and have not really been able to do all the stuff I like and love. Last year I participated in the first European OnePocket.ORG MOT in Den Hague, but have declined playing this year.
The last six months playing pool has never been so poor. I only manage a maximum of once a month.
And working on my pooltable has been nil for over a year. Mind you, that doesn't mean nothing happened. By now I purchased everything for my table except slate and cloth. Everything else is already in my possession.
Today I had some time of and access to some equipment.
Here is what I did or planned to do ...
I cleaned up the rails I glued last year, so I could plane one side
This worked out okay, but I seem to forgot to take pictures of the planed surface.
Next I would use this milling machine to make some cuts for attaching the skirts, for the featherstrip and underneath for stapling the rail cloth. Here, I'm not showing the safety shield I put up when using ... but eventually the feeder malfunctioned and this part of the job didn't get done.
In the past year I figured out how to make the top of the rails curved, like in this picture
I purchased a new router and baseplate (was needing a replacement for my ol equipment and have other projects lined up too)
and then I built this jig for routing a curved rail top:
The baseplate wil be equiped with 2 ball bearings on each short side and will ride on top of the curved inner edges. The rails will be put in between the two blanks (only the left one is permanently fixed to the jig, the right one will have 2 adjusting bolts to fit the width of the rail perfectly.
With a flattening bit I will be able to follow the curved line of the rail on the picture.
So, since I have no idea when the feeder of that milling machine will be fixed, I have no idea when the next step will be taken.
But this step has been done and it was really a fullfilling moment.
At least I had a fun afternoon, doing stuff I like and getting closer to a future I cherish ...
Enjoy ...
MamboFats
Active member
my last purchase: a 12" solid tube of Ivorene, diameter 15mm (about 5/8")
This will be the material to make the points on the rails

the idea is fit this in the rail before routing the curved top.
The rails are, at this moment, just shy of 10 feet, the distance between the points and the distance to the rail nose is known through the official table specifications.
That means:
1. easy drilling the hole (because of the flat top of the rail)
2. knowing exactly where to drill
3. perfect end result garanteed because everything routed at the same time
Just have to figure the right glue to use, but that's just a minor question to answer in this project.
Just need to carefull using the word "garanteed"
I'll just do my best.
Nobody can do better than his or her best
Nobody can give more than the full 100 %
Everybody is perfect in his or her own way
This will be the material to make the points on the rails
the idea is fit this in the rail before routing the curved top.
The rails are, at this moment, just shy of 10 feet, the distance between the points and the distance to the rail nose is known through the official table specifications.
That means:
1. easy drilling the hole (because of the flat top of the rail)
2. knowing exactly where to drill
3. perfect end result garanteed because everything routed at the same time
Just have to figure the right glue to use, but that's just a minor question to answer in this project.
Just need to carefull using the word "garanteed"
I'll just do my best.
Nobody can do better than his or her best
Nobody can give more than the full 100 %
Everybody is perfect in his or her own way
MamboFats
Active member
Hi guys,
just remembered I took one photograph directly in a messenger-chat, so yesterday it didn't pop up when preparing for upload here.
Here you can see my four rails: a glue up of 18mm rubberwood and 28mm of solid french oak. They've been curing for over a year now.
On top the profile that will be used in my jig from above post for milling the top of those rails.
Just curious, that jig profile you're copying is of a Diamond rail, made by butcher block cutting the oak, capping the outer edges with Dyamondwood and poplar, then capped over with Dyamondwood so that the outside edge of the rail has the same finished look in the profile. What's you plans to blend in the outside edge of the rails with the same finished look?Hi guys,
just remembered I took one photograph directly in a messenger-chat, so yesterday it didn't pop up when preparing for upload here.
Here you can see my four rails: a glue up of 18mm rubberwood and 28mm of solid french oak. They've been curing for over a year now.
On top the profile that will be used in my jig from above post for milling the top of those rails.
View attachment 704342
MamboFats
Active member
Got to the workshop today and had the chance to use my new handheld router for the first time.

First i cut a slot the lenght of the outside of the rail. Started with a cutting depth of 3/4" but was chasing the limits. Then I swithced to making multiple cuts of 1/4" and felt like going through butter. Later there will be a second angled cut from the bottom to make the connections with the railskirts.

Second I routed the small indent (about 1/16") on the bottom of the inside of the rail where the rail cloth will be stapled on the bottom. First time use of my flush cutting router bit, that I purchased to do the eventual profile routing: this was like cutting through melted butter.

Next time visiting the workshop I'm arranging my colleague/carpenter to help me out.
We'll be cutting the cushion angle on all rails. Since these rails are oak and rubberwood, I estimate they weigh close to 20 kilogram (about 44 pound) a piece. Handling these with 4 hands is recommended.
At this point I'm making four identical 10' long rails with all cuts and profiles, so when all is done,I can cut them into 2 long rails, 2 short rails and 4 corner pieces, all perfectly and identically profiled.
I finished the afternoon with preparing some basic templates for the pocket liners to be routed in the rails.
These still need some handwork finishing with a wood file, but you get the idea.

.jpg")
It's fun when you see progress
My new handheld router is a Makita RT0702 in kit with a lot of accessories.
I'm going to have so much fun with this machine.
First i cut a slot the lenght of the outside of the rail. Started with a cutting depth of 3/4" but was chasing the limits. Then I swithced to making multiple cuts of 1/4" and felt like going through butter. Later there will be a second angled cut from the bottom to make the connections with the railskirts.
Second I routed the small indent (about 1/16") on the bottom of the inside of the rail where the rail cloth will be stapled on the bottom. First time use of my flush cutting router bit, that I purchased to do the eventual profile routing: this was like cutting through melted butter.
Next time visiting the workshop I'm arranging my colleague/carpenter to help me out.
We'll be cutting the cushion angle on all rails. Since these rails are oak and rubberwood, I estimate they weigh close to 20 kilogram (about 44 pound) a piece. Handling these with 4 hands is recommended.
At this point I'm making four identical 10' long rails with all cuts and profiles, so when all is done,I can cut them into 2 long rails, 2 short rails and 4 corner pieces, all perfectly and identically profiled.
I finished the afternoon with preparing some basic templates for the pocket liners to be routed in the rails.
These still need some handwork finishing with a wood file, but you get the idea.
It's fun when you see progress
My new handheld router is a Makita RT0702 in kit with a lot of accessories.
I'm going to have so much fun with this machine.
MamboFats
Active member
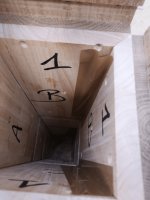
It didn't plan, but I got the day off and decided to go the workshop...
Doing some leg work today.
Almost a year ago, I suffered from lack of the right equipment

My saw and sawblade were not up to the task
So, this time, I'm using some heavier equipment. Some big ass table saw with computer control and homemade jig

After a couple of hours, this is the result:


I will need my router for the inside work, but when I tape it together you get an idea of what it will become


I'm having fun
Hopfully this time next year I'll be breaking some balls on this table
C U at the table
Doing some leg work today.
Almost a year ago, I suffered from lack of the right equipment
My saw and sawblade were not up to the task
So, this time, I'm using some heavier equipment. Some big ass table saw with computer control and homemade jig
After a couple of hours, this is the result:
I will need my router for the inside work, but when I tape it together you get an idea of what it will become
I'm having fun
Hopfully this time next year I'll be breaking some balls on this table
C U at the table
Attachments
Looking good!!!
MamboFats
Active member
I was planning on gardening today... but it's been raining since dawn.
So I took a trip to the workshop.
Took a big step today in working on the rails: I cut 2 angles
1. for attaching the rubber cushion (I chose 22,5°)
2. the inwards angle at the bottom of the rubber cushion

where these 2 cuts meet will be the bottom of the rubber profile. It was a little trial and error to get it just right, so the tip of my K55 profile is at the right height for a perfect ball rebounce.
The part where the rubber will be glued is not yet the right dimension, since the top of the rail has not yet been routed with the rail profile.
I took the opportunity to put on the rubbers with some low adhesive double-sided tape, so I could take a picture.


These rails are really heavy: I think they weigh between 30 and 40 pounds (15 to 20 kilograms).
Just got home and it stopped raining, maybe I'll still do some gardening, maybe not ... everything is soaking wet ... ;-))
Tomorrow morning I'm off to the club for some 3cushion
I know I'll have a great sunday, I hope you guys have one too
C Ya
So I took a trip to the workshop.
Took a big step today in working on the rails: I cut 2 angles
1. for attaching the rubber cushion (I chose 22,5°)
2. the inwards angle at the bottom of the rubber cushion
where these 2 cuts meet will be the bottom of the rubber profile. It was a little trial and error to get it just right, so the tip of my K55 profile is at the right height for a perfect ball rebounce.
The part where the rubber will be glued is not yet the right dimension, since the top of the rail has not yet been routed with the rail profile.
I took the opportunity to put on the rubbers with some low adhesive double-sided tape, so I could take a picture.
These rails are really heavy: I think they weigh between 30 and 40 pounds (15 to 20 kilograms).
Just got home and it stopped raining, maybe I'll still do some gardening, maybe not ... everything is soaking wet ... ;-))
Tomorrow morning I'm off to the club for some 3cushion
I know I'll have a great sunday, I hope you guys have one too
C Ya
Sorry, but those cushions are not the K55 profile, they're the K66 profile, and won't work with the 22.5 degree bevel if those rails are 1 3/4" thick.I was planning on gardening today... but it's been raining since dawn.
So I took a trip to the workshop.
Took a big step today in working on the rails: I cut 2 angles
1. for attaching the rubber cushion (I chose 22,5°)
2. the inwards angle at the bottom of the rubber cushion
View attachment 710949
where these 2 cuts meet will be the bottom of the rubber profile. It was a little trial and error to get it just right, so the tip of my K55 profile is at the right height for a perfect ball rebounce.
The part where the rubber will be glued is not yet the right dimension, since the top of the rail has not yet been routed with the rail profile.
I took the opportunity to put on the rubbers with some low adhesive double-sided tape, so I could take a picture.
View attachment 710950
View attachment 710951
View attachment 710952
These rails are really heavy: I think they weigh between 30 and 40 pounds (15 to 20 kilograms).
Just got home and it stopped raining, maybe I'll still do some gardening, maybe not ... everything is soaking wet ... ;-))
Tomorrow morning I'm off to the club for some 3cushion
I know I'll have a great sunday, I hope you guys have one too
C Ya
Yup. The Artemis Intercontinental No. 66 are K55 profile. The Pool No. 66 are K66 profile.Sorry, but those cushions are not the K55 profile, they're the K66 profile, and won't work with the 22.5 degree bevel if those rails are 1 3/4" thick.
So Artemis makes K66 which is a K66 profile and they make Intercontinental K66 which is K55 profile??
J'avais prévu de jardiner aujourd'hui... mais il pleut depuis l'aube.
J'ai donc fait un tour à l'atelier.
J'ai fait un grand pas aujourd'hui dans le travail sur les rails : j'ai coupé 2 angles
1. pour fixer le coussin en caoutchouc (j'ai choisi 22,5°)
2. l'angle vers l'intérieur au bas du coussin en caoutchouc
[JOINDRE]710949[/JOINDRE]
où ces 2 coupes se rencontrent sera le bas du profil en caoutchouc. C'était un peu d'essais et d'erreurs pour bien faire les choses, donc la pointe de mon profil K55 est à la bonne hauteur pour un rebond de balle parfait.
La partie où sera collé le caoutchouc n'est pas encore à la bonne dimension, puisque le haut du rail n'a pas encore été détouré avec le profil du rail.
J'en ai profité pour enfiler les caoutchoucs avec du scotch double face peu adhésif, pour pouvoir prendre une photo.
[JOINDRE]710950[/JOINDRE]
[JOINDRE]710951[/JOINDRE]
[JOINDRE]710952[/JOINDRE]
Ces rails sont vraiment lourds : je pense qu'ils pèsent entre 30 et 40 livres (15 à 20 kilogrammes).
Je viens de rentrer et il a cessé de pleuvoir, peut-être que je vais encore faire du jardinage, peut-être pas... tout est trempé... ;-))
Demain matin, je pars au club pour quelques 3 coussins
Je sais que je vais passer un bon dimanche, j'espère que vous en avez un aussi
C Y
Yes and I seen K66 with K55 profile and they are identified or estamped K66 not K55.So Artemis makes K66 which is a K66 profile and they make Intercontinental K66 which is K55 profile??
Nice job, what will be your top rail profile, flat or convex?I was planning on gardening today... but it's been raining since dawn.
So I took a trip to the workshop.
Took a big step today in working on the rails: I cut 2 angles
1. for attaching the rubber cushion (I chose 22,5°)
2. the inwards angle at the bottom of the rubber cushion
View attachment 710949
where these 2 cuts meet will be the bottom of the rubber profile. It was a little trial and error to get it just right, so the tip of my K55 profile is at the right height for a perfect ball rebounce.
The part where the rubber will be glued is not yet the right dimension, since the top of the rail has not yet been routed with the rail profile.
I took the opportunity to put on the rubbers with some low adhesive double-sided tape, so I could take a picture.
View attachment 710950
View attachment 710951
View attachment 710952
These rails are really heavy: I think they weigh between 30 and 40 pounds (15 to 20 kilograms).
Just got home and it stopped raining, maybe I'll still do some gardening, maybe not ... everything is soaking wet ... ;-))
Tomorrow morning I'm off to the club for some 3cushion
I know I'll have a great sunday, I hope you guys have one too
C Ya