You are using an out of date browser. It may not display this or other websites correctly.
You should upgrade or use an alternative browser.
You should upgrade or use an alternative browser.
Gold Crown casting dates match model year?
- Thread starter SDB
- Start date
SDB
Registered
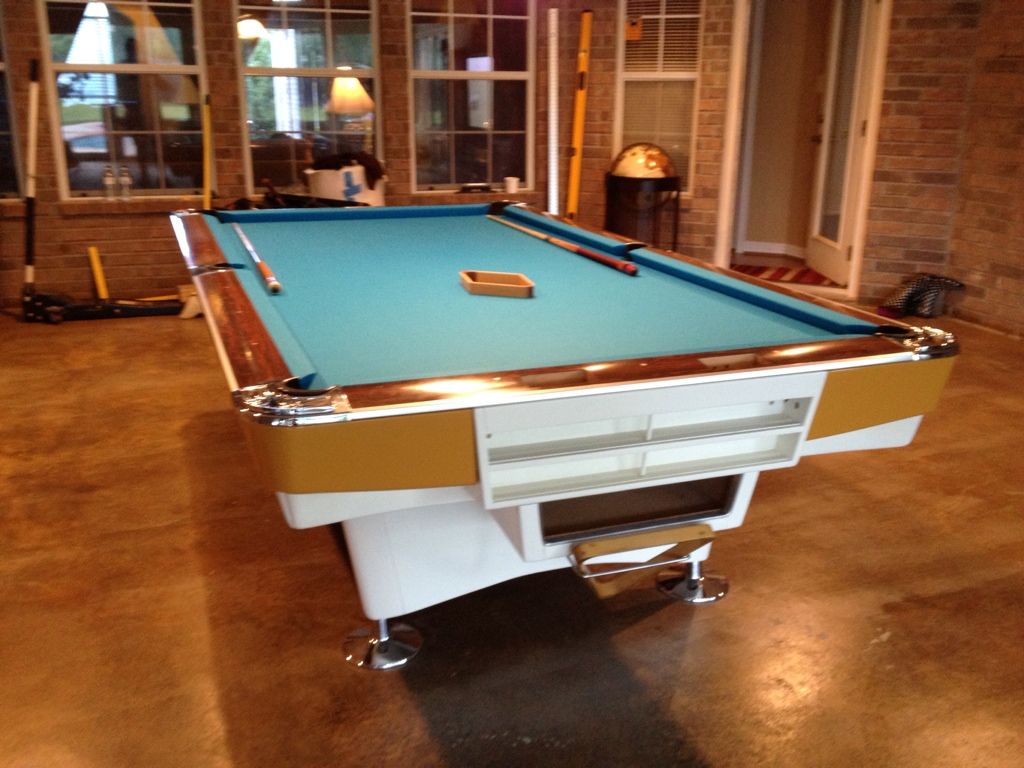
She's Done! :thumbup:
First of all-Anyone looking for a Mechanic in the Chicagoland/NW Indiana area, I highly recommend Jerimy Chambers in Minooka IL. He's professional, considerate, diligent, and doesn't short cut on anything. He's also a second generation mechanic, which I respect. He knows his shit. I won't go into specifics on cost, but lets just say he's more than reasonable for what he does and he was able to supply the cushions and cloth, modify my rails for Diamond blacks, cover everything in Simonis 860 cloth, and assemble the table for not much more than it would cost me to just buy the materials on-line. A big thank you to this website, as without it, I would not have been referred to a professional and would have either tackled it myself or hired some local hack installer. I guarantee without this site, my table would not have turned out as nice.
The table plays like a dream. Smooth and fast, but not too fast. Breaks are awsome! Cushions are quick and accurate. I'm not a pro, just an enthusiest, but this table plays better than any other table I've ever played on. My only complaint is burn marks on the cloth. I've got a new set of Centenials, but the cue ball keeps burning in.

I saved the original paper assembly sticker and manufacturer label.


Painted the subframe.

Side skirts are '63 Corvette Daytona Blue and base is '63 Corvette Ermine White. Paint is Dupont 2K B/C - clear sanded and polished. Two tone stain on base is Minwax Red Oak. I only wish I could get some nice pictures of the Blue. It doesn't photograph well inside. Outside it really pops! Inside it just looks like a dark blue. I need more daylight I guess.


Cuffed pockets with new rubber returns from Ken Hash at Classicbilliards. Ken also helped me out with a triangle holder and springs for the counters.


First of all-Anyone looking for a Mechanic in the Chicagoland/NW Indiana area, I highly recommend Jerimy Chambers in Minooka IL. He's professional, considerate, diligent, and doesn't short cut on anything. He's also a second generation mechanic, which I respect. He knows his shit. I won't go into specifics on cost, but lets just say he's more than reasonable for what he does and he was able to supply the cushions and cloth, modify my rails for Diamond blacks, cover everything in Simonis 860 cloth, and assemble the table for not much more than it would cost me to just buy the materials on-line. A big thank you to this website, as without it, I would not have been referred to a professional and would have either tackled it myself or hired some local hack installer. I guarantee without this site, my table would not have turned out as nice.
The table plays like a dream. Smooth and fast, but not too fast. Breaks are awsome! Cushions are quick and accurate. I'm not a pro, just an enthusiest, but this table plays better than any other table I've ever played on. My only complaint is burn marks on the cloth. I've got a new set of Centenials, but the cue ball keeps burning in.
I saved the original paper assembly sticker and manufacturer label.
Painted the subframe.
Side skirts are '63 Corvette Daytona Blue and base is '63 Corvette Ermine White. Paint is Dupont 2K B/C - clear sanded and polished. Two tone stain on base is Minwax Red Oak. I only wish I could get some nice pictures of the Blue. It doesn't photograph well inside. Outside it really pops! Inside it just looks like a dark blue. I need more daylight I guess.
Cuffed pockets with new rubber returns from Ken Hash at Classicbilliards. Ken also helped me out with a triangle holder and springs for the counters.
Last edited:


SDB
Registered
Table turned out awesome SDB, could you post some picture's of the table
with the light showing, About the burn marks on the cloth mine has them also and it make the cloth look cheap, Thanks for posting. :thumbup:
With the amount of light it gives, it's hard to get a decent picture. Everything glares in the camera. Here you go.


SDB
Registered
Everyone likes pictures.
Here's a link to my photobucket album. More pictures there.
http://s298.beta.photobucket.com/user/bobinss/library/Gold Crown
Here's a link to my photobucket album. More pictures there.
http://s298.beta.photobucket.com/user/bobinss/library/Gold Crown
LOL
Looking at those pictures, it looks like it's hovering.
I wish I'd taken pictures as I was assembling it.
I mounted it directly to the ceiling. No hanging here.
Used 4 2x4's, in 2 pairs, mounted flat on top of each other as a 3" spacer.
So the two lights are butted end to end and screwd directly internally to the 2x4's above them.
The 2x4's spaced the light down enough to clear the wiring conduit above it as well as locate the light low enough for my drop ceiling to work out later. The 2x4's are the same length as the overall length of the two lights, which allows you to screw the ends of the finish trim to the 2x4's.
Technically, I could remove both light fixtures and the trim would remain, or I could take down the trim without effecting the fixtures. The trim and lights are independent of each other. There is also quite a bit of weight there with two lights, 4- 8' 2x4, 20+ feet of 1x6 and 20+ feet of finish trim. With only a 7' ceiling, the final height came out great, about 78 inches above the floor. The light spread is very even with the egg crate lenses too. I'll post up more pictures once the table is installed.
Hope that all makes sense.
I did have to lay down the first house rule with my wife the other day though. No laying in a horizontal position on the table. :wink:
...just came back to the thread..
thanks for the mounting details. Nice light. Nice work.
Not surprising since the table looks Terrific.
Is the Brunswick emblem in the rail, painted the same color as the scorekeeper bezels, or blasted to remove the original 'pink-orange..ish' color.
Absolutely beautiful. Congratulations on the great result of your time and efforts.
SDB
Registered
...just came back to the thread..
thanks for the mounting details. Nice light. Nice work.
Not surprising since the table looks Terrific.
Is the Brunswick emblem in the rail, painted the same color as the scorekeeper bezels, or blasted to remove the original 'pink-orange..ish' color.
Absolutely beautiful. Congratulations on the great result of your time and efforts.
Both. :grin:
The rail counters, emblem, bridge and triangle racks, and ball box trim were all blasted and powder coated with a two stage "aluminum" color and "clear" powder coat. They look like polished aluminum in person. I then painted the inlay portions of the counters and emblem with a metallic pewter and clear coated them again. Thanks for noticing. :thumbup:
I would have liked to rechrome all of this, but the price was over $800, so I settled on $300 for polishing the feet, pockets, and rail edge trim and $95 for powder coating the steel and pot metal parts. I wanted to keep the table's roots with the two tone paint, but make it a little more modern with the colors and powder coating. I also sunk the Brunswick emblem into the rail so that the face is flush with the formica.
Thanks for the compliments.


Last edited:
SDB
Registered
SDB thanks for the pictures and the link to your photo's, are you planing on putting the skirting back on,
I don't know. I think the lines of the table flow better without the skirting, but I also think it looks more complete with the skirts. For now, the skirts are sitting on a shelf in my garage. I would probably sell them if somebody wanted a set.
Gorgeous
I have a GCI myself and your's is just gorgeous. The previous owner of mine stripped and polyurethaned the wood. Bad idea in my opinion. I love the original painted tables.
Jay
I have a GCI myself and your's is just gorgeous. The previous owner of mine stripped and polyurethaned the wood. Bad idea in my opinion. I love the original painted tables.
Jay
SDB here is my GC 2 after a rebuild, Mark did the rails, great job.
Good luck with yours.
Beautiful table. Your attention to detail is impressive.
I should have done the same while my table sat in storage. :-(
Enjoy.......
I should have done the same while my table sat in storage. :-(
Enjoy.......
She's Done! :thumbup:
The table plays like a dream. Smooth and fast, but not too fast. Breaks are awsome! Cushions are quick and accurate. I'm not a pro, just an enthusiest, but this table plays better than any other table I've ever played on. My only complaint is burn marks on the cloth. I've got a new set of Centenials, but the cue ball keeps burning in.