Home Room Project

cjr3559

AzB Silver Member
Silver Member
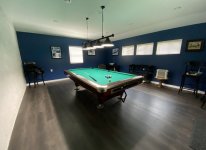
Exactly one year ago today we broke ground on a home game room for a pool table I’ve been wanting for three decades.

As an anniversary gift to myself, thought I’d start a blog showing the development.

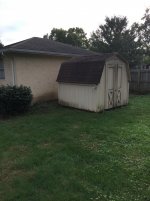
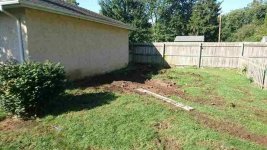
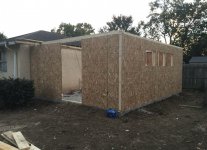
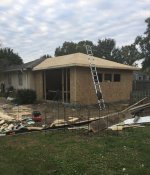
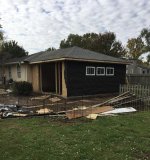
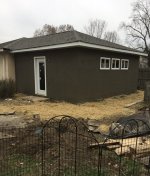
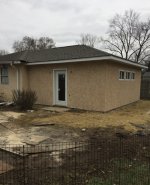
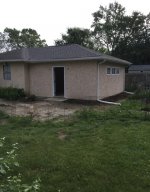
Here’s the spot. We have a detached garage and the new space is built right behind it. Say goodbye to the shed, it’s getting moved further back in the yard.

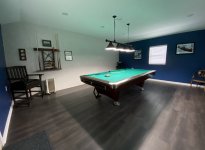
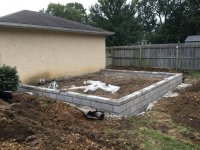
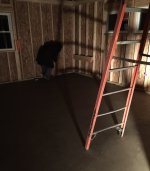
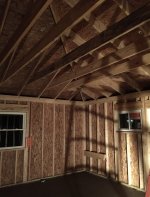
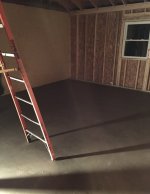
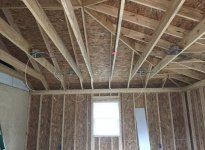
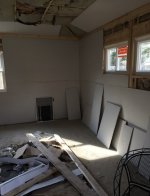
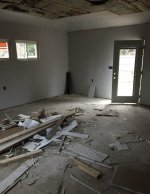
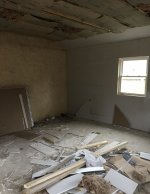
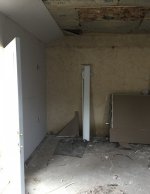
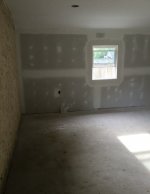
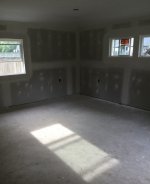
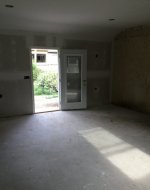
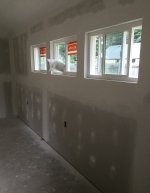
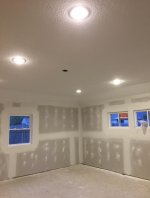
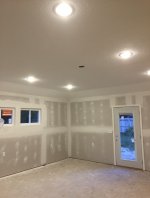
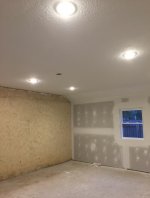
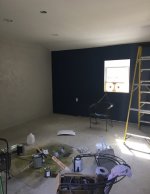
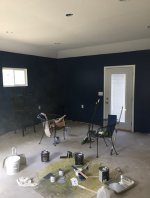
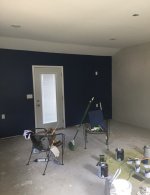
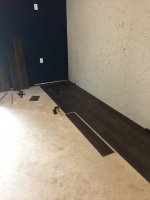
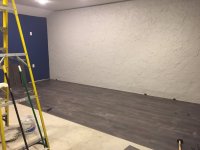
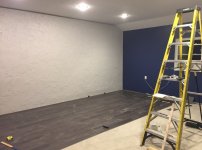
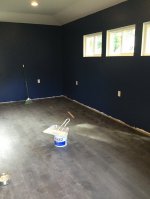
We did all the proper planning we could to ensure the room would fit a 9’ foot table. The city approved the construction, and the overall dimensions are 21’ x 18’ with a 9’ foot vaulted ceiling.

Question is, will my pics upload...
 

Attachments

  • 72EBB518-0040-412A-A279-CE71189977BC.jpg
    72EBB518-0040-412A-A279-CE71189977BC.jpg
    200.5 KB · Views: 891

cjr3559

AzB Silver Member
Silver Member
Forgot about updating this blog.

Here’s the groundbreaking. Shed from previous post was moved out of the way. Foundation dug.

Much more to come (eventually)
 

Attachments

  • F2085512-174D-4B4B-88C7-06786FCB058D.jpeg
    F2085512-174D-4B4B-88C7-06786FCB058D.jpeg
    294.5 KB · Views: 149
  • B6513A61-494B-430C-B54D-7E074A667757.jpeg
    B6513A61-494B-430C-B54D-7E074A667757.jpeg
    128.8 KB · Views: 150
  • 4B2E2E24-7C22-4091-AFCC-592BD91B267E.jpeg
    4B2E2E24-7C22-4091-AFCC-592BD91B267E.jpeg
    103.8 KB · Views: 162
  • 757125E0-8FB5-404F-9F63-41D30D77F0DB.jpeg
    757125E0-8FB5-404F-9F63-41D30D77F0DB.jpeg
    78.5 KB · Views: 147
  • 388D8571-28A2-4801-A1FD-69013ACC5D4E.jpeg
    388D8571-28A2-4801-A1FD-69013ACC5D4E.jpeg
    138.3 KB · Views: 153

Pin

AzB Gold Member
Gold Member
I'm glad this project is moving along as quickly as my own DIY jobs
 

cjr3559

AzB Silver Member
Silver Member
Next was foundation; cinder block, cement and gravel. Basic stuff, this all went quickly.

I’d upload the next round of pics, but getting annoyed they all upload sideways and upside down. Now recall why I abandoned this blog two years ago.
 

Attachments

  • 6F4A74FC-5786-48CB-AA28-91FC7097266E.jpeg
    6F4A74FC-5786-48CB-AA28-91FC7097266E.jpeg
    255.8 KB · Views: 161

cjr3559

AzB Silver Member
Silver Member
Now we’re getting somewhere with the pictures. Framing was next, surprised how quickly this part went. Roof shingled already. This was about 1 month into the construction.
 

Attachments

  • 86E033B9-B848-46B6-B65F-1CA2D42E9401.jpeg
    86E033B9-B848-46B6-B65F-1CA2D42E9401.jpeg
    205.4 KB · Views: 158
  • D2F8FE7E-5ABE-4B6A-A2F6-CBCBCEC4AE97.jpeg
    D2F8FE7E-5ABE-4B6A-A2F6-CBCBCEC4AE97.jpeg
    214.8 KB · Views: 164
  • 5D583630-BDE5-45C5-906F-A1BEFC688D49.jpeg
    5D583630-BDE5-45C5-906F-A1BEFC688D49.jpeg
    281.8 KB · Views: 156

cjr3559

AzB Silver Member
Silver Member
Then the floor was cemented, I forget how thick but the contractor said it would be thick enough to hold a pool table with no issue. The guy normally does garage builds so I took his word for it.

An interior view shows the 9 foot ceiling we requested to keep errant cue tips from hitting the ceiling and marking it up.

And we’re marking spots for power outlets to go for the electrician.
 

Attachments

  • 0107288B-CD8C-4D33-84C7-2E69FC31D99D.jpeg
    0107288B-CD8C-4D33-84C7-2E69FC31D99D.jpeg
    141.1 KB · Views: 147
  • 04F95CEF-6C95-483B-AB19-1CDD2C80F722.jpeg
    04F95CEF-6C95-483B-AB19-1CDD2C80F722.jpeg
    176.2 KB · Views: 151
  • 788C85D7-0683-4811-A193-3A7050897D77.jpeg
    788C85D7-0683-4811-A193-3A7050897D77.jpeg
    131.9 KB · Views: 152

cjr3559

AzB Silver Member
Silver Member
Electric wired, and the exterior stucco. All of this was completed in three months by the end of December 2018 which now seems like an eternity ago.

Still, this part of the project went quickly and we felt confident we’d be finished by spring.
 

Attachments

  • 3A84489A-3023-4ABC-B6CB-30C1EEE1CDAE.jpeg
    3A84489A-3023-4ABC-B6CB-30C1EEE1CDAE.jpeg
    192.7 KB · Views: 151
  • 568270CC-2376-4671-B042-4403C6D10095.jpeg
    568270CC-2376-4671-B042-4403C6D10095.jpeg
    263.2 KB · Views: 155
  • B5F71648-3AAA-428C-B787-AA65DED8AD28.jpeg
    B5F71648-3AAA-428C-B787-AA65DED8AD28.jpeg
    231.9 KB · Views: 160

cjr3559

AzB Silver Member
Silver Member
Then three months of winter passed with zero progress. Finally mid-March the interior installation started with insulation and drywall. We kept the back side of the stucco garage for interest.

This part of the project took forever. Three months of off/on work and they were finally finished.
 

Attachments

  • CD73933F-A095-427C-840E-AC9512594AA7.jpeg
    CD73933F-A095-427C-840E-AC9512594AA7.jpeg
    151.8 KB · Views: 144
  • 21740328-CEF1-428E-87CA-EFF003328929.jpeg
    21740328-CEF1-428E-87CA-EFF003328929.jpeg
    120.5 KB · Views: 147
  • 6B738D12-A51A-4FAE-A422-1ADDD929C1D9.jpeg
    6B738D12-A51A-4FAE-A422-1ADDD929C1D9.jpeg
    109.2 KB · Views: 148
  • 18139C44-62A7-4DE0-838B-14663FCCD23C.jpeg
    18139C44-62A7-4DE0-838B-14663FCCD23C.jpeg
    142.7 KB · Views: 141
  • E52F0075-6023-4E17-9888-C5DAA1B27592.jpeg
    E52F0075-6023-4E17-9888-C5DAA1B27592.jpeg
    91.9 KB · Views: 149
  • D30A9141-C9EE-4B18-B132-4549D57DA9B8.jpeg
    D30A9141-C9EE-4B18-B132-4549D57DA9B8.jpeg
    97.2 KB · Views: 158
  • FF69350C-0856-425C-B1D0-231BBB421EB7.jpeg
    FF69350C-0856-425C-B1D0-231BBB421EB7.jpeg
    96.2 KB · Views: 160
  • D833B57C-8014-4C8C-8F24-A200388FCA10.jpeg
    D833B57C-8014-4C8C-8F24-A200388FCA10.jpeg
    101.3 KB · Views: 156

cjr3559

AzB Silver Member
Silver Member
Lighting was hooked up, and then prep for painting which was a lot of dust removal. Some patchwork was required as well.

Also got the door hardware.

Outdoor photos show the condition of our yard which was dirt and weeds. It was also around this time they dug a gravel for water runoff (mandated by city code). The final photo kind of shows where the hole was back filled, and the gutter downspouts are now underground.
 

Attachments

  • 8D5DBF41-9889-4039-95F0-57E40F890D36.jpeg
    8D5DBF41-9889-4039-95F0-57E40F890D36.jpeg
    59.8 KB · Views: 153
  • 5930F1EE-3E7B-45FD-9B78-4F06E44C664C.jpeg
    5930F1EE-3E7B-45FD-9B78-4F06E44C664C.jpeg
    56.7 KB · Views: 164
  • 8B495CD3-4044-4BC1-9F68-9630E4BF2C1A.jpeg
    8B495CD3-4044-4BC1-9F68-9630E4BF2C1A.jpeg
    57.4 KB · Views: 151
  • BC918005-FDB5-4C5F-BB63-009E9E273BB8.jpeg
    BC918005-FDB5-4C5F-BB63-009E9E273BB8.jpeg
    72.5 KB · Views: 161
  • D604113E-940D-499F-BC30-A7E166D3DAC6.jpeg
    D604113E-940D-499F-BC30-A7E166D3DAC6.jpeg
    119.9 KB · Views: 165
  • C28F5E4F-C6F7-4E6D-B529-A5C075AEB80F.jpeg
    C28F5E4F-C6F7-4E6D-B529-A5C075AEB80F.jpeg
    82.5 KB · Views: 163
  • A33701CA-1A14-4AEC-8992-C432B5B4899E.jpeg
    A33701CA-1A14-4AEC-8992-C432B5B4899E.jpeg
    129.1 KB · Views: 164

cjr3559

AzB Silver Member
Silver Member
Almost a year after breaking ground we’re painting. Took some time to settle on shades, but what we finally decided worked well. The blue could have been a bit darker but no big deal. All I recall was it was August, warm, and muggy. No A/C yet, that’s a whole other story for later.
 

Attachments

  • B9BFFD82-EFE3-4AFB-B886-DE86B6153F55.jpeg
    B9BFFD82-EFE3-4AFB-B886-DE86B6153F55.jpeg
    65.6 KB · Views: 149
  • FB3DA501-877B-4937-8C1F-794BD8FEDFEE.jpeg
    FB3DA501-877B-4937-8C1F-794BD8FEDFEE.jpeg
    74.5 KB · Views: 145
  • BE0DB6EE-961D-4704-9003-33266D86985A.jpeg
    BE0DB6EE-961D-4704-9003-33266D86985A.jpeg
    67.3 KB · Views: 141
  • 8AA45FD3-0DF1-4015-B0BC-DF16EDD2071D.jpeg
    8AA45FD3-0DF1-4015-B0BC-DF16EDD2071D.jpeg
    60.9 KB · Views: 146

cjr3559

AzB Silver Member
Silver Member
On to flooring; vinyl plank. Saved some money installing this ourselves. Lots of work with cutting, choosing planks so the whole pattern looked random, and tapping and hammering, but thankfully it was straightforward with no odd cuts and angles.

Even though we measured the area what seemed like a dozen times, there was a tense moment halfway through installing where we discovered the width of each plank was NOT what was listed on the box, which would have meant having to rip the last row to fit. Fortunately we just made it with about a quarter inch to spare which was eventually concealed easily by the trim work.
 

Attachments

  • E73FB432-E623-4432-AAC0-4156DC099E1F.jpeg
    E73FB432-E623-4432-AAC0-4156DC099E1F.jpeg
    100.6 KB · Views: 151
  • 220C1D67-D72F-4F42-814D-A5F690813641.jpeg
    220C1D67-D72F-4F42-814D-A5F690813641.jpeg
    136.9 KB · Views: 149
  • DB53738E-17C8-4CFE-A2D5-8F817C17AD0B.jpeg
    DB53738E-17C8-4CFE-A2D5-8F817C17AD0B.jpeg
    135.5 KB · Views: 153
  • 521BC969-A066-4EFC-9DB5-5854F727DA6B.jpeg
    521BC969-A066-4EFC-9DB5-5854F727DA6B.jpeg
    127.6 KB · Views: 152

8cree

Reverse Engineer
Silver Member
Hey nice build! You're about to be a happy camper before too long! Thanks for sharing, I love these type threads! (y)
 

measureman

AzB Silver Member
Silver Member
I couldn't tell from your pics if you kept the planking a 1/4 inch from the walls.
If you are installing base molding don't push it hard to the planks,just gently let it rest and nail it.
Vinyl planking needs room to move a little.
 

cjr3559

AzB Silver Member
Silver Member
We did the best we could with keeping the flooring 1/4 inch away from the walls, but ultimately the trim molding didn’t quite cover some gaps so we needed to finish with quarter round on the three plaster walls. The stucco wall gap was filled with clear silicone.

One of these pictures was taken before the quarter round was added.
 

Attachments

  • 7A00DA16-3CDA-42F7-AC20-1BEE9BF5ED02.jpeg
    7A00DA16-3CDA-42F7-AC20-1BEE9BF5ED02.jpeg
    148.8 KB · Views: 154
  • 26D6F5B8-3F39-4C99-B484-62B3E90C5C41.jpeg
    26D6F5B8-3F39-4C99-B484-62B3E90C5C41.jpeg
    141.9 KB · Views: 155
  • 2FD1F090-619E-403A-B402-099B963ADC27.jpeg
    2FD1F090-619E-403A-B402-099B963ADC27.jpeg
    104 KB · Views: 154

cjr3559

AzB Silver Member
Silver Member
I realized the trim work came after table and light installation. The light is a no-frills 4 can light with LED bulbs. I think they’re daylight 5000k but I’d have to check. Also added cheapish horizontal blinds on the windows.

Other than some slight furniture changes this is basically the finished project.

These photos were taken in April ‘20 which was 18 months after the project started. And we still weren’t finished…

next up the HVAC. At this point it was fans and a portable propane heater, which was less than optimal.
 

Attachments

  • 63BFF170-F750-4702-8047-26C6F2066F38.jpeg
    63BFF170-F750-4702-8047-26C6F2066F38.jpeg
    106.1 KB · Views: 203
  • DA1E8F5B-DD3A-49A3-970F-E72A36B239DA.jpeg
    DA1E8F5B-DD3A-49A3-970F-E72A36B239DA.jpeg
    109.9 KB · Views: 200
Top