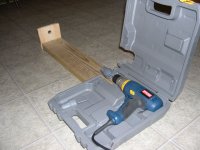
Well, I wouldn't exactly call it a lathe as much as a "shaft turner" would be a better way to describe it. But I did make it dirt cheap. $3.99 is what I invested in it (I had to purchase some crutch tips from the drugstore). Here is how I built it (keep in mind I had all material already on hand except for the crutch tips): Materials consisted of a hand drill, the drill's plastic carrying case, a 3' length of 2x4x6" (I believe a 2x4x12" would have worked better), a 6" piece of 1x6", a crutch tip, a 3" machine screw (1/4") with a lock nut and some 2" self-tapping wood screws.
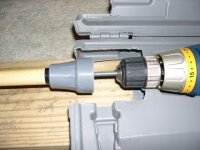
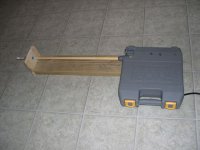
To build: With a cutting wheel, hacksaw, or whatever, cut out part of the hand drills carrying case enough to expose the chuck (be sure to allow some extra room on the sides. Cut out a notch for the electrical cord to go through. Drill some good sized vent holes in the case where the cooling vents on the drill line up so the drill motor won't overheat. With self-tapping screws, screw the case down onto one end of the 2x6" (2x12" is better) with the chuck pointing to the other end of the plank. Put the drill inside the case, close and latch the lid and measure the height that the center of the chuck is from the bottom of the plank. With self-tapping screws, attach the 1x6" board onto the far end of the plank with the center of the chuck pointing directly to the center of the 1x6". Take a 3/4" hole saw and drill a hole through the center of the 1x6" at the same height the chuck was from the plank. File and sand this hole until it is very smooth. Drill a hole through the center of the crutch tip and run the machine screw through the tip to where it is coming out of the bottom of the tip and run the lock nut down the screw until snug. Put the machine screw/crutch tip into chuck tightly and put the drill into the case. Lock the trigger down put the power cord in the notch, make sure the drill is not in reverse, close lid and latch it shut. Put some blue painters tape around your cue shaft (tip end) at the point where it will be making contact with the hole saw hole and run the shaft through the hole. Take the non tip end and twist it into the crutch tip, plug in and go to work on that tip!
I just made this thing yesterday so I don't know how useful it's gonna be, but it sure works darn good for sanding/shaping tips and cleaning up a ferrule. No damage at all to the shaft. In fact, the painters tape didn't even show any wear on it. It's gonna come in mighty handy come re-tipping time!!!
And all for the cost ($3.99) of a pair of crutch tips!!!
Maniac
Thanks to AZ'ers for ideas that I gleaned off this site for this project!!!
") us all to see!!
us all to see!!

")


 .
.