You are using an out of date browser. It may not display this or other websites correctly.
You should upgrade or use an alternative browser.
You should upgrade or use an alternative browser.
How to cut / slice a pool ball
- Thread starter SPetty
- Start date
Please nobody use a chop saw or a tablesaw!!!
If you are an experienced machinist and used to making fixtures to hold cylindrical and spherical items, then maybe you can figure out a good and safe way to hold it. Otherwise, a table saw or chop saw is the most dangerous option by far, that is ASKING for trouble. A sphere is the hardest shape to hold securely, especially when you can't hold all of it because you are cutting it in half.
If you are an experienced machinist and used to making fixtures to hold cylindrical and spherical items, then maybe you can figure out a good and safe way to hold it. Otherwise, a table saw or chop saw is the most dangerous option by far, that is ASKING for trouble. A sphere is the hardest shape to hold securely, especially when you can't hold all of it because you are cutting it in half.
per request
You'll need a lathe or a band saw for the safest results. If you're not qualified on either, it's best to stay away from them. Even people who think they know what they are doing can get badly hurt in a flash.
The number on a ball does not go very deep, though the white cylinder runs all the way through.
Also, going back to an earlier thread, notice the difference in the color of the white on the surface of the ball. Yellowed. Yet just below the surface, it's almost pure white. I polished the number on the disc I cut off - that's why both the blue & white are brighter.
Attachments
Howdy y'all, long time, no see...
Sorry to bother you with this, but I tried searching but came up with only aiming threads...
Does anyone have any successful methods for cutting or slicing a pool ball? Let's say I wanted to cut off the number of a pool ball, to be about 1-1/4" in diameter? How might that be accomplished?
I have a bunch of ideas, but I betcha someone here has already done it...
Thanks for any help!
Give it to Spiderman. He has a bandsaw in his living room and a lathe in his garage.

Here is what I was talking about in my earlier post. I have never cut a ball before, but doing it one-off, with safety in mind, this is the way I'd do it. If I was doing it all the time, I'd come up with a dedicated fixture for it. I don't claim to be an expert, and take no responsibility for you cutting your fingers off. My qualifications are I have been building furniture since I was 12 with a full shop of woodworking equipment, and I also worked as a machinist under several journeymen toolmakers for 3 years.
Safe cutting.
PS, As I uploaded the picture, it might make more sense to make the V-Blocks almost touch in the middle. This way, you cut through the V-Block with the bandsaw blade, before the blade gets to the ball. This would help keep the blade from slipping off the ball, which can easily happen on a rounded surface. You would lose half of the wood from one side of the blade by the time you touched the ball, but the other side might still help guide the blade.
Howdy y'all, long time, no see...
Sorry to bother you with this, but I tried searching but came up with only aiming threads...
Does anyone have any successful methods for cutting or slicing a pool ball? Let's say I wanted to cut off the number of a pool ball, to be about 1-1/4" in diameter? How might that be accomplished?
I have a bunch of ideas, but I betcha someone here has already done it...
Thanks for any help!
Can I have your cues?
follow-up
In your lathe, chuck up on the middle of the ball so it's held securely. Tweak it till the number runs true.
Turn the diameter of the exposed section to 1.250" for a distance of 1/2" to 3/4". The distance depends on how much room you need to get your parting tool in there.
Part it off to the thickness you want.
Flip the ball around and do it again for the other side.
You can not simply chuck up on the diameter you just turned because the white cylinder containing the number is rarely on center. Each end has to be set up individually.
OMG! I hope that healed OK!!!...after slicing my thumb almost to the bone before I came up with a better way to hold the ball...
Another cool idea I hadn't considered...How about trying a plug cutter in a drill press?
Thank you for chiming in here, dzcues! What you cut is pretty much exactly what I am going for! I thought it would be easier/better if I did the polishing before cutting off the number, but your result is exactly what I am going for! That is a phenomenal picture, BTW...I polished the number on the disc I cut off - that's why both the blue & white are brighter.
Spiderman is a great guy and has actually made that offer, but I kinda want to do it myself, or at least have the opportunity to see it being done...Give it to Spiderman. He has a bandsaw in his living room and a lathe in his garage.
Howdy iusedtoberich, That's a great drawing and something I had thought of, but I just kept thinking that there had to be an easier way than to create those angly pieces to hold the balls...Here is what I was talking about in my earlier post.
Way too funny! :thumbup:Can I have your cues?
Awesome info, Bob!In your lathe, chuck up on the middle of the ball so it's held securely. Tweak it till the number runs true.
Turn the diameter of the exposed section to 1.250" for a distance of 1/2" to 3/4". The distance depends on how much room you need to get your parting tool in there.
Part it off to the thickness you want.
Flip the ball around and do it again for the other side.
You can not simply chuck up on the diameter you just turned because the white cylinder containing the number is rarely on center. Each end has to be set up individually.
just buy a set of mini 1.5 inch balls and cut them in half. It would be an easier cut.
I got some fake, rubber pool balls out of a vending machine once. I've used a couple of those to plug holes in the wall of my poolroom (don't ask). They look kinda retro.
Jeff Livingston
Okay, where there's a will, there's a way!
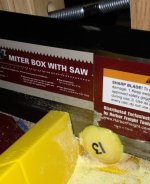
I bought a cheap plastic mitre box w/saw, and a cheap wooden clamp.
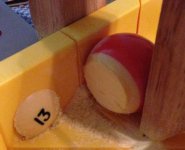
The secret to success was the idea of flattening the parts of the ball that should be flat for this to work... I (barely) flattened the part of the ball on the bottom, and both sides where the clamp is holding it...

Then just started sawing. Unexpectedly, it was working!

I added some 3-in-1 oil to help the saw along. The "problem" if there is one is that once you are past halfway, it feels much easier and you get impatient. The last part of the cut at the bottom "broke" rather than "cut", but it worked out...

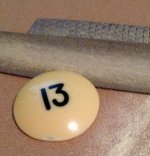
Once the number was sawn off, I slowly manually filed it down to what seems like a circle. File turn file turn file turn file turn, etc. It took awhile...

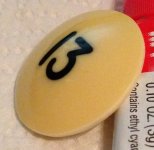
This is my finished disk. I was very very lucky to cut it exactly right to get it just the depth I was looking for. I doubt that I will be able to be that lucky again using this method.

Not optimal or repeatable, but this was my first attempt.
Just thought I'd share.
I bought a cheap plastic mitre box w/saw, and a cheap wooden clamp.
The secret to success was the idea of flattening the parts of the ball that should be flat for this to work... I (barely) flattened the part of the ball on the bottom, and both sides where the clamp is holding it...

Then just started sawing. Unexpectedly, it was working!

I added some 3-in-1 oil to help the saw along. The "problem" if there is one is that once you are past halfway, it feels much easier and you get impatient. The last part of the cut at the bottom "broke" rather than "cut", but it worked out...

Once the number was sawn off, I slowly manually filed it down to what seems like a circle. File turn file turn file turn file turn, etc. It took awhile...

This is my finished disk. I was very very lucky to cut it exactly right to get it just the depth I was looking for. I doubt that I will be able to be that lucky again using this method.

Not optimal or repeatable, but this was my first attempt.
Just thought I'd share.
