Installing sewing machine motor on Hightower Deluxe

  • Thread starter Thread starter JC
  • Start date Start date

JC

Coos Cues
I have been asked several times various questions about how to do this so I decided to make a short video that hopefully will help someone wanting to do this.

Please note that the polarity reversing toggle switches come in several varieties and may wire different than the one I show here. Just check the schematic and connect so the wires switch places when you flip the switch with whatever toggle switch you get.

Another afterthought to add. When you are glueing the magnet on to the housing you should do this last when you can run the motor as it's placement is touchy. You turn on the motor and slide the magnet around until the motor runs it's fastest and glue it exactly there. This setup has plenty of power for coring. If I was Chris I would scrap the AC motor entirely and use these as an original build. Way better and probably cheaper.

https://youtu.be/XRtoPOjh7oQ

JC
 
Last edited:
Sweet, nice video.

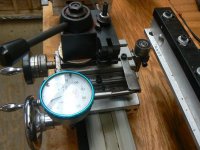
Please tell, how do you have that dial indicator mounted up for the cross slide ?? Can't tell in the video how it's bolted up. Also, can you use it and the roller bearing for the taper bars at the same time, looks close to that bracket.

Now...... lemme go scour around on ebay. :)

Sent from my SM-G900V using Tapatalk

I have two deluxe lathes and put the taper bars on the other one with the lead screws. On the one in the video it's mounted directly to the roller mount spot and works really nicely. Don't think I could do precision work without indicators. It's so much easier to keep track of things.

I don't taper butts or shafts on the lathes so the bars don't get much of a workout. Mostly use them for wrap grooves and repairs to match a taper etc. Here is how I have my dial indicator mounted to my lathe with the taper bars on it. I used a short tool post and put it where the handle lock was. I'm planning to remount the lock to the face of the carriage so it's out of the way but haven't got around to it as I don't use it much. The indicator comes off and on very easily with this setup in case it gets in the way of something with the same size t handle allen wrench on all the bolts. Takes about 15 seconds to remove or reinstall.

P1090644.jpg

P1090645.jpg

JC
 
Cool. Great idea on using the tool post.

You get the larger wheel for the cross slide from Chris ?? I got a larger one for the carriage from Todd, would like one for the cross slide too.

Sent from my SM-G900V using Tapatalk
 
Cool. Great idea on using the tool post.

You get the larger wheel for the cross slide from Chris ?? I got a larger one for the carriage from Todd, would like one for the cross slide too.

Sent from my SM-G900V using Tapatalk

Chris built the lathe with the larger wheel. I also clipped off the allen wrench to release the cross slide to the taper bar to make is short enough to not hit the dial indicator bracket.

JC
 
Nice job on the video and the dial indicator photos that should be very helpful to many.
 
  • Like
Reactions: JC
Back
Top