You are using an out of date browser. It may not display this or other websites correctly.
You should upgrade or use an alternative browser.
You should upgrade or use an alternative browser.
My new Inlay Machine
- Thread starter DanO
- Start date
Here is an end pick of my machine. I was planning on 8” of travel in my Y for no particular reason. I could feel a little flex in my X frame so I added the two end gussets. They make it rock solid but now I only have 4.5” of travel.
I’m concerned about contaminates falling on my Y lead screw. For now I installed some precision purchased cardboard pieces to cover up the lead screw. (Busch Light 30 pack can separators.) My lead screws have a factory Teflon coating on them so I hope this is enough. Haydon Kerk told me I would be fine as long as the material is not abrasive. Define abrasive? I know plenty of players that are abrasive but they can’t hurt my lead screw. For my Y, I may come up with some sort of collapsible bellows covering on the back side of the screw and a U channel on the front since I need to travel out to my end bearing.
I cant see...
How did the union/Screwing between indexers and dovetail clamps? and What size of screw you used? 1/2-10?
very very nice job, congratulations¡
Not exactly sure what your question is but maybe this drawing will help. The dovetail is mounted with #10-24 flat head cap screws. The spin indexes are mounted to the clamps with (2) Ø1/4-20 socket head cap screws that are on center. The bolt holes in the clamps for the Ø1/4-20 screws are drilled right at Ø.250 to try and minimize any play in the mounting. Surprisingly over the 30" of X travel, my Y is only off .005". I can live with that. If I took it apart to try and correct it, it would probably be worse.
Attachments
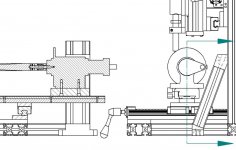
Here is an end pick of my machine. I was planning on 8” of travel in my Y for no particular reason. I could feel a little flex in my X frame so I added the two end gussets. They make it rock solid but now I only have 4.5” of travel.
What's keeping you from putting the gussets on the backside of your stanchions and getting your Y back to 8"? Doesn't appear like too much, except for maybe your bench size.
Cool machine though. Should work out real nice. Does your bed flex much along your X if you rack it by hand?
Regards,
Frank
Last edited:
You're exactly right Frank. Table size is the only thing keeping the gussets on the inside. If I used a deeper table I would have to use a short stick on the corner of my pool table. ") I'd rather loose the 4" of travel for now. No racking at all on the X assembly. Very solid. The only movement I was getting was in my extruded framing. It probably wasn't even enough to warrant the gussets as long as you didn't hang on it while cutting, but being new at this I want to eliminate any possible issues that I am aware of.
I'd rather loose the 4" of travel for now. No racking at all on the X assembly. Very solid. The only movement I was getting was in my extruded framing. It probably wasn't even enough to warrant the gussets as long as you didn't hang on it while cutting, but being new at this I want to eliminate any possible issues that I am aware of.
I'd rather loose the 4" of travel for now. No racking at all on the X assembly. Very solid. The only movement I was getting was in my extruded framing. It probably wasn't even enough to warrant the gussets as long as you didn't hang on it while cutting, but being new at this I want to eliminate any possible issues that I am aware of.Dan
Do a search on Ebay for "way covers" or "mill way covers" and you can find several that may work for you. They come and go so just keep watching and you will find the right deal on the cheap.
Dan
DanO, another item to consider for your short Y screw, I'd look at some ATV shock covers, like "Outerwears" from White Brothers. They're made to keep sand, mud and dirt out of your shocks. Depending on how close your nut gets to the screw mounts, they'd probably work pretty good for you. About $30 for a pair.
Frank
It's a keeper.
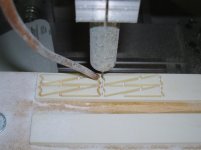
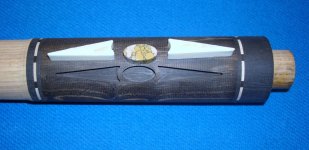
Cutting two patterns of four arrows in the first pic. Not quite through the second four as it is cutting. In pic two I noticed a tiny nick in the Leopard oval. Gotta figure that out but too late now. I could feel it before I glued it but honestly didn't see it till I looked at my pics. I would not have finished it otherwise. Must be Cueman's fault for selling me the material... LOL.
Cutting two patterns of four arrows in the first pic. Not quite through the second four as it is cutting. In pic two I noticed a tiny nick in the Leopard oval. Gotta figure that out but too late now. I could feel it before I glued it but honestly didn't see it till I looked at my pics. I would not have finished it otherwise. Must be Cueman's fault for selling me the material... LOL.
Attachments
Last edited: