No Finish Butt Cap Material

SSDiver2112

Escott Cues
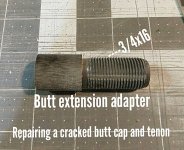
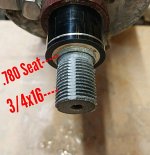
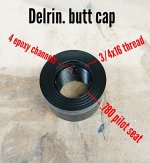
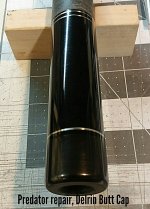
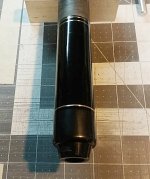
I have a Buddy Hall, Meucci in to repair a broken butt cap. Ironically for a Meucci the entire cue does not have a clear coat finish.

I normally use phenolic, but this needs to be made out of a smooth black material that can be simply polished as is, with no finish.

I have used white Tomahawk for ferrules and it is great for that. Does anyone have experience or opinion on the look and durability of Tomahawk versus Juma (Black) unfinished as a butt material?
 
Last edited:
I hadn't thought of that, and I do have some of that on hand I have made different tools with. I am pretty sure I will be able to use the existing bolt since delrin cannot be glued. I assume it is pretty straight forward, but I will experiment with sanding and polishing to see how it will look on the cue.

Thanks,
Scott
After the threaded plug is installed and dry, then thread the outer side and leave the hub.
 

Attachments

  • IMG_20240504_104910.jpg
    IMG_20240504_104910.jpg
    240.3 KB · Views: 99
  • IMG_20240504_105416.jpg
    IMG_20240504_105416.jpg
    147.7 KB · Views: 97
  • IMG_20240504_131744.jpg
    IMG_20240504_131744.jpg
    165.1 KB · Views: 105
  • IMG_20240505_001216.jpg
    IMG_20240505_001216.jpg
    183.9 KB · Views: 102
  • IMG_20240505_080828.jpg
    IMG_20240505_080828.jpg
    151.8 KB · Views: 95
I'd bet the finish has worn off over time. The butt cap material is ABS or PVC, both available at Atlas.
Normally Meucci finishes over the wrap. The wrap would have had to be replaced. The forearm showed no sign of a finish. The wood is bare and full of chalk like a used shaft.

IMG_0366.jpeg

IMG_0365.jpeg
 
Last edited:
This is where I am so far. I put some thin CA in the cracks and then removed the bad part up to the logo. Made as much of a tenon out of it as I could so the new butt cap could act as a ferrule to hold the old parts together. I thought about using the Meucci style bumper but went with the threaded style instead since it was larger and might protect it better???

Still need to trim, shape, and polish it.

IMG_0367.jpeg


IMG_0369.jpeg


IMG_0371.jpeg
 
Last edited:
This is where I am so far. I put some thin CA in the cracks and then removed the bad part up to the logo. Made as much of a tenon out of it as I could so the new butt cap could act as a ferrule to hold the old parts together. I thought about using the Meucci style bumper but went with the threaded style instead since it was larger and might protect it better???

Still need to trim, shape, and polish it.

View attachment 784410

View attachment 784411
View attachment 784412
Your having to much fun!
 
A bit late now, but a great trick for Delrin is flame polishing. Takes a few tries to get it just right, but it will really smooth out the finish
 
I’ll try it on some scrap, but this is where it is now. Being a 'seasoned' cue, it may match better the way it ended up.

I cleaned up the rest of the cue, got as much chalk out as I could and pressed the wrap.

View attachment 784555


View attachment 784556
Good stuff. Looks like you have a decent finish there, flame polishing will make it pop more, but it's definently worth testing on some scrap pieces so you get the feel and timing right before trying your newly machined buttcap :)
 
Never mind. Watched a video.
Interesting!
I made dental appliances... one was a vinyl mouth guard that got polished/finished with micro torch. A little too much flame and the item is killed. The technique is interesting specially on the cars vinyl or a cue. But until the operator develops a touch... forgetaboutit.
 
I made dental appliances... one was a vinyl mouth guard that got polished/finished with micro torch. A little too much flame and the item is killed. The technique is interesting specially on the cars vinyl or a cue. But until the operator develops a touch... forgetaboutit.
I agree, I'll pass!
 
This is where I am so far. I put some thin CA in the cracks and then removed the bad part up to the logo. Made as much of a tenon out of it as I could so the new butt cap could act as a ferrule to hold the old parts together. I thought about using the Meucci style bumper but went with the threaded style instead since it was larger and might protect it better???

Still need to trim, shape, and polish it.

View attachment 784410

View attachment 784411

View attachment 784412
Very nice. 👍
 
Back
Top