pool cue re tip questions with a twist

rackemky

New member
looking for general tip install by hand advice if i can. before anyone says get a lathe i dont have one because i am dirt poor. so trying just wanting to re tip from home for average cues, bars sticks, myself or friends.

i have everything i need except a way to trim the edges down from 14 mm to 13 mm, it must be big enough to shave a 14mm tip also need a reliable method to shape tip radius without trashing the ferrule. burnish tips by hand anyone know a good method? leather piece? and again a lathe would be best here and im aware of it just cant ever get the hundreds of dollars together oh but i will.

thanks for the help

jonathan
At minimum rig yourself up a lathe out of a high speed drill.
If you can't afford a drill and some lathe pins, then turning the cue tip down on a table and trimming flush with a razor knife is hard to master and is how I started out. It is your best option without buying tooling. Shape the top with a curved sanding file. Wet and burnish the side of the tip on a piece of formica.
Once all this becomes more hassle than you want to go through, put a little down for a lathe on layaway and get your lathe when finished paying for it.
 
thanks for the input chris i had the cash 1 time not long ago and it vanished to the bill black hole. i seen a shop using the side of a bench grinder stone while turning to flush trim sides. it came out pretty good i thought, but danger zone for the fingers and ferrule id say. is there any kind of tape that i could use to attempt it on cheap cues or just no all together? i really hate putting stuff like this on here cuz im going to get slammed by a few of the big guys with big money tools and shops. oh well im learning and thats why i am here. thanks again : also how much for a set of pins? on a bed what do you think about the grizzly tools hobby lathe?

http://www.grizzly.com/products/Hobby-Lathe/H2669

At minimum rig yourself up a lathe out of a high speed drill.
If you can't afford a drill and some lathe pins, then turning the cue tip down on a table and trimming flush with a razor knife is hard to master and is how I started out. It is your best option without buying tooling. Shape the top with a curved sanding file. Wet and burnish the side of the tip on a piece of formica.
Once all this becomes more hassle than you want to go through, put a little down for a lathe on layaway and get your lathe when finished paying for it.
 
Been there, done that, and survived(somehow). This is the tool I started with http://cgi.ebay.com/Joe-Porper-Big-...DefaultDomain_0&hash=item2a0f92765f&x=44&y=10
I used it on bar cues from the local bar I hung out at. It does take a bit to master, but works very well. Patience is the best thing to have, so that you try it, learn a bit, try and then learn some more. This tool will do it, but you must go slow and take notes and learn. If any questions, just pm me.
Concerning the Grizzly tool, it can be made to work, but first off, the bed isn't long enough, so you would need to cut it in half and attach the pieces to a piece of plywood roughly about 36-40" long, so you can accomodate a 29"-30" shaft. You would need to make sure that they are aligned as dead nutz as possible to each other. At this point it will be usable for sanding and cleaning, but to use as a tip changing tool, you need to fashion a steady rest to hold the tip end of the shaft so you can do the actual tip work. A little engineering can get you close to what you want/need but it won't take the place of a machine designed to do this work. Another issue is cutting the ferrule flush and straight before doing the tip. Tips will only stay on if the surface they are put onto is flat and parallel to the flat bottom of the tip. If it rocks slightly when placed on the ferrule by hand, then it will probably come off shortly after being done and used. It may also end up costing a bunch more, as when you do another person's shaft and something goes wrong and it gets damaged, You're on the hook for replacement or repair.
Good luck, pm me if you need any additional advice.
Dave
 
I'm going to look at some equipment this weekend. It belonged to an older man nearby that recently passed away. From what I've been told, he had several lathes both full size and mini's. I'll keep an eye out for something you might be able to use.
 
Hang in there pal. No one here started out a pro. Determination def pays off though. Ingenuity now will def make you appreciate and understand a lathe much more in time when it comes. Meantime, be creative and most of all HAVE FUN. :thumbup:
 
As noted above, the way they did it many years ago was to glue the tip on and when dry trim the excess off with a razor knife. They would turn the shaft upsidedown with the new tip resting on a block of wood. They would then cut down on the overhanging tip with the razor (being careful not to touch the ferrule). By continuing to turn the shaft and trimming the tip they would eventually get it flush, all the way around, with the ferrule. They would finish off with some sandpaper and would have a usable tip.
 
Last edited:
tips

Mase gave good advice. A utility knife will do it, just as described above.
It sounds real cave man but works great and if you're careful no one will know a lathe was not used.
Back when the whole world was more do-it-yourself, this was the method of choice for many pool players, including me.
 
thanks everyone i came here to learn from you all most have more exp doing this than years i have been alive. 7-18-81 =) not saying theres older people here just age and wisdom normally go hand in hand. keep em coming

jp
 
1) Glue the tips on with a rubberband setup, or you can buy the plastic thing with the rubber bands. P.S. Use the super glue that says gel. Wait 24 hrs.

2) Trim as mention with the shaft joint up and tip down (taking your time) slice around and aroung until shaped.

3) tape the ferrule to protect it and sand the tip to bring to a more conformal round shape (your not hitting with the edge of the tip, you hit with the center). After sanding remove protective tape.

4) burnish with leather (not easy without a power tool) or buy a burnishing tool (which still takes some elbow grease and time)


You will make yourself proud for your first time if you just take your time with these instructions.
 
thanks for all the great insight. i want to start piecing togather a taig micro lathe soon. need money i may have to sell some hand tools to buy this tool. i d rather not sell my tools but then again i really want a lathe to happen for me. in the end it will pay for its self. for now i like the industrial porper big shaver square. BUT it's very agressive i hear and $80 !!!! thats a huge price tag another couple hundred i might could get most of my mini lathe together. my uncle re build electric motors =) one of the most expensive and heavyiest items to ship. that will help out a ton on the cost. please keep the info coming i enjoy learning all i can on this.
 
Secure some toothpics around the perimeter. Buy 13mm tips for a 13mm ferrule. Use super glue gel and hold it down for a minute with your finger letting the toothpics center it.
 
I have been working on my set up now for a few years. My motto is you don't have to buy big and expensive to get the quality.
 
As noted above, the way they did it many years ago was to glue the tip on and when dry trim the excess off with a razor knife. They would turn the shaft upsidedown with the new tip resting on a block of wood. They would then cut down on the overhanging tip with the razor (being careful not to touch the ferrule). By continuing to turn the shaft and trimming the tip they would eventually get it flush, all the way around, with the ferrule. They would finish off with some sandpaper and would have a usable tip.

Instead of a razor knife, I used to use a wide butcher knife. Of course, you can shave with any knife of mine. The wider blade kinda helps (not thicker).
 
Update on lathe conversion

http://forums.azbilliards.com/album.php?albumid=876

check my public picture folder for the other photos.

thanks to the help of you all and to some help and donations from some loyal az users i have obtained nearly a entire set of shaft drive pins ideas and knowledge. thank you

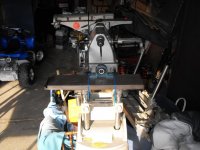
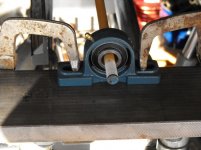
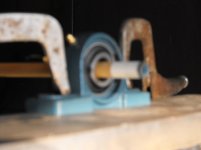
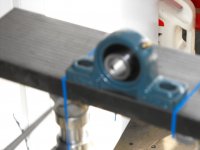
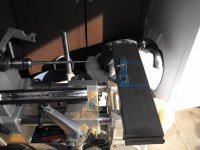
the pictures are what i have got done so far a full size total smith lathe witch is printed onto the lathe as capable of turning most metals and wood. so i dug around found a 1/2 inch chuck and secured it to the lathe shaft. i chucked in a usa made steel center punch and spun it a long punch. i was really pretty impressed it turned very tru to the eye. could not think of a good and cheap way to build a roller steady though there is 1 great plan i found using counter top formica, just didnt have the money and no scrap laying around of that size. i personally thought about it and decided to use a special extended life ( shelf bearing ) witch is widely used in factorys and farming in sever duty conveyors. seen in blue temporary mounted using vice grip welding pliers. the shelf bearing rpm is rated in the 5000 rpm range so where good. if you look at the pictures i have a nice flat steel rest area where the bearing setup mounts it looks good so far please let me know what you all think ( other than buy a unit please thats not a option)

the next problem is i need something that will grip the shaft and grip the inner bearing race so everything spins freely would a rubber collet work here? the bearing has a 1/6 of a inch gap with a shaft centered in race and the shaft pushed just past the back of bearing as shown in photos.

THIS IS A EXPERIMENTAL PROJECT FOR TIP INSTALL AND UN INSTALL ONLY! yes its 500 lbs and not portable but its sitting there and moneys non exsistant so i figured lets adapt it to make it useful even though it is worth $10. let me know your input i will be greatfull. im getting closer once i resolve this all i will need is a tina blade i really like the looks of those and there nimble no razors here i value my hands and eye sight. =)
 

Attachments

  • DSCF2627.jpg
    DSCF2627.jpg
    85.9 KB · Views: 462
  • DSCF2628.jpg
    DSCF2628.jpg
    91.2 KB · Views: 411
  • DSCF2629.jpg
    DSCF2629.jpg
    91.6 KB · Views: 401
  • DSCF2630.jpg
    DSCF2630.jpg
    92.5 KB · Views: 405
  • DSCF2631.jpg
    DSCF2631.jpg
    77.5 KB · Views: 439
Last edited:
Quit trying to make something so easy so hard. Most of us started with nothing also. You need to get the two mating surfaces flat and then glue,trim, and shape. It's not rocket science, keep it simple.
http://www.poolndarts.com/p-3529-Rapid-Cue-Top-Sander/
This will get you flat enough. Then all you need is a box cutter and a small flat wooden block with sand paper glued to it and you will be set to do tips. It takes a little practice but you will get good results. Good Luck
 
well , if your wife has one of those home manicure grinders , you can get both beautiful tips AND a speedy divorce !:cool:
 
Back
Top