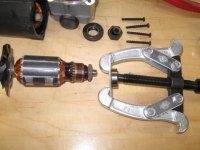
I was a technician, then taught others for years. But whenever I take anything apart for the first time I keep my digital camera handy, and take pics of every key step, wiring color and hookup, gear positions, etc. The router is simple, but when I took each of my large metal lathes apart, that camera was my best friend. Especially when I had to wait months for a part, i would have never remembered every little detail. A long cry from the days when I could throw an entire engine or tranny in a box then reassemble it from memory. To think these are the golden years!
Yeah my memory is not what It once was either, I doubt I could not even memorize a carb that I'm not familiar with now days, although some I may remember by heart, but even the first one I ever rebuilt as a kid I was able to do on memory. Now I either take pictures of what I'm working on, use schematics or both. I've rebuilt engines and trannys, but when I was younger, My father also owned a parts yard as part of his business, so even on My own cars if the tranny went out, I could go out and pull one out of another car that was still good, maybe put a stall, and shift kit in It and be good to go, until I needed another one. We did more swaps then rebuilds, although occasionally we did, I did, or I helped someone that I know do one. At that age a lot of My buddies were into cars, so we ordered parts from places like summit, and built stuff at home for fun too. My dad ran on local and regional strips occasionally in his hay day, and there were some stock car racers in the family, he did a little himself, and even race bikes at one time, so I grew up hearing about some stuff, as well as being there for some of It, and so naturally that sort of thing kept my interest at a young age. now days I get cramped & claustrophobic crawling under cars, so I only do It when I have to. I've maybe done or took part in 5 to 10 trans tops, but mostly did swaps on those. Amoco use to buy the old ones from us for cores. I remember having to deliver truck beds of them, and putting them in a little shed behind the place by myself, and having to walk on and carry them over other transmissions to stack them in the back. I'm sure all the stuff that I did like that over the years contributed to My hips and spine now flaring up at times.
I'm the same way I have forgot stuff while waiting on parts to arrive. I usually figure It out, but It can sometimes turn into a huge waste of time, without pictures or a schematic to go on. I try to make sure to remember to snap pics, before getting into to deep with anything, and in some cases labeling things along the way or separating parts into mini assemblies also helps. The pictures also make It nice when researching something online for a side by side comparison, or just to get the info off of a tag without having to write everything down.
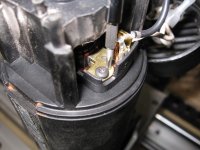
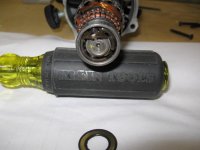
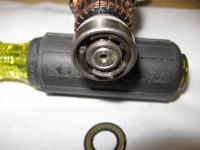
 I haven't taken the time to pull it all apart to see which one, though I suspect the bigger one on the bottom.
") when I installed it on the shaft.
when I installed it on the shaft.