You are using an out of date browser. It may not display this or other websites correctly.
You should upgrade or use an alternative browser.
You should upgrade or use an alternative browser.
Recut Fixture In Action
- Thread starter brianna187
- Start date

brianna187 said:More Pictures................................
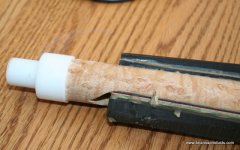
Lee, are you cutting to the exact center of the prong to attain this clearance? I would think that is what you would have to do, cut two grooves 180 deg. apart to the center, glue in the points and then cut for the final two points. At least that is what it appears. At present, I cut mine to a depth of .050 from dead center on all 4 point grooves and then glue all points in. This makes for a wide point but they don't quite touch at the back and it leaves the prong very weak in the back when turning the completed points back down to a cylinder. Looks very good!
Dick
FIRST OFF GOOD TO HERE FROM YOU DICK, AND HAPPY HOLIDAYS!rhncue said:Lee, are you cutting to the exact center of the prong to attain this clearance? I would think that is what you would have to do, cut two grooves 180 deg. apart to the center, glue in the points and then cut for the final two points. At least that is what it appears. At present, I cut mine to a depth of .050 from dead center on all 4 point grooves and then glue all points in. This makes for a wide point but they don't quite touch at the back and it leaves the prong very weak in the back when turning the completed points back down to a cylinder. Looks very good!
Dick
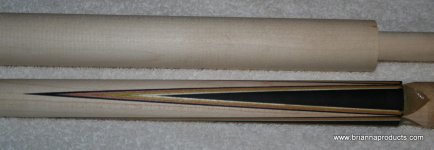
I CUT 2 180 DEGREES APART TAKE THE FORE ARM OUT OF THE MACHINE AND GLUE BOTH IN THEN I PUT IT BACK IN AND INDEX 90 DEGREES RE ZERO CUT NUMBER 3 TAKE OUT AND GLUE IT IN EACH TIME I AM PUTING EXPOXY IN THAT LITTLE SPACE TO THE BIG END OF THE FORE ARM I THEN REPEAT AND DO NUMBER 4 WHEN EVERYTHING IS DRY I HAVE A PROGRAM THAT TURNS THESE DOWN TO ALMOST FINISH SIZE AT THAT POINT I ATTACH TO HANDLE AND TAPER THE CUE ON THE CNC AGAIN WITH A SPECIAL PROGRAM WE HAVE USING MACRO VARIABLES SO CHANGE NUMBERS ON THE FLY IS SIMPLE YOU CAN ADUST LENGTH TAPER SPEED OF SPINDLE EVERY THING .
THANKS FOR THE NICE THOUGHT AND GOOD HEARING FROM YOU AGAIN
HAPPY HOLIDAYS.LEE
brianna187 said:FIRST OFF GOOD TO HERE FROM YOU DICK, AND HAPPY HOLIDAYS!
I CUT 2 180 DEGREES APART TAKE THE FORE ARM OUT OF THE MACHINE AND GLUE BOTH IN THEN I PUT IT BACK IN AND INDEX 90 DEGREES RE ZERO CUT NUMBER 3 TAKE OUT AND GLUE IT IN EACH TIME I AM PUTING EXPOXY IN THAT LITTLE SPACE TO THE BIG END OF THE FORE ARM I THEN REPEAT AND DO NUMBER 4 WHEN EVERYTHING IS DRY I HAVE A PROGRAM THAT TURNS THESE DOWN TO ALMOST FINISH SIZE AT THAT POINT I ATTACH TO HANDLE AND TAPER THE CUE ON THE CNC AGAIN WITH A SPECIAL PROGRAM WE HAVE USING MACRO VARIABLES SO CHANGE NUMBERS ON THE FLY IS SIMPLE YOU CAN ADUST LENGTH TAPER SPEED OF SPINDLE EVERY THING .
THANKS FOR THE NICE THOUGHT AND GOOD HEARING FROM YOU AGAIN
HAPPY HOLIDAYS.LEE
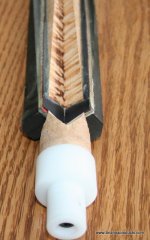
I figured out your procedure pretty closely and knew you had to glue in the veneers to regain stability but I was still wondering how deep you cut at the very back of the V-cut. I would think that you would have to go to the exact center of the prong so as to have the veneers touch each other at the back.
Dick
dick i touch off the recut fixture with the tip of the cutter then in mach 3 i type in the y axis box half the diameter of the rcut fixture which is 1.22
half is .610 this tells the program just where the cutter is to have some thin walls inbetween the points leave it as is if you want to cut out like i did you need to give the cutter a false reading i comand y to 1 inch in the mdi mode then move y in .035 at that point i re tpye in the y axis box 1 inch now your cutting to the very bottom each time you can the first time cut zero and 180 at the same time and glue in veneers also glue the back cavity behind the point wood then put back in and cut number 3 point glue and also epoxy back then do the fourth point. then we use our taper program to cut fore arm to finish size 4 passes then cut off back end of point and put in lathe using the whale penis inside thru spindle to keep centered face off back of fore arm center drill then drill and tap for handle installtion at that point put on butt end and back to the storm to taper in 4 pasess then inlay and run number 4 pass again triming off only excess inlays sand seal and finish
half is .610 this tells the program just where the cutter is to have some thin walls inbetween the points leave it as is if you want to cut out like i did you need to give the cutter a false reading i comand y to 1 inch in the mdi mode then move y in .035 at that point i re tpye in the y axis box 1 inch now your cutting to the very bottom each time you can the first time cut zero and 180 at the same time and glue in veneers also glue the back cavity behind the point wood then put back in and cut number 3 point glue and also epoxy back then do the fourth point. then we use our taper program to cut fore arm to finish size 4 passes then cut off back end of point and put in lathe using the whale penis inside thru spindle to keep centered face off back of fore arm center drill then drill and tap for handle installtion at that point put on butt end and back to the storm to taper in 4 pasess then inlay and run number 4 pass again triming off only excess inlays sand seal and finish
MrHMr Hoppe said:Lee,
Is this fixture on your web site? Maybe I just missed it.
Mr H
i think we listed it not 100$ sure
its $75.00 and comes with3 colets
extra collets are $6.00 each