I Have An Ole Gold Crown 9 Foot And I Have One Of The Pieces Of Slate Is Broke In Two. What Is The Best Way To Repair This Propeerly And Or Where Can I Get A Complete Replacement Piece Of Slate For This
You are using an out of date browser. It may not display this or other websites correctly.
You should upgrade or use an alternative browser.
You should upgrade or use an alternative browser.
Repairing Broken Slate
- Thread starter POOL--TIME
- Start date
I repair slates by: once they're in place use superglue, followed by epoxy and then bondo.
will try that thank you
also i have put my hands on a set of 10 foot snooker rails from a brunswick table now the best shape but usable and i also got the pockets and rail bolts....
may try to acquire slate and frame or possible sell the parts if any of you mechanics would have a need for them let me know thanks again
also i have put my hands on a set of 10 foot snooker rails from a brunswick table now the best shape but usable and i also got the pockets and rail bolts....
may try to acquire slate and frame or possible sell the parts if any of you mechanics would have a need for them let me know thanks again
I will assume its an end slate clean and level the center slate.
1. take the broken slate apart clean up and grind off a little material so the slate will go back together smoothly.
2. Line the center slate with wax paper. line up the broken slate then glue the 2 pieces together with superglue or epoxy. lay them done on the center slate then clamp the broken slate down to the center slate. you might need 10 clamps or more depending on how you clamp it the center slate.
3. let it dry for a day flip it over and glue the other side, clamp it and let it dry.
4. remove left over glue fill seams with bondo or colored epoxy to blend into the slate. scrape off any extra glue, you dont have to fill it all in in 1 try.
5. if you pile on the glue or bondo you may have to wet sand a little go gentle on the slate.
6.if you have other cracks in the slate and can follow were they are going but havent reached the end of the slate you can drill a small hole were you think the crack stopped this will resease any pressure on the crack and keep it from growing. fill the small hole up with bondo.
If you take your time the slates should be 95% or better then new when done.
Craig
I have a 9' Sport King that had the same disease. I bored through the slate with a masonry bit on either side of the split, countersunk the holes and screwed it down tight to the slate pads in 2 places. It's flat and undetectable and has been for years.
Visit us on the web at www.penguinamusement.com
Visit us on the web at www.penguinamusement.com
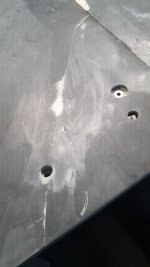
I need to fix a broken slate, and could use advice as to how to go about it. The pictures show how it's broken; a 5x5x5" about 1/8" thin triangular piece of the slate surface has broken off at some point. It has been glued back on, and now sits a bit proud compared to the rest of the slate.
I was going to use a modified RKC-method by gluing an 8" piece of sandpaper to the bottom of my carpenters level, and another longer piece the rough side facing the bottom of the level. Then I know to stop as the sandpaper stops catching the proud piece of slate. Anyone have a better fix?
I was going to use a modified RKC-method by gluing an 8" piece of sandpaper to the bottom of my carpenters level, and another longer piece the rough side facing the bottom of the level. Then I know to stop as the sandpaper stops catching the proud piece of slate. Anyone have a better fix?
Attachments

Last edited:
snookered_again
Well-known member
with a wood project where part is proud and I didn't want to cause damage to the surrounding , Id use tape to build a little thinckness to support my sandpaper block. then when the repair area is down to the tape, go more carefully and at that point you are only dealing with the thickness of your tape.
in other words , you can use tape to protect the area you do not want sandpaper to touch and also as a means of holding your sanding block above the finished surface to prevent damage.
to cut slate, you need a type of grit that is harder than slate, you can refer to mohs scale. i looked quickly and from that it said slate is 5.5 on the mohs scale..
if the sandpaper you have won't cut then maybe go towards silicone carbide or diamond paper.. garnet or aluminum oxide paper is common , basically the grit just needs to be harder than what you are sanding otherwise it won't cut.
I'd use a lubricant, it helps it cut better.. you could try common wet wet-or-dry paper and see how it cuts.. sanding slate is not something I have any particular experience with.
the block you use should be hard, you don't want the block to conform to hollows. - using a level as your sanding block may be reasonable.
with repairs of this type Just define the area you need to sand, protect the surrounding, there is no advantage in making the repair area larger than it needs to be and doing so often just makes unnecessary work.
masking tape will work , if it gets worn from the paper you cna change it, if you want thinner after, maybe try packing tape or the red tape used in wrapping houses is slightly thicker and tougher than packing tape. maybe reduce the grit size as you creep closer to the finished height , if you go over there is always filler.
Thanks for the reply and suggestions! The tape method might not be sufficient because the tolerances are quite tight as it is. I don't want the sanding block to be riding on anything else than the reference surface, meaning the rest of the slate which defines the 'zero'.with a wood project where part is proud and I didn't want to cause damage to the surrounding , Id use tape to build a little thinckness to support my sandpaper block. then when the repair area is down to the tape, go more carefully and at that point you are only dealing with the thickness of your tape.
in other words , you can use tape to protect the area you do not want sandpaper to touch and also as a means of holding your sanding block above the finished surface to prevent damage.
to cut slate, you need a type of grit that is harder than slate, you can refer to mohs scale. i looked quickly and from that it said slate is 5.5 on the mohs scale..
if the sandpaper you have won't cut then maybe go towards silicone carbide or diamond paper.. garnet or aluminum oxide paper is common , basically the grit just needs to be harder than what you are sanding otherwise it won't cut.
I'd use a lubricant, it helps it cut better.. you could try common wet wet-or-dry paper and see how it cuts.. sanding slate is not something I have any particular experience with.
the block you use should be hard, you don't want the block to conform to hollows. - using a level as your sanding block may be reasonable.
with repairs of this type Just define the area you need to sand, protect the surrounding, there is no advantage in making the repair area larger than it needs to be and doing so often just makes unnecessary work.
masking tape will work , if it gets worn from the paper you cna change it, if you want thinner after, maybe try packing tape or the red tape used in wrapping houses is slightly thicker and tougher than packing tape. maybe reduce the grit size as you creep closer to the finished height , if you go over there is always filler.
The sanding paper hardeness issue you mentioned makes sense, thanks!
snookered_again
Well-known member
so here's a rather long post and if its too long please just skip it..
tape has thickness but if you go into packing tape , its probably only .005" or so. So you can get it really close and then just be careful once tape is not there. on wood fillers I'll often use the tape to guide a cabinet scraper. you can always just change tape if you find it wears out. often my rule of thumb is to keep any repair area as small as possible, no point expanding into areas that dont need repair.. with wood fillers the smaller the repair is the less its likely to be noticed. on slate of course the cloth covers any color etc. with wood , spreading fillers can sometimes affect the results of the color of finish, absorption of a topcoat or stain etc. lots of people like bondo or you can use glazing putty if its very thin, the glazing putty doesn;t need catalist so you aren't needing to do mixes but its not good to put it thick, might chip.. I liked the durhams hard rock putty, but use what you like best. The durhams might not be the best if you put it thick.. but its sort of watery stuff that spreads thin easily..
any greasy or glossy area might bget a better bondo if its roughened up a bit before bondo, to get a better "hook" there are different types of bondo, some sands way easier. If you need to knock off high spots in bondo you might try a sharp cabinet scraper. bit of a knack to using one right but they can often do what sandpaper can, if its a flat surface. you can buy them or if you want to make one you can use a chunk of a handsaw blade. ( cut it with a zip disk) it needs to be a metal you can file, but a bit springy. I'll just take a mill file and draw file it a bit to sharpen it square, sharp like the corners of an ice skate. If i want to take a bit more off , on wood. I'll run a screwdriver over the edge pushing down and form a hook on the edge then it will be more agressive and remove wood faster.
for finer work you cna use a thinner blade, Ill usually just hold the balde and you dont eed all the accessories but the holder helps, especially for learning or pulling itowards yourself, normally its a tool you push away from you while forming a slight a slight bend in the blade. anytime I use a hand plane Ill use a cabinet scraper and it replaces sanding in many cases. they will pull of fine shavings without digging into the grain,, a plane or a jointer or thickness palner sometimes has a tendancy to tear out the grain. especially if the grain is confusing and there there is no real direction ,, otherwise one direction ( in wiood) will often cause more tearout than another direction. Of course any filler has no grain or direction.
Sandpaper has a tendancy to pull out the softer parts of the grain, on wood, a cabinet scraper just works upon what it touches so it flattens things out very nicely. often a cabinet maker will keep one in his shirt pocket. they are very handy and simple.
with wood fillers and maybe with bondo you can have some shrinkage in the filler so sometimes I find it easier to put it on a bit thick , I put masking tape either side of a crack . kheeping the tape tight to the area,, then i can use a putty knife to press it into the crack , and over fill just the crack. that way Im not contaminating the surrounding area but can use the knife on its flat to force stuff into thin cracks.
then pull my tape, then when good and dry use a cabinet scraper to level it, that way im not going back with a second coat due to the problem of shrinkage bringing my filler below surface level.
here's a set of tools, which you dont need but if you do lots they can be handy. the file holder lets you sharpen without going to put the blade in a vice, but not really a necessary item.
 www.leevalley.com
I have a special tool that was used by saw filers ot flatten saw blades if they are warped.. its simply bacically a flat straightedge, about 1/16" or so thick with one edge ground true..
If I take that and put it near where slates meet, and turn int in a circular way, then you can feel it drag on the slate.. if it is perfeclly coplaner at the joint, then you can feel the high points easily and you can also check if it rocks at the point where slates meet.
If I lie a strong flashlight behind it and study the glint of light coming under from the other side it helps you see any difference visually..
what I found helped was to take a straightedge, I used a 6 foot level. then put a playing card under it at 4 pionts, two on each slate.. then just check if the cards are loose anywhere.. if a card is loose then you can shim the slate.
with the machinists level you can put it on top of the carpenters level to check a longer stretch, like lay it across both slates.. put it along the table and acoss as you adjust.. important that the carpenters level is true, not an old bent one. if you start flipping it end to end or flipping it over you may detect any slight bend in your level..
with he machinists level , the way you check it , just turn it around, set it in the same spot,, if the bubble finds a different spot the level is out of adjustment.. If you dont want to adjust the level itslef , just split the difference.
you should be able to get it so you see the machinists level tip from the bubble on one end to the other by placing a playing card under the longer carpenter's level on either end. once you are within that then you are starting to split hairs and geting very close. Im talking about a differnece of a playing card thickness over 6' moving thebubble.
putting a pool ball on the slate with no cloth shows a lot by the way the ball rolls when its moving slowly.
I wouldn't worry about the machinist level too much until you are at the point that the ( less sensitive) carpenters level reads true, get it close before getting overly fussy.
on mine i had some bow it the frame. I think it was made that way intentionally back in 1916 and anyway,, some warp over the 120 years or so is expected.. I levelled my center slate first, then checked that i had enough room to shim under the end slates.. if the center slate is lower, you can trap yourself because you can't get the ends any lower than the frame ( unless you plane the frame down)
so if that seems to be the case I'd set the center slate up a bit higher so you have room for adjustment shims when you get to levelelling the end slates..
in the end you can take the machinist level and mark with chalk which direction the slope is and check various points, then you are checking the slate itself and you may find some irregularities, then all you can really do is start splitting differences.
I found a slight bow in one near where they mate and filled a small area , very thinly with the hard rock putty, but that was very slight. I did not want any difference in height at the joint as that might affect the ball. so how they mate up is as important as overall being perfectly level.
I'm not a pool table mechanic by trade, but have some experience doing precision levelling.. A guy that does this for a living may use some different techniques, or have different advice but thats what I did and felt happy wiht the outcome. I had the advantage of spending as much time as I liked to get it as perfect as I could and satisfy myself. T
there is a pool table mechainc that thinks Im not authorized to advise and doesn't like reading anythign too long, thats ok.. he's made a few rude coments saying im not experienced anough to advise or things to that effect.. my take is the purpose of the foum is so forum members can share ideas, share info, and discuss experiences and things, help one another learn. It very old school thiking that giving out the secrets of your trade diminishes your trade but maybe some still think like that. anyway I don't claim to be any authority, and my only reason to write all this is to try to be helpful..
I don't see much that's very complex here, mostly just taking enough time to "get it right so you are happy," . True flatness and also true level is exacting and thus infinite so you can go to the point of rediculousness with super accurate machine setup levels if you desire to.
My take on it is this is something a reasonably thinking person can work through on their own although they may not do it as fast as a "pro" .. If you DIY, you can set your own thresholds on perfection. Personally I'd rather keep those decisions within my own control and wasn't worried about the time taken at all. It's different economics for a pool hall owner paying by the hour to come in and change all his cloth without interrupting business too long.
tape has thickness but if you go into packing tape , its probably only .005" or so. So you can get it really close and then just be careful once tape is not there. on wood fillers I'll often use the tape to guide a cabinet scraper. you can always just change tape if you find it wears out. often my rule of thumb is to keep any repair area as small as possible, no point expanding into areas that dont need repair.. with wood fillers the smaller the repair is the less its likely to be noticed. on slate of course the cloth covers any color etc. with wood , spreading fillers can sometimes affect the results of the color of finish, absorption of a topcoat or stain etc. lots of people like bondo or you can use glazing putty if its very thin, the glazing putty doesn;t need catalist so you aren't needing to do mixes but its not good to put it thick, might chip.. I liked the durhams hard rock putty, but use what you like best. The durhams might not be the best if you put it thick.. but its sort of watery stuff that spreads thin easily..
any greasy or glossy area might bget a better bondo if its roughened up a bit before bondo, to get a better "hook" there are different types of bondo, some sands way easier. If you need to knock off high spots in bondo you might try a sharp cabinet scraper. bit of a knack to using one right but they can often do what sandpaper can, if its a flat surface. you can buy them or if you want to make one you can use a chunk of a handsaw blade. ( cut it with a zip disk) it needs to be a metal you can file, but a bit springy. I'll just take a mill file and draw file it a bit to sharpen it square, sharp like the corners of an ice skate. If i want to take a bit more off , on wood. I'll run a screwdriver over the edge pushing down and form a hook on the edge then it will be more agressive and remove wood faster.
for finer work you cna use a thinner blade, Ill usually just hold the balde and you dont eed all the accessories but the holder helps, especially for learning or pulling itowards yourself, normally its a tool you push away from you while forming a slight a slight bend in the blade. anytime I use a hand plane Ill use a cabinet scraper and it replaces sanding in many cases. they will pull of fine shavings without digging into the grain,, a plane or a jointer or thickness palner sometimes has a tendancy to tear out the grain. especially if the grain is confusing and there there is no real direction ,, otherwise one direction ( in wiood) will often cause more tearout than another direction. Of course any filler has no grain or direction.
Sandpaper has a tendancy to pull out the softer parts of the grain, on wood, a cabinet scraper just works upon what it touches so it flattens things out very nicely. often a cabinet maker will keep one in his shirt pocket. they are very handy and simple.
with wood fillers and maybe with bondo you can have some shrinkage in the filler so sometimes I find it easier to put it on a bit thick , I put masking tape either side of a crack . kheeping the tape tight to the area,, then i can use a putty knife to press it into the crack , and over fill just the crack. that way Im not contaminating the surrounding area but can use the knife on its flat to force stuff into thin cracks.
then pull my tape, then when good and dry use a cabinet scraper to level it, that way im not going back with a second coat due to the problem of shrinkage bringing my filler below surface level.
here's a set of tools, which you dont need but if you do lots they can be handy. the file holder lets you sharpen without going to put the blade in a vice, but not really a necessary item.
Veritas Scraping Set - Lee Valley Tools
Discover the Veritas Scraping Set. Buy this product now on our Lee Valley online store.
I have a special tool that was used by saw filers ot flatten saw blades if they are warped.. its simply bacically a flat straightedge, about 1/16" or so thick with one edge ground true..
If I take that and put it near where slates meet, and turn int in a circular way, then you can feel it drag on the slate.. if it is perfeclly coplaner at the joint, then you can feel the high points easily and you can also check if it rocks at the point where slates meet.
If I lie a strong flashlight behind it and study the glint of light coming under from the other side it helps you see any difference visually..
what I found helped was to take a straightedge, I used a 6 foot level. then put a playing card under it at 4 pionts, two on each slate.. then just check if the cards are loose anywhere.. if a card is loose then you can shim the slate.
with the machinists level you can put it on top of the carpenters level to check a longer stretch, like lay it across both slates.. put it along the table and acoss as you adjust.. important that the carpenters level is true, not an old bent one. if you start flipping it end to end or flipping it over you may detect any slight bend in your level..
with he machinists level , the way you check it , just turn it around, set it in the same spot,, if the bubble finds a different spot the level is out of adjustment.. If you dont want to adjust the level itslef , just split the difference.
you should be able to get it so you see the machinists level tip from the bubble on one end to the other by placing a playing card under the longer carpenter's level on either end. once you are within that then you are starting to split hairs and geting very close. Im talking about a differnece of a playing card thickness over 6' moving thebubble.
putting a pool ball on the slate with no cloth shows a lot by the way the ball rolls when its moving slowly.
I wouldn't worry about the machinist level too much until you are at the point that the ( less sensitive) carpenters level reads true, get it close before getting overly fussy.
on mine i had some bow it the frame. I think it was made that way intentionally back in 1916 and anyway,, some warp over the 120 years or so is expected.. I levelled my center slate first, then checked that i had enough room to shim under the end slates.. if the center slate is lower, you can trap yourself because you can't get the ends any lower than the frame ( unless you plane the frame down)
so if that seems to be the case I'd set the center slate up a bit higher so you have room for adjustment shims when you get to levelelling the end slates..
in the end you can take the machinist level and mark with chalk which direction the slope is and check various points, then you are checking the slate itself and you may find some irregularities, then all you can really do is start splitting differences.
I found a slight bow in one near where they mate and filled a small area , very thinly with the hard rock putty, but that was very slight. I did not want any difference in height at the joint as that might affect the ball. so how they mate up is as important as overall being perfectly level.
I'm not a pool table mechanic by trade, but have some experience doing precision levelling.. A guy that does this for a living may use some different techniques, or have different advice but thats what I did and felt happy wiht the outcome. I had the advantage of spending as much time as I liked to get it as perfect as I could and satisfy myself. T
there is a pool table mechainc that thinks Im not authorized to advise and doesn't like reading anythign too long, thats ok.. he's made a few rude coments saying im not experienced anough to advise or things to that effect.. my take is the purpose of the foum is so forum members can share ideas, share info, and discuss experiences and things, help one another learn. It very old school thiking that giving out the secrets of your trade diminishes your trade but maybe some still think like that. anyway I don't claim to be any authority, and my only reason to write all this is to try to be helpful..
I don't see much that's very complex here, mostly just taking enough time to "get it right so you are happy," . True flatness and also true level is exacting and thus infinite so you can go to the point of rediculousness with super accurate machine setup levels if you desire to.
My take on it is this is something a reasonably thinking person can work through on their own although they may not do it as fast as a "pro" .. If you DIY, you can set your own thresholds on perfection. Personally I'd rather keep those decisions within my own control and wasn't worried about the time taken at all. It's different economics for a pool hall owner paying by the hour to come in and change all his cloth without interrupting business too long.
Last edited:
snookered_again
Well-known member
with the weight of the table it may shift over time. I never saw much shift in my 100 year old house with fir framing.. its done it's settling.. and the weight didn't seem to make any notable difference. In some buildings you might see movment after the table sits a while. If its a concrete floor it's probably pretty stable.
my floor is old growth fir, I didn't want to wear a circle in the floor out around the table so I placed a big and pretty thin rug under it.. if the rug wears Ill just cut it away after a few years. I was glad I did that..
if you want to hang a light and wan to tie that into the ceiling joist, you might think about where it will hang and where power is so your light is centered.. I put up two chains and wanted to hit my joist.. I wanted the chains centered over the table. Id just give that a moment's thought so you have the table located in the best spot, in case it mde any difference to the layout. If you place it under a light pot and use that to suspend your table light you don't want to be later moving the light pot over by 2", for example.
If anyone takes the time to look up my past post about how to repair broken slate using soup cans, you'd be doing yourself a favor, because you'd throw out all these suggestions about how to repair broken slates!!!
xX-Wizard-Xx
Well-known member
Slate Repair Method
I received great instruction from RKC regarding broken slate repair. Here are a few pictures of the process and the end result. So first things first, if you’re reading this... THANKS GLEN! I picked up a Gold Crown 3 for free due to the person...
forums.azbilliards.com
I appreciate all your comments and advice. The soup can method isn't applicable here, because my slate isn't broken all the way through. Only a 1/8" thin top layer of the slate has broken off at some point, glued back in, and now sits a bit proud of the rest of the slate. Check the pics I posted. So I think the best way is to sand it down, and I'm trying to think of a way that references the rest of the slate while sanding so I'll get it flush. Glen's sandpaper glued to the carpenter's level - method seems like it should work best, so I'll go with that. Thanks guys for your input!Slate Repair Method
I received great instruction from RKC regarding broken slate repair. Here are a few pictures of the process and the end result. So first things first, if you’re reading this... THANKS GLEN! I picked up a Gold Crown 3 for free due to the person...forums.azbilliards.com
xX-Wizard-Xx
Well-known member
I could see them just fine... maybe it's your device not worth a damnThose pics in that post ain't worth a damn. Broken links the all of em.

boogieman
It don't mean a thing if it ain't got that ping.
Well heck, I can now too. Must have been something on my end.I could see them just fine
boogieman
It don't mean a thing if it ain't got that ping.
Found the original post!
xX-Wizard-Xx
Well-known member
On campbells site rule 2 strictly says that their soup cans should not be used for any reasons other than a container unless properly licensed. This usage of soup cans seems to be in direct violation of the rules and illegal without proper licensing.
I would recommend consulting a lawyer and get proper licensing from campbells before attempting this method to avoid any legal situation.
I would recommend consulting a lawyer and get proper licensing from campbells before attempting this method to avoid any legal situation.
Last edited:
boogieman
It don't mean a thing if it ain't got that ping.
What are you the police or something? You gotta tell me if you're a cop!On campbells site rule 2 strictly says that their soup cans should not be used for any reasons other than a container unless properly licensed. This usage of soup cans seems to be in direct violation of the rules and illegal without proper licensing.
I would recommend consulting a lawyer and get proper licensing from campbells before attempting this method to avoid any legal situation.
")

xX-Wizard-Xx
Well-known member
Just don't be posting pictures about unlicensed campbells can usage .... All I got to say ...What are you the police or something? You gotta tell me if you're a cop!

Well, seeing how I BOUGHT the soup cans, that makes them MINE, and I did open and eat them later, so, sue meJust don't be posting pictures about unlicensed campbells can usage .... All I got to say ...
