Shaft collet recipe...

pescadoman

Randy
Silver Member
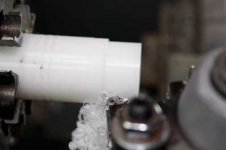
1. Drill. This bit was 31/64....boreto taste if needed...I did not
2. Turn and part....face parted side(not shown)
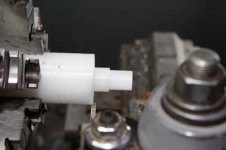
3. Chamfer the insides with whatever you like(400 was used), but do chamfer
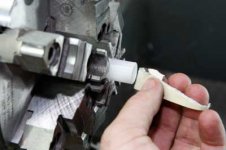
4. Split(be very careful here of course)
5. Debur split(that is simply a jewelers file)
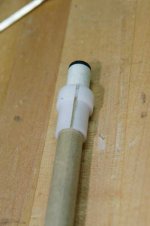
6. Serve
7. I prefer white. Sometimes debris floats around the work area and I can see it easily(and remove it) before something bad happens(mar a shaft).
Sorry if some of the pics aren't perfect. Was holding camera with one hand and piece in other for some....

Shaft is 12.4(roughly)
 

Attachments

  • drill.jpg
    drill.jpg
    11.3 KB · Views: 403
  • drilling.jpg
    drilling.jpg
    7.5 KB · Views: 408
  • turing.jpg
    turing.jpg
    6.6 KB · Views: 410
  • turning-done-cutoff.jpg
    turning-done-cutoff.jpg
    8.3 KB · Views: 406
  • chamfering.jpg
    chamfering.jpg
    11.1 KB · Views: 401
Last edited:
the rest of the pics
 

Attachments

  • splitting-collet.jpg
    splitting-collet.jpg
    22.9 KB · Views: 416
  • debur-collet.jpg
    debur-collet.jpg
    8.6 KB · Views: 411
  • collet-done.jpg
    collet-done.jpg
    13.1 KB · Views: 403
If anyone would like to add or comment on how this can be improved upon, please feel free.

Entire operation took less than 10 mins, including the pics.
 
Very nice Randy, i'm anxiously awaiting your pin install recipe;) A bit off topic, but i wonder why delrin is'nt used for buttcaps much anymore? Personally, i love the way it looks, and the way the black bumper shows thru the bottom part of it. My favorite buttcap material, for sure:thumbup:
 
Very nice Randy, i'm anxiously awaiting your pin install recipe;) A bit off topic, but i wonder why delrin is'nt used for buttcaps much anymore? Personally, i love the way it looks, and the way the black bumper shows thru the bottom part of it. My favorite buttcap material, for sure:thumbup:
Delrin is still used for buttcaps as far as I know, it's just some feel there is better material out there.

It needs to be threaded and doesn't take finishes(nothing sticks to it).
 
Digital caliper ? That's blasphemy.:grin:

I put them on junk shaft then cut the slit with a thin wing cutter carefully.
Like tapering a shaft but the shaft not spinning.

I don't know how DZ cuts his slits 180* to have a total split collet.
 
Digital caliper ? That's blasphemy.:grin:

I put them on junk shaft then cut the slit with a thin wing cutter carefully.
Like tapering a shaft but the shaft not spinning.

I don't know how DZ cuts his slits 180* to have a total split collet.

"junk" shaft? You?! :)

I don't have any thin kerf cutters atm. Carbide Saw keeps trying to sell me some though.

Suppose you could just put one on a dowel and run it through a bandsaw for 180 or split(the first inch or so of six inches) them first, then turn (probably be ok with Delrin..wouldn't try with anything else.) OR, you could turn, leave the finished piece on the stock and run through saw(I like that idea the best!)then part.
 
Last edited:
I don't know how DZ cuts his slits 180* to have a total split collet.

I don't know how Mr. Dzuricky does it, but I have drilled a hole in a block of wood (tight fitting) and put the collet in the hole. Set your bandsaw fence up to cut through the middle of the hole and you run it through only up until the collet is completely cut. Turn the saw off and then back out the block and fish out the collet. The block is only ever cut on one side of the hole.

To keep the walls of the collet thin for varying collet sizes, just make the shoulder of the collet a consistent size so one hole in your block of wood fits all of the shaft collets.

Kelly
 
You can make split collets from 2 pieces held in the 4 jaw chuck.
If it is rectangular section, you can use a self centering 4 jaw chuck.
There is lots of was to do it.
 
Back
Top