no body posted any reply in the mainsection,
so i thought maybe here more people would be interested in seeing the pictures and folowing the project, and i hope it might work as a inspiration for alot of other tablefreaks.
So small recap.
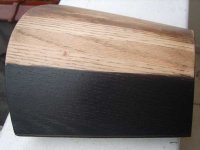
bought a 9ft used diamond pro, didnt like the colour AT all, but i love the quality of the table. Also the table is 8y old, it was in very good state, and didnt really needed a conversion, but i wanted to work on the table myself to give it that special look, to make the table a one of a kind, and to change the looks of the table.
part 1 SANDING THE TABLE
http://forums.azbilliards.com/showthread.php?t=61407 here is a link to the first day, with some pictures of the sanding. Really this is a hard job and takes up 80% of the time. there are ALOT of pieces to sand, and the finishing is SO hard, and consists of 6 layers, wich makes it very hard, but worth it. Im not sure how many hours it takes to sand a diamond down to its VERY NICE bare oak wood, but id say around 30-50 hours.
a good tip, use a machine to sand of the top finishing coat, and once u see the original wood coming true, do the rest by hand. Ive used a 60grid for the first finishing layers, then a 80 grid, and then a 100 grid once you are on the wood and a 200 to finish off. also once everything is sanded, i used a wet cloth to raise the woodgrains, and then resand it with a 200 grid.
advice: Dont use cheap regular sandpaper on paper. Use rather sandpaper that are round to put onto a machine and thats glued on some sort of cloth. They are alot more expensive but they last 10 times longer. U need around 10 of these of the different thickness to sand a diamond. in the paperversion u probably will need 100 sandingpapers. so worth investing on GOOD sanding material.
side note: EVERY part of a diamond is full oak, some parts like the upperrails are differente parts glued together. The only piece of the table thats not full oak are the large sides underneath the table. The pieces are to thick to cut from a oak, and its just a small 1mm oak plate glued onto a MDF plate. (probably the weak spot of a diamond, but as its under the table, u hardly see it).
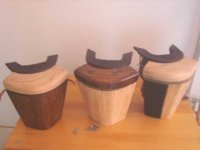
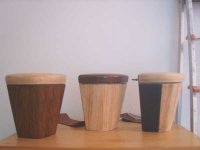
part 2 the pedestals.
Then the pedestals. (sp?)
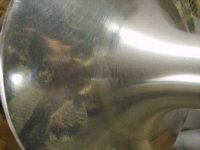
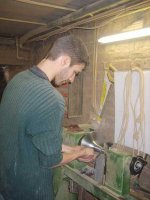
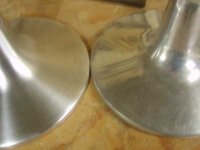
i didnt like the shiny cheap clossy look of it. it make it look like cheap silver paint. As the pedestals took alot of beating and scratching, i atached them onto a lathé (worked greath) and then used a 100grid to sand the first parts of, and then finish the work with stealwoll. (i tried to use a wax over it , but i sanded it off as the result wasnt satisfying.)
here u can see the pictures of the pedestals. at least now they have a nice brushed stainless steal look instead of the cheap glossy silver painted plastic look.
so i thought maybe here more people would be interested in seeing the pictures and folowing the project, and i hope it might work as a inspiration for alot of other tablefreaks.
So small recap.
bought a 9ft used diamond pro, didnt like the colour AT all, but i love the quality of the table. Also the table is 8y old, it was in very good state, and didnt really needed a conversion, but i wanted to work on the table myself to give it that special look, to make the table a one of a kind, and to change the looks of the table.
part 1 SANDING THE TABLE
http://forums.azbilliards.com/showthread.php?t=61407 here is a link to the first day, with some pictures of the sanding. Really this is a hard job and takes up 80% of the time. there are ALOT of pieces to sand, and the finishing is SO hard, and consists of 6 layers, wich makes it very hard, but worth it. Im not sure how many hours it takes to sand a diamond down to its VERY NICE bare oak wood, but id say around 30-50 hours.
a good tip, use a machine to sand of the top finishing coat, and once u see the original wood coming true, do the rest by hand. Ive used a 60grid for the first finishing layers, then a 80 grid, and then a 100 grid once you are on the wood and a 200 to finish off. also once everything is sanded, i used a wet cloth to raise the woodgrains, and then resand it with a 200 grid.
advice: Dont use cheap regular sandpaper on paper. Use rather sandpaper that are round to put onto a machine and thats glued on some sort of cloth. They are alot more expensive but they last 10 times longer. U need around 10 of these of the different thickness to sand a diamond. in the paperversion u probably will need 100 sandingpapers. so worth investing on GOOD sanding material.
side note: EVERY part of a diamond is full oak, some parts like the upperrails are differente parts glued together. The only piece of the table thats not full oak are the large sides underneath the table. The pieces are to thick to cut from a oak, and its just a small 1mm oak plate glued onto a MDF plate. (probably the weak spot of a diamond, but as its under the table, u hardly see it).
part 2 the pedestals.
Then the pedestals. (sp?)
i didnt like the shiny cheap clossy look of it. it make it look like cheap silver paint. As the pedestals took alot of beating and scratching, i atached them onto a lathé (worked greath) and then used a 100grid to sand the first parts of, and then finish the work with stealwoll. (i tried to use a wax over it , but i sanded it off as the result wasnt satisfying.)
here u can see the pictures of the pedestals. at least now they have a nice brushed stainless steal look instead of the cheap glossy silver painted plastic look.


")

 )
) maybe i made the wrong choice. Well ill try with a black-red/black combo and see how it looks.