Studiotronics Finishing Process

kling&allen

AzB Gold Member
Gold Member
Eddie's videos are always great. He gives a detailed look at his finishing process in his newest video:

(skip to 19:30 for the finishing).

Looks like solarez + west + gloss resin.

I haven't used gloss resin w/ wax as a top coat before--looks like it's typically used for surfboards?
 
I call it the swaylocks* method:

- max 1618 or vinyl ester grain filler for base coat. For thirsty porous woods (burls etc) I like 1618. If you use vinyl ester grain filler, it has to be razor thin or it’ll never cure. Even with razor thin coats it can take a couple hours sitting in direct Texas sun.
- laminating resin. I use this for thickness. It cures tacky (by design, for laminating additional layers on top)
- gloss resin topcoat. Gloss resin is basically laminating resin but with wax and styrene added- this allows it to cure bone dry with no tackiness.

I also like to add a drop or two of mekp catalyst.

Solarez does all of this premixed, under the hood. I like to do it myself so I can mix the wax right before I use it. This avoids alot of the mess and headache associated with Solarez which is premixed weeks/months in advance (with frequent formulation changes).

I like to sand between each step but it’s not required. Keep acetone far far away. Unless you like craters. If you need to clean finger prints or blemishes, just sand. The sanding dust will disappear when flooded with a subsequent layer.

For micro bubbles (if you’ve used Solarez, you know what I’m referring to), pull your resin through a vacuum. Brake bleeder kits work great for small batches. I do this every single time, regardless of layer

* swaylocks is a now defunct forum for surfboard enthusiasts. It’s still accessible with 20+ years of archived knowledge and these guys were resin wizards.

Thank you! I had forgotten you are a member here.

That Loki-inspired butt inlay was amazing.
 
I am impressed with the small refinements/improvements noticeable on his builds with each subsequent video.

This is an extremely talented man and to share his journey with the world via video is a timeless treasure.

While we are on the topic of finishing, your video from a couple years ago has always been my go-to for advice. I think you posted somewhere you now use 2k instead of that instrument finish as top coat?
 
While we are on the topic of finishing, your video from a couple years ago has always been my go-to for advice. I think you posted somewhere you now use 2k instead of that instrument finish as top coat?
I decided, which was a tough one for me, that brite tone is not durable enough for the finish on pool cues. This was after seeing the aging of it over a couple of years on well played cues.

Anyone reading this that has one of my cues with Brite tone on it and it's peeling please send it back to me and I will refinish it for you at no charge.
 
I call it the swaylocks* method:

- max 1618 or vinyl ester grain filler for base coat. For thirsty porous woods (burls etc) I like 1618. If you use vinyl ester grain filler, it has to be razor thin or it’ll never cure. Even with razor thin coats it can take a couple hours sitting in direct Texas sun.
- laminating resin. I use this for thickness. It cures tacky (by design, for laminating additional layers on top)
- gloss resin topcoat. Gloss resin is basically laminating resin but with wax and styrene added- this allows it to cure bone dry with no tackiness.

I also like to add a drop or two of mekp catalyst.

Solarez does all of this premixed, under the hood. I like to do it myself so I can mix the wax right before I use it. This avoids alot of the mess and headache associated with Solarez which is premixed weeks/months in advance (with frequent formulation changes).

I like to sand between each step but it’s not required. Keep acetone far far away. Unless you like craters. If you need to clean finger prints or blemishes, just sand. The sanding dust will disappear when flooded with a subsequent layer.

For micro bubbles (if you’ve used Solarez, you know what I’m referring to), pull your resin through a vacuum. Brake bleeder kits work great for small batches. I do this every single time, regardless of layer

* swaylocks is a now defunct forum for surfboard enthusiasts. It’s still accessible with 20+ years of archived knowledge and these guys were resin wizards.
Thanks for all the valuable info and your videos. Can you explain a little more about the vacuum process for the resin. Like others I am getting bubbles!
 
Damn, just two weeks ago I put my brake bleeder system in the trash. I hadn't used it in several years so tossed it. It would have been perfect for this application! Funny how we wait years to discard something only to find out shortly afterwards that we could use it. Humans....
 
While we are on the topic of finishing, your video from a couple years ago has always been my go-to for advice. I think you posted somewhere you now use 2k instead of that instrument finish as top coat?
I have felt bad if I influenced others to use brite tone with my video and they have had similar issues. It was such a promising product with so much upside that it was very disappointing to learn the truth over time. In fact I thought Eddie may have been one of those as he has tried it in the past if I recall correctly.
 
I have felt bad if I influenced others to use brite tone with my video and they have had similar issues. It was such a promising product with so much upside that it was very disappointing to learn the truth over time. In fact I thought Eddie may have been one of those as he has tried it in the past if I recall correctly.

Your own videos are wonderful so you shouldn’t feel bad. Some day I will get around to building a version of your vertical cabinet mounted tapering machine.
 
I have felt bad if I influenced others to use brite tone with my video and they have had similar issues. It was such a promising product with so much upside that it was very disappointing to learn the truth over time. In fact I thought Eddie may have been one of those as he has tried it in the past if I recall correctly.
It’s true, I’ve been watching your videos for quite a long time actually. I really wanted the brite tone to work, too. Applying it was a pleasure.

I’ve also built a sled from a video of yours. it was for cutting thin strips for ring billets on a table saw.
 
Thanks for all the valuable info and your videos. Can you explain a little more about the vacuum process for the resin. Like others I am getting bubbles!
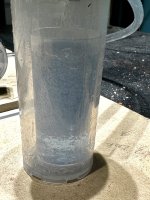
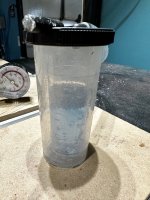
No matter how diligent you are when stirring/mixing, that’s where the micro bubbles are being introduced. It took me so long to verify this. As confirmation, stir some resin in a shot glass and toss it into a vacuum chamber. Brake bleeders are small and cheap. Suck all the air out and watch your resin. All the bubbles, previously invisible, will start expanding and rising.

Look at how many bubbles are in the first picture. You can’t even see through them. This was a batch I was 100% confident had zero bubbles in it too—I stirred nice and slow. I couldn’t have been more wrong.

The second pic is a minute or two later, you can see all the bubbles rising and popping due to the vacuum.

Lay a topcoat after with this vacuumed resin. No more surprise micro bubbles appearing after 800 grit or so.
 

Attachments

  • IMG_9267.jpeg
    IMG_9267.jpeg
    220.8 KB · Views: 172
  • IMG_9268.jpeg
    IMG_9268.jpeg
    216.1 KB · Views: 167
It’s true, I’ve been watching your videos for quite a long time actually. I really wanted the brite tone to work, too. Applying it was a pleasure.

I’ve also built a sled from a video of yours. it was for cutting thin strips for ring billets on a table saw.
I really enjoy your videos and almost always learn something or get an idea for something from your processes.

Sometimes I wonder if it takes you longer to make some of your videos than it does for me to make a cue.😁
 
No matter how diligent you are when stirring/mixing, that’s where the micro bubbles are being introduced. It took me so long to verify this. As confirmation, stir some resin in a shot glass and toss it into a vacuum chamber. Brake bleeders are small and cheap. Suck all the air out and watch your resin. All the bubbles, previously invisible, will start expanding and rising.

Look at how many bubbles are in the first picture. You can’t even see through them. This was a batch I was 100% confident had zero bubbles in it too—I stirred nice and slow. I couldn’t have been more wrong.

The second pic is a minute or two later, you can see all the bubbles rising and popping due to the vacuum.

Lay a topcoat after with this vacuumed resin. No more surprise micro bubbles appearing after 800 grit or so.

Thanks for the idea.
I ordered one so I can try it out on the next one.

The little plastic reservoir that comes with it is small so I got a glass jar that is easier to get the cup in and out of, plus is heavier and stays put.

IMG_5727.jpeg
 
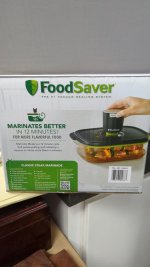
I bought this at an Ollie's and thought I was going to use it for laminating my veneers. But I think I could do the same thing with it. If it works out I may have to pick up another one, if there's any left.
It was only 20 bucks
 

Attachments

  • 16923084099348344300052010494308.jpg
    16923084099348344300052010494308.jpg
    107.3 KB · Views: 93
  • 16923087376103760967865855958455.jpg
    16923087376103760967865855958455.jpg
    106.8 KB · Views: 91
I bought this at an Ollie's and thought I was going to use it for laminating my veneers. But I think I could do the same thing with it. If it works out I may have to pick up another one, if there's any left.
It was only 20 bucks
I actually meant to say I was going to use this vacuum container to dye my veneers. Thinking that pulling the air out would help the wood to absorb more of the dye.
 
I actually meant to say I was going to use this vacuum container to dye my veneers. Thinking that pulling the air out would help the wood to absorb more of the dye.
Let us know how that goes. I bet there’s a dozen people reading this that would go buy one if successful.

I’ve priced out all the gear needed for a pretty serious cactus juice stabilizing setup many times but never pull the trigger. There’s so many facets of cue making to focus on, for now I’ve been happy outsourcing that stuff. One day though!
 
Back
Top