what does everyone use to keep rubber in place

reverend

Table Mechanic
Silver Member
after gluing the rubber to the rails using (insert favorite contact glue here). I have used a few rubber bands in the past on commercial-style rails, and have used blue masking tape on home style tables.

Just curious to see what others have used. Has anyone used any sort of clamping method, if so post some pics.
 
reverend said:
after gluing the rubber to the rails using (insert favorite contact glue here). I have used a few rubber bands in the past on commercial-style rails, and have used blue masking tape on home style tables.

Just curious to see what others have used. Has anyone used any sort of clamping method, if so post some pics.
ummmm....why? When you use contact cement, that's why its called "Contact" cement...LOL as soon as you apply it, it sticks...LOL I increase its hold my using a wheel to rub out the nose of the cushions, and the lower half of the cushions to the sub-rail, after rolling it out, there is no need to clamp it, or hold it in place with anything...it's done.

Glen

PS. Makes me wonder what it is that you're doing when you apply the cushions...LOL
 
Reverand, most people use a dry method when using contact cement. Letting the glue dry before putting the cushion in place. Let the glue dry until tacky but not sticky. Once you put the cushion in place it will stay without clamps. If using a wet method like you described in your thread you will need to either staple or nail the ends in place and use rubberbands or tape to hold the cushion in place while drying. I have posted this process in a thread a few months ago if you want to see it. The problem with this method is it takes days for glue to dry, masking tape will affect the finish and sometimes even the rubberbands will leave lines. I used this method for about a year before getting some tips from Glen, I switched back to the dry method.

-sundown
 
realkingcobra said:
ummmm....why? When you use contact cement, that's why its called "Contact" cement...LOL as soon as you apply it, it sticks...LOL I increase its hold my using a wheel to rub out the nose of the cushions, and the lower half of the cushions to the sub-rail, after rolling it out, there is no need to clamp it, or hold it in place with anything...it's done.

Glen

PS. Makes me wonder what it is that you're doing when you apply the cushions...LOL


I guess i never thought of it like that it makes sense tho. from the first time I was showed to do it a few years ago, thats how it was done, with rubber bands, so I guess I never thought to do it any differently. I have done a few dozen sets of rails using either rubber bands or tape and all have come out looking good. I use a wall paper roller to roll the top of the cushions to pop any little air bubbles that might have come to be in the glue.

the last few days I have been in the process of extending my subrails and will be getting rubber soon so I will try not using anything to hold them down this time (if you all say it will work...lol) this is the first time i have extended rails using wood pieces, so i hope it all turns out well.
 
reverend said:
I guess i never thought of it like that it makes sense tho. from the first time I was showed to do it a few years ago, thats how it was done, with rubber bands, so I guess I never thought to do it any differently. I have done a few dozen sets of rails using either rubber bands or tape and all have come out looking good. I use a wall paper roller to roll the top of the cushions to pop any little air bubbles that might have come to be in the glue.

the last few days I have been in the process of extending my subrails and will be getting rubber soon so I will try not using anything to hold them down this time (if you all say it will work...lol) this is the first time i have extended rails using wood pieces, so i hope it all turns out well.
If you'd like some advice, give me a call.

Glen 702-927-5689
 
realkingcobra said:
If you'd like some advice, give me a call.

Glen 702-927-5689

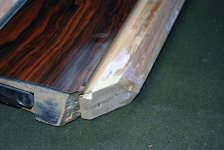
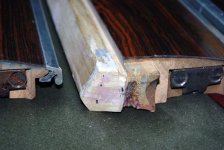
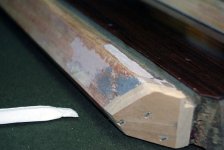
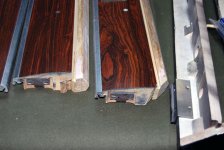
Well thanks for being so ready to help out thats what I love about this forum. I think I have a pretty good handle on what is going on with, but you be the judge...tell me if you see any potential problems.


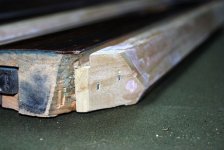
DSC_0165.jpg

DSC_0166.jpg

DSC_0167.jpg

DSC_0172.jpg

DSC_0175.jpg

I have higher res pics to post on here if wanted.
 
Very good. When I apply the wood extensions, I set the rail flat down, then use the flat surface to square up my wood extention so to speak, so that it lines up to the feather strip dado at a 90 degree angle to the rail. Meaning, straight up and down. You did some very good work for your first wood sub-rail extention. My hat's off to you.

Glen
 
Now all you have to do is make new feather strips. Underline the feather strip and cut it upside down so it matches the extension. You're going to like the way the pocket liners go back in and how they fit, doing the extensions that way with the 45 degree relief really helps keep the pocket liner from pouching out so much when they get installed.

Glen
 
I take it as a complement every-time I see someone doing my style of work...LOL

Glen

PS. You guys are going to make me think I've been fixing rails all over the place, judging by the work done...LOL
 
Rails look great! Question about installing facings ? i think most mnfrs put their facings to the very back of the channel. do you recomend holding them to the front to avoid bending them around the return? Nice job!!
 
scruffy1 said:
Rails look great! Question about installing facings ? i think most mnfrs put their facings to the very back of the channel. do you recomend holding them to the front to avoid bending them around the return? Nice job!!
In this application, they should stop right at the front of the feather strip dado, even with the 45 degree edge of the wood extension.

Glen
 
Those rails look just like my 10 foot National table that I just did the same way. I put a half inch thick piece of wood on each side and the pocket ended up three and seven eights.
Gary
 
realkingcobra said:
Very good. When I apply the wood extensions, I set the rail flat down, then use the flat surface to square up my wood extention so to speak, so that it lines up to the feather strip dado at a 90 degree angle to the rail. Meaning, straight up and down. You did some very good work for your first wood sub-rail extention. My hat's off to you.

Glen

I know what you mean with them being squared up at the back. I did it with a 5 degree angle because the way my pockets fit on them. The rubber is cut on an angle, so I tried to match the angle. Hopefully it will look good when its all said and done. Now Im just waiting on rubber, and to get my belt sander in the mail.

What is different about the Diamond facings I have heard about? What makes them different than the black rubber ones with (for lack of a better way to describe it) white cloth or fabric vulcanized into it on the outsides?

And im still trying to decide between Artemis Inter. and Brunswick super speed.
 
reverend said:
I know what you mean with them being squared up at the back. I did it with a 5 degree angle because the way my pockets fit on them. The rubber is cut on an angle, so I tried to match the angle. Hopefully it will look good when its all said and done. Now Im just waiting on rubber, and to get my belt sander in the mail.

What is different about the Diamond facings I have heard about? What makes them different than the black rubber ones with (for lack of a better way to describe it) white cloth or fabric vulcanized into it on the outsides?

And im still trying to decide between Artemis Inter. and Brunswick super speed.
Diamond uses straight neoprene, 3/16" of an inch thick, it'll never turn hard and it stops the cloth from cutting through on the pocket facings on the end rail corner pockets.

Glen
 
Back
Top