Table looks great,nice work and pics.
You are using an out of date browser. It may not display this or other websites correctly.
You should upgrade or use an alternative browser.
You should upgrade or use an alternative browser.
Headed to New York
- Thread starter Club Billiards
- Start date
We took the original facings off:
QUOTE]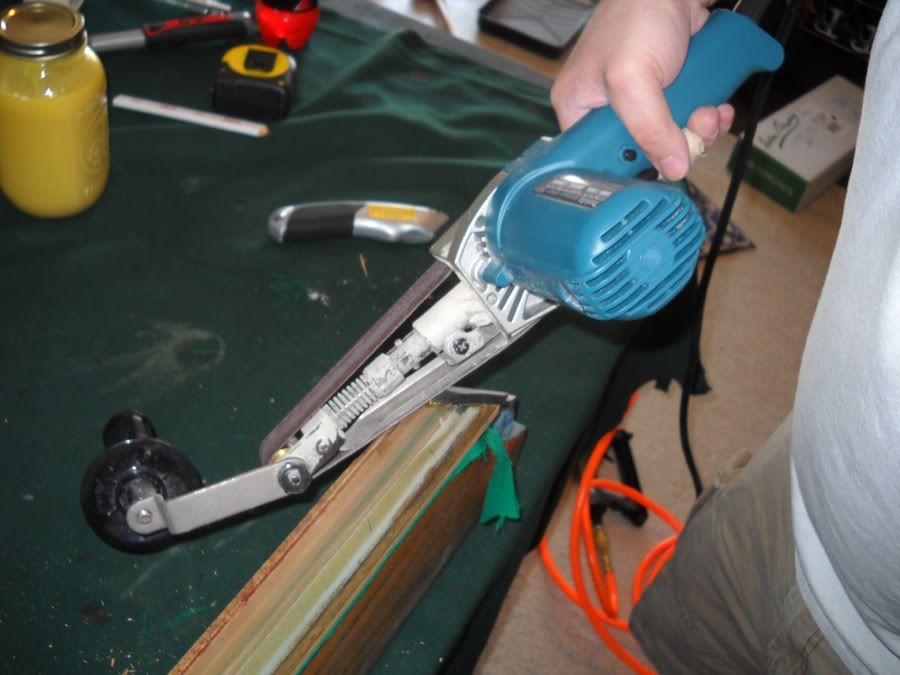
Take the handle off that belt sander first of all. Second, sand across the facing in the direction of the cushion, sanding the way you're sanding pulls the facing away from the cushion and the bond, and you'll have a tendency to sand in a down-ward angle. When you sand across the facing to-wards the cushion, the cushion acts as an alignment gage to keep your sander as flat as possible, without pulling on the facing.
Good job Josh & Don. And the only thing Donny has on you is that he got about 3 weeks or so with me, whereas you only got 4 days or sobut that'll soon change
Glen
Yeah, that handle does get in the way. That picture was actually just taken to show the sander against the rail. No sanding was taking place in that picture since I couldn't sand and take the pic at the same time.

I bet the customer was very happy he hired you Josh. The table looks great.. Thanks for the pictures now I see what everyone is talking about when they talk about Diamond's tables. After taking my Olehausen apart I can see some definite attention to detail that Diamond has that Olehausen is missing. The dadoe on the edge of the rail to recess the cloth stapling and the 3 screws in the plates which hold the rail bolts .. nice touches!
Question.. The cushions seem to extend beyond the top rail was this due to tightening the pockets or is this an optical illusion because the pockets screw in from the bottom and take up that 3/4 inch space around the curve of the pocket. Hope my question makes sense..
John
If I'm understanding your question right, that recess is for the pockets to sit down into the rail when they're screwed down. They sit with the tops basically flush to the top of the rail. I like that design MUCH better than the old Gold Crown design where you get rubber on your shaft every time you stroke across the top of a pocket. Diamond is doing a couple things right.
So I tried changing the way I trimmed the corners on my pockets. I think I like this a lot better than the way I folded them before.


Any thoughts or suggestions to make them even better?
By the way, this was on a SERIOUSLY hacked Diamond Professional that we worked on today. I'm about to post some pics in the Hack Work Section. I've never seen a rubber job this bad!!!!
Any thoughts or suggestions to make them even better?
By the way, this was on a SERIOUSLY hacked Diamond Professional that we worked on today. I'm about to post some pics in the Hack Work Section. I've never seen a rubber job this bad!!!!
SyracuseJohn
Registered
Thanks. Yes that does answer my question.
John
John
If I'm understanding your question right, that recess is for the pockets to sit down into the rail when they're screwed down. They sit with the tops basically flush to the top of the rail. I like that design MUCH better than the old Gold Crown design where you get rubber on your shaft every time you stroke across the top of a pocket. Diamond is doing a couple things right.
Then we use the 3M10 and variation of Glen's gluing method on the slate. I'm still impressed at how well that glue works and laugh when I think about the first time I heard him say he could get cloth tighter with glue than with staples. I'll never doubt again! LOL
Careful with that glue, next thing you know you will be driving all over the country and inventing strange tools. Nice job!
So I tried changing the way I trimmed the corners on my pockets. I think I like this a lot better than the way I folded them before.
Superlative work.
Don't kick a winner.
Then we use the 3M10 and variation of Glen's gluing method on the slate. I'm still impressed at how well that glue works and laugh when I think about the first time I heard him say he could get cloth tighter with glue than with staples. I'll never doubt again! LOL
Careful with that glue, next thing you know you will be driving all over the country and inventing strange tools. Nice job!
I love it.
Josh- Do you do any work in the Cleveland area? I need 860 installed and my pockets shimmed up. Its a cheaper Brunswick table(4x8), BTW- That table looks beautiful...nice job.
Yeah, Cleveland is just right up the road.
We could do something. Shoot me a PM and we'll talk details.Thanks!