Restoring '46 Brunswick Anniversary - Castings Concern

http://www.brunswickbilliards.com/our_rich_history/antique_tables/centennial.html

From the Brunswick Billiard Service Parts guide effective January 1, 1950:

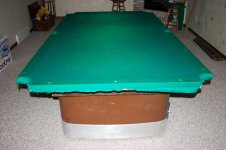
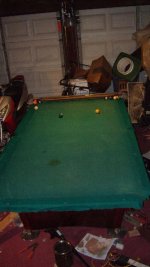
The Centennial identifying features: The Table name and model number stamped on outside of leg near top of head and foot end.

Model C:
- Finish: Rosewood satin.
- Rails: Rosewood; side pocket butt joint; no side pocket castings; 3 hole nut plate.
- Slate, 3 piece, 1" thick.
- Rail castings: Polished anodized aluminum: used at corners only; attached to rail by bolt passing through center of face into recessed rail nut.
- Apron corner castings: Polished anodized aluminum.
- Pockets: Maroon; one piece molded rubber.
- Legs: Oval shaped, tapered, rosewood finish with aluminum trim; without stretchers. Attached to base frame by bolts without angle brackets.
- Apron ball rack: recessed in foot end apron; rosewood. finish.

Model C-1: Same as C except:
- Rails: Rosewood with side pocket castings, 5 hole nut plates.
- Rail castings: Polished anodized aluminum; used at corner and side pockets; attached to rail by bolt passing through center of face into recessed rail nut.
- Legs: Oval shaped, tapered, rosewood finish with aluminum trim with stretchers. attached to base frame with angle brackets.

Model D-C: Same as C except:
- Rails: Rosewood with side pocket casting; figure 8 nut plates.
- Rail castings: Polished anodized aluminum; used at corner and side pockets; attached to rail by bolt passing through face into rail angle nut plate.


I'm not an expert. I would love to know how to date these tables.

I seems to me that on the Centennials that the first models (C) only had corner pocket castings and had 3 hole nut plates. The tables were gradually improved to the last model (D-C) which had a two piece long rail and the figure 8 nut plate.

A manufacturing start date for each model would be nice. If someone knows, please chime in.
 
IMG_1365.jpg

IMG_1399.jpg

Here is a pic on the 3 hole nut plate. Also, I noticed that the captured nut for the corner casting on my rails looks to be done differently than yours. These differences could be due to a diff between the Cent. and Aniv.
 
Had a fantastic trip up to Pictured Rocks National Lakeshore - highly recommend it for anyone wishing they were on another planet, but can't afford to leave North America.

I understand that between the figure 8 nutplates, the cross member between the ovals, and the brass nameplate, my table is dated to very late 40's, early 50's, but that is about as accurate as I'm going to get.

I'm anxious to continue working on the Anni's restoration. I'm picking up my Simonis cloth this week, but I need to continue focusing on the wood stripping, and start working on my new "emerald" sights. My neighbor is working on stripping the ball storage unit. He has to add a strip of black walnut to it so it's the same height as the apron skirts, now that the ball catch portion has been removed. I'll be photographing that soon.

I suppose I should wait until the rails are completely refinished before hiring a table mechanic to put new rubber and cloth on them??? :cool:
 
Welcome back...

Yep you wouldn't like what would happen if you tried to skip ahead and then ruined your new cloth one way or another. Even just sanding dust could screw it up getting under the cloth and clumping up.

Speaking of skipping ahead, I've finally got everything on mine done except new cloth and slate repair, but I'm going to slap it together so I have a platform to fix the slate then put the old cloth back on so I can test for dead rails or any other problems. I'm hoping I don't need new rubber and can get by on the original that's still on her, but I have no way to tell if the rails are acceptable without putting it together. I bought it in such a hurry I really didn't test it and can't afford to just put on new rail rubber just in case. Can't really afford new cloth and pockets atm either so I may have to just leave it as is for a while and stop there.
 
I suppose I should wait until the rails are completely refinished before hiring a table mechanic to put new rubber and cloth on them??? :cool:

I had the rail work completed first. I didn't want to risk scratching the new finish. I would ask your mech what he wants. I used 3M painters tape on the new rubber to protect them from over spray and stain.
 
Rail rubber replacement - before or after rail refinishing?

Thanks for the input guys. I'll call the mech in my area and ask what he thinks. Probably best to not risk damaging all the work that will go into the finishing... at least there would be opportunity to repair. Unnecessary risk. Probably need to tape up the cloth on the cushions and everything.

@ Oregonmeds... any progress photos to share?
 
I'll have some photo's eventually, it's still mostly in parts though so haven't been all that motivated to take pics of just parts yet and it hasn't turned out as nice as I'd hoped for either. I have the legs and frame up with slates just sitting on top. Just got that stuff lifted and bolted up today. What a *****, did all that moving and lifting by myself. Wow that frame is a lot heavier than I remembered from moving it the first time, but then I had help. Big big difference trying to move these things all by yourself, I was sweating buckets it was 95 degrees or so here today.


Next is slate repair, a lot of work needs to be done to the slate actually, it's 6 piece slate until I fix it. I thought it was 5 with two corners broken off, but now I see one of the corners is actually in two pieces.

Then all the cloth on the rails has to be restapled and trimmed just to reuse the old ugly cloth, because whoever had this before me just left it long and bunched it up and stapled all the excess down. Didn't even staple it where it's supposed to be stapled to fit in that groove, just stapled it wherever they pleased so nothing would fit right and the rails would sit way too high and probably crack the slate again trying to tighten anything down if I don't fix it first.

It's just one thing after another... Oh plus I can't find a working cable that fits my camera either, going to have to go buy another just to show pics because the only one that does fit my camera the end got smashed. I really miss that cable too because it's the one that also fit my mp3 player, which I can't even charge or use without it.


It hasn't turned out as nice as I wanted because I had to cheap out and use some stain/clear combo stuff that was leftover from a project a long time ago. I've given up on high gloss or perfection. I really like the color in most places, the skirts look good most of them, it's all a really dark red mahogany almost purplish more than red now, but some didn't come out the way I wanted and that's after redoing a couple parts already. I'm just too tired to redo anything any more. Haven't totally given up, but pretty fed up at this point.

Almost broke down and just painted the whole thing over all the work I did trying to stain strip and sand it, but I hope even as is it'll still look better this way. We'll see... Paint is on standby still. :)

Here's the plan for all the slate repair in this thread below. I guess this guys method can be trusted, RKC seems to be one of the most respected experts on here and going to just follow his super glue method.

http://forums.azbilliards.com/showthread.php?t=182188

I have said before this was the worst and cheapest gold crown ever, was destined for the dumpster and it's clear why.
I'm paying the price in labor though trying to save it and it's kind of kicking my ass. I've refinished plenty of furniture and cues even before but a 9' pool table is a real monster when you add up all the work, far bigger and more work than anything I've ever done before

And it sure doesn't help having an incredibly bad back with multiple crushed disks and three vertibrae crushed to half their original size. Might not do more work for a while, after lifting those things today I'll be lucky if I can move at all tomorrow. I'm borderline disabled on a good day and have a lot of severe chronic pain even without any physical work.
:)
 
Last edited:
Then all the cloth on the rails has to be restapled and trimmed just to reuse the old ugly cloth, because whoever had this before me just left it long and bunched it up and stapled all the excess down. Didn't even staple it where it's supposed to be stapled to fit in that groove, just stapled it wherever they pleased so nothing would fit right and the rails would sit way too high and probably crack the slate again trying to tighten anything down if I don't fix it first.

I just picked up the new cloth last night. My existing cloth is still in remarkable condition by the way. I don't really know how to determine how many times it has been used, but there are no rips or stains. It simply has chalk dust and maybe some UV discoloration over time. The cloth color under the rails is the tell-tale. So the current color is a consistent green-blue. I wonder if it can be steam cleaned or just vaccuumed to get the majority of the dust out. I re-used this cloth when buying the table and if I didn't have to replace the cushions and their cloth, I'd have been quite tempted to save some cash and re-use this cloth. The color of the old cloth is Simonis Green and is of the 860 variety. You're welcome to it if you'd like. Cushion cloth I cannot provide. The table cloth is still on my slate but I suspect over the next month it will be off. :cool:
 
Thank you, seriously, that would help a lot! You bet I'll take you up on that offer!

My cloth is also dark blue green except it's not anything like simonis and pretty much horrible condition. Old thick style heavy slow cloth that's faded, heavily stained, and has a couple tiny cuts and tears, and it looks like somoene fixed a leaky lawnmower on it, but I just wanted to get this table playable for now regardless until I can afford better. I was hoping to at least buy some cheap cloth off ebay and cheap new pockets cause those are about cracked apart but too many bills have been hitting me in the face lately that I wasn't prepapred for to spend a dime on this table now. Better to stay out of collections. Well I did have to buy super glue and two sheets of sandpaper so far, but that's all. Had everything else already.

The rail cloth I have isn't bad at all really aside from pretty heavy fading and one stained end rail but I don't care about that, and the pockets I have will be good enough to get me by if I just tape them up and or glue them or plastic weld them so they don't crack the rest of the way.


I know this all sounds pretty pathetic, but oh well. Sometimes you do what you gotta do. I'm broke, but a lot better off than a lot of people just having both a table and a home to put it in.

Let me know when you can spare that cloth. :thumbup:
 
Last edited:
latest progress report...

I don't have a picture of it yet, but in the interest of continued and informed progress, I managed to strip a 9 ft apron section yesterday, inbetween tomato canning efforts, kids all over the place, and other interuptions. I'm still working on digging out the off-white paint in the grooves (which is more of a creamy yellow). I've been using a precision made antique German carving tool for that effort (i have awesome neighbors!).

What continues to amaze me is the white-ish primer-like coating that seems completely resistent to the stripper agent. This is the last coat before bare wood and has to be sanded. It makes me wonder if this was some sort of pre-stain conditioner that ends up looking white because the layer above it, was a dark brown stain/varnish/or perhaps was indeed paint. Or it really was a primer coat, which means someone took the time to prime over bare wood before painting.

I am struggling with the polishing of the corner casting surrounds... not the surface pieces, but the corner shrouds. They are quite pitted in places and I really don't understand how they got that way in the first place. I had to go with a 40 grit on one of them just to get it somewhat smooth, and it's not done yet.

Anyhoo... I'm hoping to make serious progress on the wood prep over the next 2 weeks as there is a long weekend coming up.
 
Just posting the image of the groove getting its sickening creamy yellow paint chiseled out.
 

Attachments

  • Long apron stripped_chiseling groove.jpg
    Long apron stripped_chiseling groove.jpg
    95.3 KB · Views: 1,762
That pesky primer has been a real pain sanding completely off. There are remnants all down this 9 ft apron. Groove chiseling has taken longer than expected too. I found myself sharpening the chisel about every 10 min.
 

Attachments

  • IMG-20110830-00025.jpg
    IMG-20110830-00025.jpg
    95.6 KB · Views: 1,767
I think it is a primer/sealer that soaks in quite a bit. On my GC even after I had sanded to what I thought was new clean wood all over, a few spots on the legs still didn't take stain like normal because of it and showed a bit of white through the stain. I ultimately could't sand them any more either because I was starting to go through the top layer of plywood. The rest of the solid hardwood parts didn't soak that up as much as that plywood, but still there were a few parts that I had to resand after the first try staining and try again.

I'm suprised you're not just sanding the grooves to level enough that it will just cover with the next round of paint in them. Have you tried maybe some sandpaper on a stick of metal or something? Better yet how about a hardened steel file? I admire your patience on that...

I've made more progress as well. I've spent two days just sanding the top of the slate to get a couple layers of built up bondo and something else green/clear and incredibly hard off them. Turns out someone had busted up the slate where many of the pins were before me, and then glued those pieces of slate back in but they glued them all a bit high. So rather than fix it they then proceeded to build up layers of bondo and some other evil tough coating to try to somewhat smooth out the high spots where they fixed it. Didn't smooth out crap, just made a huge 6-8" wide speedbump on both joints and a mess of the whole bed.

I must have spent 8 hours on that sanding, with still one little area left to go. I even tried chemical stripper on it because of that green/clear layer that was hard as a rock but that did nothing. Only sanding would get it off and sandpaper doesn't last long at all sanding on this brunstone.

I also had to take an angle grinder and then grind down the raised slate repaired areas above the bent pins and then ultimately ground off every single pin since the slate is just too damaged to see them helping anything any more, and didn't want any repaired areas popping back up because of the pins. All the pins no longer aligned properly anyway. Some were bent slightly, some were torn from their sockets in the slate and a bit loose.

Now it's not pin registered slate any more, but at least it's on it's way to being a level playing surface once again and all the damaged areas will mend with bondo now. I tried rolling a few balls on the bare slate to see how even it turned out and was suprised as how good it turned out and how well it rolled. (after spending quite a bit of time going back and forth with leg levelers and slow rolling balls to compensate for just using a carpenters level)

That brunstone is hard as a rock (wink), I was worried I might have screwed up level across the whole surface by sanding it all so agressively with 80 grit wet/dry paper but my sanding didn't hurt it one bit. Balls roll forever and track straight, aside from the repair areas where the pins were I still need to bondo:)

My slate isn't screwed down yet or shimmed, still have to super glue those corners back together. Turns out it's 7 piece slate if you don't count the other 8-9 pieces that came off where many of the pins are. I mean were... Both broken corners were in two big pieces, but they're nice clean breaks that look easy to mend. Almost too clean, like I may have trouble getting super glue to penetrate all the way into those hairline thin cracks.
 
Last edited:
@ Oregonmeds: I didn't expect to be able to salvage these, but I removed the old Simonis from each remaining rail yesterday (I have all but one) taking care not to tear any of them which I will include with the surface cloth. Please PM me with a mailing address because I also started working on the removal of the surface cloth. The staples were really deep though causing a great deal of trouble getting under them. The staples my cousin used were only about 1/8" wide and rounded. I've included a couple of photos here so you can let me know if you still want the cloth. Even if I have to tear the cloth from the small staples, there seems to be plenty of very usable stapling area.

I hope to spy my slate markings this week to check the numbers on it. I also finished digging out the paint from the grooves in both of the long aprons. I have to do a little sanding in the grooves yet, but then they both are ready for finishing. Still debating about the pre-stain conditioner, but I'm seriously considering using it, and will practice on some poplar pieces that Ken sent me (Classic Billiards).
 

Attachments

  • CRW_8853.jpg
    CRW_8853.jpg
    98.2 KB · Views: 1,720
  • CRW_8850.jpg
    CRW_8850.jpg
    52.3 KB · Views: 1,685
  • CRW_8849.jpg
    CRW_8849.jpg
    92.4 KB · Views: 1,702
Last edited:
Yes absolutely, you're a lifesaver.

And the timing is perfect, finally here are some pics to show why...

Just do what you can to prevent rips into the playing area like mine has, any little tears or whatever where it staples or under the rails I can just hit with a shot of super glue so the tears don't spread.

Clearly it's way better than my cloth. And this just shows the main stains and one of the tears, there are a couple tears like that actually, right in the playfield.

If you look close you can see the color the legs turned out, and you can see the feet I polished though they have a layer of sanding dust on them now from all the slate and bondo work lately.
Ignore the trash everywhere else, I have a whole lot of work to do to even make room to play on this table.

I'll pm you my address.
 

Attachments

  • GEDC0085.jpg
    GEDC0085.jpg
    106.5 KB · Views: 1,658
  • GEDC0086.jpg
    GEDC0086.jpg
    101.1 KB · Views: 1,650
  • GEDC0087.gif
    GEDC0087.gif
    92.7 KB · Views: 1,652
Last edited:
And finally I can show some of the work I've been doing. Here are those two main slate repair areas, one front and backside, and one just the front. They look absolutely awful I know, but they're as perfectly level as I could possibly get them with limited tools and smooth as glass. Slow rolling balls all over them with no cloth shows no flaws, the balls don't stop or roll off in wrong directions. It took more than a couple tries with coats of bondo and sanding to get it that flat so it looks a bit worse and more uneven than it probably should or would have been had I not had to sand and grind and redo it so many times...

Would have been a whole lot easier if I had any experience working with bondo before, but this is my first time with the stuff so I made a few mistakes. Under the bondo is a whole lot of super glue applied from both sides until all the cracks soaked up all they would take. I used 24 grams of super glue total on these repairs, plus going over any other potential places the slate could crack in the future around many of the bolt holes where it had little chips and dings. Filled with layers of super glue and baking soda, then bondo on top.

One corner I glued and repaired as it was, as it soaked up plenty of super glue and I could tell it had a good bond. The other corner I had to grind deep into the top and bottom to make a channel to take more glue and bondo because it just wouldn't accept enough glue, just wasn't soaking into the crack well like the other one. I'd be pretty damn suprised if either breaks again now though, that bondo is seriously stronger and a whole lot harder than I had ever imagined it would be. Seems like it would be harder to break the bondo than it would be to break the slate in a new area.

I wish there was a paint I could go over it all with so it didn't look so awful, but I imagine there isn't anything that wouldn't dent, chip, crack, or peel off. It's a good thing it'll all be covered with cloth.

I also wish I had some longboard type sander to resurface the whole thing, rather than just a palm sander...
 

Attachments

  • GEDC0083.jpg
    GEDC0083.jpg
    98.1 KB · Views: 750
  • GEDC0088.jpg
    GEDC0088.jpg
    98.3 KB · Views: 772
  • GEDC0089.jpg
    GEDC0089.jpg
    97.7 KB · Views: 764
Last edited:
Those are some serious slate cracks but looks like you got them well taken care of. The thrill of the unknown and the agony of possibly doing something 'wrong' is all part of this great adventure we call pool table restoration. It's like going on a bear hunt... "we're not scared!" (yes, I have kids.)
 
Cloth woes...

Looks like someone put a leaky can of oil on that table... jeepers! Yeah, the cloth I'm sending is quite clean comparatively. Wish i had salvaged that first rail cloth for ya though... and who knows if you'd even be able to re-use them on your GC cushions, but they were removed with great care and remain in great shape.
 
No problem as you see I have plenty of similarly colored cloth with varying degrees of fading I'll be able to cut from the bed cloth I have, so even if I don't already have a rail that matches I can probably make up one.

It's worse than just one spot. Like I said it kind of looks like someone fixed a leaky lawnmower on it. The rail I pulled my cloth from to try and wash a piece was coated with oil, oil seeped into the trim edge, oil in the counters, oil on the rubber... Everything came clean but stains in the slate and cloth though.

Speaking of which, I've only removed the cloth from one rail myself and couldn't get the feather strip out without it breaking. Did you find a way, or are you just replacing all the feather strips?
 
Last edited:
the feather strips on mine were quite fragile... some came out clean, others fractured easily. I used a small flat head and wedged between the cushion and feather strip near one of the staples in the middle, pryed up and worked my way down to one end, then the rest lifted out easily. Other strips fractured immediately. New would be far better. The table mechanic who will work on the rail cushions would certainly have feather strips with him.
 
Back
Top