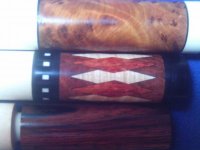
any interest in stand alone inlay machines at $1000

for those who have some interest in this , here is what i can tell you !

the depth of cut and perpendicularness of the pocket seems to work great

the test pocket is as clean as the template was ,,, So i will now have

a good template made to test its potential


THAT BEING SAID : i have 12 butts hanging since last winter that i intend

to finish over the next two months and use to fully test out the machines

capabilities and limitations

Finishing these cues are my first priority and it should allow me to refine

things before i fully deside to make any of these ....BUT so far

it seems like it is going to work fine
 
I have to totally honest with you and I hope you don't think I am being a d ick to you.

For $1000 I wouldn't buy it from what I have seen. I would spend the extra $700 and buy a tried and true panto from Chris or the one that works with the Deluxe for a bit less.

Used Pantos come up quite frequently, like the one Ryan had for sale not long ago for $1200. That one came with quite a few patterns.

I seriously admire anyone that is smart enuff to build their own equipment and jigs etc.
And good for you if it works for what you need from it.
Just not worth 1K to me.
 
Last edited:
More Pictures
 

Attachments

  • ringtemplate8.JPG
    ringtemplate8.JPG
    99.8 KB · Views: 566
  • ringtemplate6.JPG
    ringtemplate6.JPG
    79.6 KB · Views: 445
  • tplate5.JPG
    tplate5.JPG
    69.9 KB · Views: 457
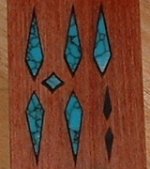
  • turqblackinlay9.JPG
    turqblackinlay9.JPG
    19.7 KB · Views: 439
Blue hog rdr i honestly agree with you . and take your post constructively

But i plan on having quite a few template to go with it if i do proceed

so if you take that into account your looking at about a $650 machine

and unlike some i would never take a nickle for a deposit till im positive its

100 % reliable

THIS IS MORE GEARED TOWARD THE GUY THAT JUST CANT PONY UP THE MONEY, 2 GRAND + TO HAVE A INLAY MACHINE AND A LOT OF PATTERNS

and i was/am truly not trying get any orders just seeing if there would
be some interest if it deems itself a good option
 
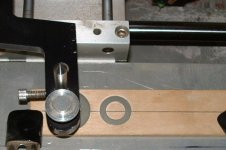
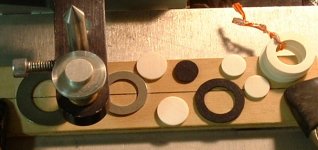
The easiest is probably the picture of the ring template, It allows you to cut rings very easily from flat stock if need be. As You can see in the picture I simply glued a couple of rings down to a strip of birch. It's easy enough to to cut the rings to size just By using a endmill and stylus of the same diameter. You can see the circles, those are middles of the ivory rings, and even those can be used on the ends of joint caps.

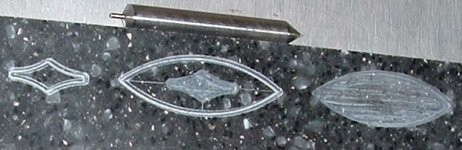
As far as finding patterns they may be all around you if you look hard enough for them. Like for example The round oval in one of the pics with the diamond. I got that one from a fancy shampoo bottle top or something like that. I just cut a slice of it off, glued It to a piece of scrap. and used a stylus while holding It tight against the edge as I cut a V-groove for It on another piece of stock. eventually it found It's way into the Corian template that was pictured, that also lets me inlay the diamond in the middle of it. You can get a lot of patterns just by gluing things to a piece of scrap like that. I've used old hack saw blades, washers, and coins pieced into patterns and glued down also. You can try scribing patterns into plexi, but I was never very good at that method, and haven't had much luck with it. You can also pull patterns from drafting stencils if You find any that you like. Some of them have several sizes of various shapes. That may be a good way to get ovals. I've seen some that looked like they would work well.

If you want to play around with making plates then a lot of It is just learning from practice, although I would be prepared to turn your styluses to size on Your lathe, and have several different diameter end mills to play with. That Corian plate was an experiment. Most of the premade plates I had seen did not allow for inlays inside of inlays while still in the flat. Most require you to first inlay one pattern into the cue, turn it down then reset it in the panto requiring realignment of everything, and then cut the smaller inlay inside, hoping that It was lined up perfectly. Everything I need for those 2 shapes are on that plate, I can do the oval, the diamond, or the oval with the diamond inside as pictured before going into the cue with it.

Oh another thing when you get a pattern that works I recommend keeping a log book of stylus and endmill sizes that you used. I like to draw a little picture of the inlay with arrows that point to both the male and female parts and what sizes I used on each to get a tight fit. it makes It easier when you have not used It in a while and are coming back to it again.

For right now though, I recommend just keeping It simple with the single solid shapes. Teach Yourself to fit those properly before moving on the advanced stuff because that basic knowledge will help you along the way.

It looks like You have a Hightower plate from the picture of your pocket. I only have one of his but that shape is on It. The floating points in the one picture are from the same plate.
 
Greg thanks for the great ideas

love to hear from someone like myself who will look for the one way he can do something instead of the 9 reasons he cant . im going to raid the linen and medicine cabinet looking for shapes lol

as for the template i cut a hole in a thin slab of wood covered the bottom
with duct tape places a male part made of balsa wood in the middle then
coated with bondo after it dried i chipped out the balsa wood
does that make me a redneck lol ?

gonna call jeff at prathers monday to get some good ones
 
Greg thanks for the great ideas

love to hear from someone like myself who will look for the one way he can do something instead of the 9 reasons he cant . im going to raid the linen and medicine cabinet looking for shapes lol

as for the template i cut a hole in a thin slab of wood covered the bottom
with duct tape places a male part made of balsa wood in the middle then
coated with bondo after it dried i chipped out the balsa wood
does that make me a redneck lol ?


gonna call jeff at prathers monday to get some good ones


That shows that You were putting some thought into it, and that's what it takes, that and a lot of patience. You could coat the sides of the male part with something slick to make It easier to remove after molding It.

Now that I think about it, it wasn't a shampoo bottle I'm pretty sure it was a perfume or cologne bottle that I got the top from. I actually got 2 different shapes from it due to the way It was made.

I would get at least one good known working template if I were you, Then after getting good at fitting parts with that, you'll know what to expect from your own plates, and the knowledge from that will serve you well when attempting to make them work.

Oh yeah practice on scrap before inlaying into a cue, I do that every time before I start inlaying cue, even with a known working setup, just to be on the safe side, but I especially do It when trying out knew plates or designs. Sometimes I use those scraps to make a plate with a larger or reduced size of the same shape, so It's also a good idea to save them.
 
The easiest is probably the picture of the ring template, It allows you to cut rings very easily from flat stock if need be. As You can see in the picture I simply glued a couple of rings down to a strip of birch. It's easy enough to to cut the rings to size just By using a endmill and stylus of the same diameter. You can see the circles, those are middles of the ivory rings, and even those can be used on the ends of joint caps.

-----

Greg, what you wrote reminded me of when I used a Deckel copy diesinking mill . There was a book with different styli and cutters to get the sizes that were required.
As is as 3d, the ball shape of the cutter and stylis effected the outcome.Also had other pantograph machines that had adjustable ratio's in the x and y plane. This was to compensate for differential shrinkage in a moulding.Hence having a single lip cutter grinder or D bit grinder became invaluable.

For the OP.
Great that you are researching the market before plowing in head 1st.
I am sure you are aware of tuning the sizes with stylis to cutter ratio etc.
Some important aspects is rigidity of the setup,the piece being cut, and securing the template. Of course there will always be the ability of the person setting up and using the setup as well.
The little things that make a decent copy/panto is how concentric the stylis is to the cl of the holder, along with the snugness of the bearing/bushed arm/arms. I like panto's with scaling , but are alot more involved in their manufacture.
 
The easiest is probably the picture of the ring template, It allows you to cut rings very easily from flat stock if need be. As You can see in the picture I simply glued a couple of rings down to a strip of birch. It's easy enough to to cut the rings to size just By using a endmill and stylus of the same diameter. You can see the circles, those are middles of the ivory rings, and even those can be used on the ends of joint caps.

-----

Greg, what you wrote reminded me of when I used a Deckel copy diesinking mill . There was a book with different styli and cutters to get the sizes that were required.
As is as 3d, the ball shape of the cutter and stylis effected the outcome.Also had other pantograph machines that had adjustable ratio's in the x and y plane. This was to compensate for differential shrinkage in a moulding.Hence having a single lip cutter grinder or D bit grinder became invaluable.


For the OP.
Great that you are researching the market before plowing in head 1st.
I am sure you are aware of tuning the sizes with stylis to cutter ratio etc.
Some important aspects is rigidity of the setup,the piece being cut, and securing the template. Of course there will always be the ability of the person setting up and using the setup as well.
The little things that make a decent copy/panto is how concentric the stylis is to the cl of the holder, along with the snugness of the bearing/bushed arm/arms. I like panto's with scaling , but are alot more involved in their manufacture.

It's similar to a copying mill, I mean, I suppose in reality It is, but the z keeps It pretty much fixed other then being able to manually change the depth, so It's not setup for 3D. I can think of a few ways It may could be modified for it, although changing the ratio I'm not sure how to go about something like that.

Mine differs quite a bit from the OP's machine, although some of the principles are the same.

I have seen units very similar to his being used By wood carvers to rough out 3D sculptures. Please pardon the expression, but kind of a poor man's rendition of a copy machine if you will. Some of the uses were roughing out things like gun stocks, or duck decoys, pretty much any 3d shape that a carver may want to duplicate. they usually just serve to get the material to a basic shape and then the rest of the work is often done by hand. It just saves them from a lot of prep work drawing lines and cutting chunks of waste away. Most of them work on the same basic principles. I have seen nicer looking commercial versions of the machines that are geared toward the carving industry as well. Here's one example- http://www.youtube.com/watch?v=o7OH-Q2Vl6Y&feature=related. Here's a version that does 2 at a time- http://www.youtube.com/watch?v=mqUtlIP81rI&feature=related those 2 seem to do a pretty nice job, not as rough as some I have seen. I think most of Your die mills or copiers used for making molds would be a little more involved & precise type of machinery. The principles are similar though. Of coarse now days with CNC a lot of these machines are becoming obsolete except to a small percentage of the hobbyists perhaps.

Here's an an example of one of the low cost homemade guitar inlay machines that I mentioned in a previous post. http://www.youtube.com/watch?v=0Qad45qXc3Y

Your are correct about the stylus being concentric, the smallest differences can make a big difference. Also about the tuning on the stylus with the bit, as well as the template for that matter. I could remake a plate several times before I get one that I'm happy with. There have been some cases where due to the type of shape It wasn't even worth the effort because getting a working design would be near impossible with a 1 to 1 machine. Also as can be seen Mine works with a dremel as well as several commercially available models. With a dremel you really want to keep an eye out for run out at the bit. I use a keyless chuck in Mine, so I may have to re chuck several times until I get It close enough for My Liking. otherwise It will effect the size and fit of your parts.

I would recommend buying one like Chris sells to anyone thinking of doing It, Mainly because he already has many of the hurdles one may come across already worked out in his machine. Doing It now, knowing what I have learned, it would be much easier, but at the time I started, even with a basic idea of a design to go on It still took me much time, effort, experimentation, and tuning to get it up to speed. It works for me, but There are still several upgrades I would like to do. Upgrading the spindle is one of them. It gets Me by though.

Oh one other recommendation for the OP always mark the orientation of your male parts, so that you can easily put them in the female part the correct way, and not reverse them. Although they may look perfectly dimensioned, very rarely will a hand made template be exact. Since a CNC tool-path is made from a drawing I would imagine some of those may be reliant on the drawing Itself, Therefore theoretically could be subject to a similar situation in some cases. not all mind you , but some. Eitherway better safe then sorry.

 
Last edited:
the machine is coming alone nicely for anyone potentially interested in one
here is a pic of a butt inlayed with the first prototype
 
trent for some reason its not letting me attach the image

im from the middle of nowhere but in between canton and stubenville

CLICK ON MY USER NAME ITS THE BURL BUTT SLEEVE WITH CURLY MAPLE AND BLOODWOOD DIAMONDS IN MY ALBUM
 
Last edited:
Back
Top