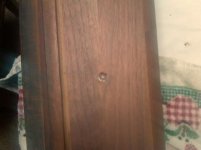
Here's how the ol' steam bent bridge holder turned out. I've seen other restorations where it blended in with the table much better. It has Watco Danish Oil (light walnut) and a single coat of Minwax satin rub-on poly. I didn't want to sand the veneer completely off.
You are using an out of date browser. It may not display this or other websites correctly.
You should upgrade or use an alternative browser.
You should upgrade or use an alternative browser.
Restoring '46 Brunswick Anniversary - Castings Concern
- Thread starter goldcrown4
- Start date
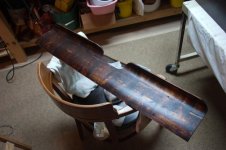
goldcrown4 said:Here's how the ol' steam bent bridge holder turned out. I've seen other restorations where it blended in with the table much better. It has Watco Danish Oil (light walnut) and a single coat of Minwax satin rub-on poly. I didn't want to sand the veneer completely off.
Thought I'd add that I did apply multiple coatings of stripper that had almost zero effect at getting the dark stain color out of this. That is why it is still dark, and darker than I wanted, but it won't be easily seen.
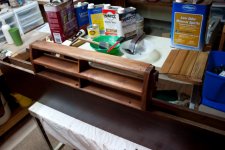
Walnut ball rack
Here's the freshly coated walnut ball storage unit (ball return bin has been removed) sitting on the stretcher. This storage unit has only one coat of Watco Danish Oil (Light Walnut flavor). Ran out of time, but will be applying another coat or two yet before deciding on the top coat - rub on poly, or Watco's finishing wax. I have to work more oil into the grain as evidenced by the light colored specs in the grain.
Speaking of the stretcher, it occurred to me that, since it had not been painted like the rest of the table, its finish color must have been close to the original stain color of the rest of the table, which tells me the table may have had a touch of mahogany stain due to its ruddy hue.
Attachments
In case anyone was wondering about the poplar cut-off sample, I have two types of finishes on it just to compare to the genuine walnut that the rest of the table is intended to match. First, the whole thing was coated with pre-stain conditioner (Varathane), then the two left side strips were coated with Dark Walnut Danish Oil, and the two right side strips were stained with Cabot's Antique Walnut. I don't have the match I'm looking for just yet. Overall I think the Antique Walnut stain would have been just fine for the whole table, but I'm kinda hooked on the Danish stuff.
Attachments
perfectpocketz
Banned
When I was still shooting in 8-ball leagues at a place in Herndon VA (Breaker's Billiards, "In the Clock Tower!"), they had all Connolly Ultimates, 6 legged Chiricahua model with 2 inch slate - all 9 footers of course. Connelly boasted of 5 bolts per rail. I believe the claim was, other things being equal, the tighter the rail is to the slate, the better/faster the ball is off the cushion. When you mention changing the floating nut plate on GC's, would that impact performance in like manner?
Also, I've been notified I can finally start donating plasma again (tomorrow), so I'll have to see how fast i can bank some more restoration money and make a decision as to whether or not to have the subrails extended sooner rather than later. I wonder what all that weight would cost to ship. Walnut is heavy.
I truly believe changing the floating nut plate to the inserts....makes the table play solid...the only real reason I change them....is when I put a new sub-rail on the rails.
I have just finished the 10' snooker table that Earl and Shane played on in Ohio....maybe the worst table I've ever repaired.
Trust me..a lot of work turning a snooker table in to a pool table.
Complete new sub-rails....Artemis cushions....4-1/2" corners.
I changed the 8-ball plate...and installed the diamond inserts....now those table need the insert for sure.....all the screws in the 8-ball plate pull out of the rail when you lock the rails down....they won't hold the rail down solid.
I don't know off hand how much to ship the rails to Atlanta...with all the hard work your putting in to your table.....well I'm going to work with you the best I can....call me when you're ready to get them done....you'll be happier if you get the table completely done.
I don't know how far you want to go with the rails...new sub-rails...change the 8-ball plate.....better to refinish after the rails are done.
Good luck with the table...looks good so far.:thumbup:
A little tidbit about Anniversary history
Sometimes I get on EBay just to see what antique Brunswicks are out there for sale. Today i found a nicely restored Anniversary, seller claiming it as a 1945 model, but IMO, the photos do not reveal enough to see if a stretcher is or isn't there. Most interesting is some historical information included in the ad as to its design origin:
"Donald Deskey, in his diverse career, designed famous projects such as The Radio City Music Hall, Tide Soap Logo, Crest tooth paste Logo, etc. In the 1940's the Brunswick Company commissioned him to design this table celebrating the 100th year anniversary of the company's founding. This table was produced in 1945, Brunswick's 100th year, and is named "The Anniversary". Solid Walnut with polished aluminum trim."
Reference: http://www.ebay.com/itm/Brunswick-A...495?pt=LH_DefaultDomain_0&hash=item3f0edfb8bf
"Donald Deskey.....In the 1940's the Brunswick Company commissioned him to design this table celebrating the 100th year anniversary of the company's founding.....
Although Deskey did design tables for Brunswick, both the Anniversary and Centennial models were designed by the same two men: Robert I. Anderson and Bert Hoeker of Grand Haven and Muskegon, Michigan respectively.
http://forums.azbilliards.com/showthread.php?t=201179
I should have known better to consult w/mr bond first before posting an historical "fact". Thanks mr B!.
I should have known better to consult w/mr bond first before posting an historical "fact". Thanks mr B!.
it usually won't get you carloads of hot women, but being a history geek does have its moments

Not to be off subject' but....hey mr bee' do you know who drew brunswicks blueprints in about there GC1 era?
-
Rob.M
sorry but no i dont... at least not at the moment anyway.
they did have 'in house' draftsmen and engineers for spec work, and a few artists in the marketing dept, but many times things like that were also outsourced to printing companies ie catalogs, brochures etc.
No pics today, but my stretcher is getting re-veneered this week and I'll have it finished by next weekend. Thank the Good Lord Green Bay has a bye-week coming up.
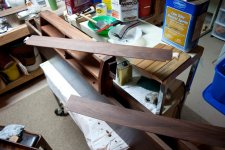
And I've *finally* started putting the finish on the apron pieces. After the first two Danish Oil coats have been applied, I'm employing the wet-sanding technique for subsequent coats, soaking 400 grit wet/dry sandpaper in the oil and rubbing the slurry into the poplar and letting it sit for a bit before wiping off. Very very smooth, and though I like the color, I'm wondering how many coats of this will be necessary to get close enough to the color of the finished walnut. At this point I've been using the finished ball storage rack to compare against the poplar aprons. The storage rack has the natural, uncolored Danish oil on it, as well as 3 coats of rub-on satin poly. (I'll be building a triangle storage rack to mount under that a little later.)
I'm going to re-attempt the dreaded aluminum castings again this weekend too in between coats of oil or poly.:groucho:
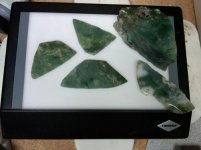
My new aluminum connector plates for the oval leg bandings have been cut. I have to polish them up and put the 1/8" side bevels on them, but they are 2" wide instead of the original 1 1/2". :grin: I've also managed to get several slabs of my green moss agate cut for the site replacements in the rails. Have to check on the stretcher veneer progress. Didn't get to my castings last week at all. 
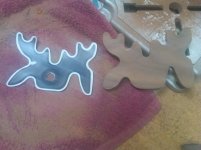
A little side-project I've been also working on is a moosehead-style bridge made of walnut. I never liked the cheap metal bridges and I figure might as well make it out of walnut to match everything else. I'll post photos when it's finished. I started with a 5" x 4" x 1/2" piece, sanded it down to 3/8ths, traced the moosehead style bridge (one could do just about any design they feel is effective) then used a bandsaw to get the basic cut-out, followed with small 13mm and larger drum sanding bits attached to my Dremel which is mounted in the Dremel Drill Press accessory.
A little side-project I've been also working on is a moosehead-style bridge made of walnut. I never liked the cheap metal bridges and I figure might as well make it out of walnut to match everything else. I'll post photos when it's finished. I started with a 5" x 4" x 1/2" piece, sanded it down to 3/8ths, traced the moosehead style bridge (one could do just about any design they feel is effective) then used a bandsaw to get the basic cut-out, followed with small 13mm and larger drum sanding bits attached to my Dremel which is mounted in the Dremel Drill Press accessory.
that Side Project I mentioned (Walnut "Moosehead" Bridge)
It's still a work-in-progress... I need to continue sanding the arc'ed grooves for the cue rests, and finish of course.
Also included here is the dirty deed... a prestine walnut rail with a missing site that I carefully removed (that's still a WIP too... hole is not cleaned out, and not at the right depth, and there is no hole for light under it yet.
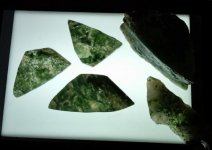
Last, a glimpse of the moss agate slabs... two images, one with no flash, and shop lights on (6500K daylight bulbs) and one image with no flash, lights off, but lit from under.
It's still a work-in-progress... I need to continue sanding the arc'ed grooves for the cue rests, and finish of course.
Also included here is the dirty deed... a prestine walnut rail with a missing site that I carefully removed (that's still a WIP too... hole is not cleaned out, and not at the right depth, and there is no hole for light under it yet.
Last, a glimpse of the moss agate slabs... two images, one with no flash, and shop lights on (6500K daylight bulbs) and one image with no flash, lights off, but lit from under.
Attachments
You're one of only two people that i've ever known to want "lit" diamonds...
how do you plan on lighting them? (or did u mention that already)
a friend of mine installed a pretty sweet set up using little white LEDs (underneath MOP) that were run off of one 9v battery per rail. the wiring was a somewhat tricky, but the end result was pretty darn cool.
i tried to talk him into using something with a little more chatoyance, such as 'tiger's eye', but he didnt have the means to slice it properly.
You're one of only two people that i've ever known to want "lit" diamonds...
how do you plan on lighting them? (or did u mention that already)
Initially I wanted to do the lighting with optical fiber strands until I started pricing the components. Instead, I'll be using the same method as your friend, ordinary battery powered Christmas LED strings. This may require me to mask the bulbs I don't want lit, but before masking, I'll see if I actually like the illumination from under the table that would otherwise result. For battery powered LED strings, I don't think I can just pull the bulbs that I don't want lit and expect those under the diamonds to remain lit.
a friend of mine installed a pretty sweet set up using little white LEDs (underneath MOP) that were run off of one 9v battery per rail. the wiring was a somewhat tricky, but the end result was pretty darn cool.
i tried to talk him into using something with a little more chatoyance, such as 'tiger's eye', but he didnt have the means to slice it properly.
In this case, the problem with tiger's eye (brown, blue, red doesn't really matter which one... none are translucent but rather opaque. That's not to say that the color itself (especially the brown/gold version) wouldnt' be gorgeous, but it just can't be illuminated effectively. In my opinion however, its natural chatoyance could very well be refractive enough to see with the billiard light for aiming purposes without the need to light it up from under. Hmmmmm..... Walnut rails & Tiger's Eye... vs Simonis Green & Green Moss Agate... it's not too late to change my mind. DANG IT MR. BOND !!!
Of course, the "DANG IT MR. BOND!" remark was intended in good humor due to what I already went thru to get the slabs of India Moss Agate cut (it wasn't Montana Moss Agate). I actually think the natural chatoyance of Tiger's Eye could be really super cool, as long as the gold glimmer portions are carefully cut out and chosen for the site placement. Would save the trouble of lighting it from under.
One thing I'm at odds with are some of the center sites... they are directly underneath a figure-8 nut plate! Which means I'd have to drill a small hole thru them... which isn't too much of a big deal because there are no screws where the drilled hole would be. Question is, do I want to mess these original nut-plates up. If I go with Tiger's Eye, I wouldn't have to drill any holes.
One thing I'm at odds with are some of the center sites... they are directly underneath a figure-8 nut plate! Which means I'd have to drill a small hole thru them... which isn't too much of a big deal because there are no screws where the drilled hole would be. Question is, do I want to mess these original nut-plates up. If I go with Tiger's Eye, I wouldn't have to drill any holes.
LOL DANGIT BACK AT YA !! now you got me thinking about installing little dome shaped tiger eyes...that might be nice.
as far as the xmas light strands are concerned...hmmm i dont know.
running two (very) thin wires to a single LED isnt that tough. just visit your local radio shack
as far as the xmas light strands are concerned...hmmm i dont know.
running two (very) thin wires to a single LED isnt that tough. just visit your local radio shack
LOL DANGIT BACK AT YA !! now you got me thinking about installing little dome shaped tiger eyes...that might be nice.
as far as the xmas light strands are concerned...hmmm i dont know. running two (very) thin wires to a single LED isnt that tough. just visit your local radio shack
I believe Tiger's Eye is a 7 on MOH's hardness scale... so it should be durable even as a dome, and as a dome, much more visible when shooting.
I saw 10 ft strands of white LED lights at Lowes for like $10.00 ... would rigging something up from Radio Shack be even cheaper? More or less durable?