Restoring '46 Brunswick Anniversary - Castings Concern

Apron finally poly'ed...

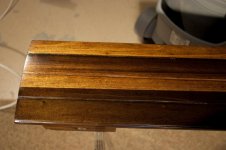
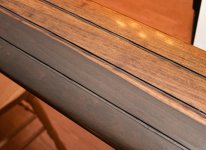
Originally I planned to go with Watco's Finishing Wax for the poplar aprons, and satin Minwax rub-on polyurethane for the walnut rails. After too much deliberation, I know the wax will not hold up nearly as well with leaning players, and jean scuffs (not to mention two young boys in the house and all those dang light sabres everywhere), so after 1 coat of poly, I think they're looking good. Between each coat I will lightly sand with 600 grit.

*** Does anyone think I should stop at 3 coats of poly? ***
 

Attachments

  • Poly Coat 1b.jpg
    Poly Coat 1b.jpg
    83.5 KB · Views: 696
  • Poly Coat 1c.jpg
    Poly Coat 1c.jpg
    91.7 KB · Views: 696
  • Poly Coat 1d.jpg
    Poly Coat 1d.jpg
    60.9 KB · Views: 687
Got all 17 aiming sights (moss agates) dopped and shaped to the proper diameter last night. I have not worked on the Tiger's Eye versions... still waiting on rough material. Another coat of polyurethane has been applied to all aprons.

The rest of the weekend's opportunities will consist of polishing the agates and maybe start finishing the rails, but I'm thinking I should wait until either the sights are done and/or the cushions have been dealt with as in, replaced and covered. Some feel it is best to leave the rails until after the cushion work is done in case accidental nicks and scratches occur (but I know the best mechanix would never let that happen.)

Still have some veneering to do on the stretcher and oval legs, and finally, polishing the castings and banding. Jeepers... all before Christmas??? I'm hopeful.
 
Happy Dance!

Well, I've been surprised by my wife in the past, but not quite to this degree. I've been given the go-ahead to get my rails done right. I'm enlisting Jack Zimmerman's expertise, going with Artemis Intercontinental rubber, and 4 1/2" pockets. I will be making every effort to get the rails properly protected, packaged and shipped this week. :thumbup:

And on top of this, I've been given a contact here in my hometown to take a look at these annoying castings (he has commercial quality metal magic machines! AND he's retired! That means he needs something to do... and wouldn't ya know it... he knows just about everyone in my family.

You hit the Jackpot.
 
You hit the Jackpot.

Last night I dropped off all but two of the castings. To test his machine, he immediately worked on the one I did an ok job on... in about 5 minutes, he had it looking like chrome! This guy worked on Mercury Marine props a good part of his life and knows what he's doing. Industrial strength machine shop... neat, organized, clean. He has to do some sanding on the shroud castings, but the pocket castings will buff out fairly quickly. About two weeks, I'll have them back.

I also boxed up the rails... not a task for the weak at heart. Those will get shipped today or tomorrow at the latest.
 
Black Grooves for Anniversary Aprons

Rails arrived to JZ's... can't wait for their return. :thumbup:

I got a few things done this weekend. I managed to get the grooves painted in the aprons. As stated earlier in the thread, I wanted them black. Went to Hobby Lobby, got some good advice I used a special "Aquash" water brush. It had a fillable container that I poured India Rapidograph Ulniversal ink into. It took a couple of passes because of the waterproofing qualities of the poly under it.

I'm interested in viewer's subjective opinions. White is nice like most restorations/refurbish efforts, but I really like the black. It will look good with the black pockets due to arrive Wed. They aren't the leather ones from Ken at Classic as those will have to wait for greener days (maybe the Spring).
 

Attachments

  • Black grooves4.jpg
    Black grooves4.jpg
    94 KB · Views: 709
  • Black grooves5c.jpg
    Black grooves5c.jpg
    88.8 KB · Views: 718
  • Art supplies used for groove painting.jpg
    Art supplies used for groove painting.jpg
    95.9 KB · Views: 726
Latest progress report...

It's kinda funny how I started this thread about the trouble I had polishing the castings. If everything else was done, it would be fitting to end the restoration part of the thread with pics of them. But here is what the right tools can do for a DIY'er... finding someone with said tools is the decision I wished I had made much earlier.

Though a professional was used for the castings, I attacked the bandings on the oval legs myself. Electric sanders were only doing a good job cleaning them up, but fell short of the desired reflection. I used a tapered buffing bit attached to my Dewalt drill and with good ol' fashioned elbow grease, I'm very pleased with how they're turning out. It took me about 2 hours to get one side of one oval banding shiny enough to see who was working on them. :wink:
 

Attachments

  • CRW_9275.jpg
    CRW_9275.jpg
    75.5 KB · Views: 694
  • CRW_9277.jpg
    CRW_9277.jpg
    101.1 KB · Views: 692
  • CRW_9268.jpg
    CRW_9268.jpg
    86.2 KB · Views: 692
  • CRW_9267.jpg
    CRW_9267.jpg
    91.7 KB · Views: 685
Anniversary

The grooves on my Anniversary are black as well. I didn't change them-they were that way when I got it-but I've always thought the dark color made the table look 'richer'. I've never been crazy about the white lines.
 
The grooves on my Anniversary are black as well. I didn't change them-they were that way when I got it-but I've always thought the dark color made the table look 'richer'. I've never been crazy about the white lines.

I'm glad someone else out there likes the black grooves as much as I do. It may be quite rare to see the Anni aprons this way, but should have been an option. Don't get me wrong, I love the white lines in all the restorations I've seen online, but really like the black grooves. Hopefully I can make those black pockets work.
 
Polishing the leg bands

Hi there,
I'm doing some work on an Anniversary I recently purchased. Your thread is very timely for me. Thanks for your postings.
My leg bandings need some work too, so I'm wondering what polish you're using. It sounds like you've sanded them some with a RO sander to clean them up and have now moved on to polish. I'm also curious what grits you worked your way through in the sanding. Also, did you mask the veneer with tape or something more substantial?
 
Last edited:
Hi there,
I'm doing some work on an Anniversary I recently purchased. Your thread is very timely for me. Thanks for your postings.
My leg bandings need some work too, so I'm wondering what polish you're using. It sounds like you've sanded them some with a RO sander to clean them up and have now moved on to polish. I'm also curious what grits you worked your way through in the sanding. Also, did you mask the veneer with tape or something more substantial?

You may wish to start a new thread to log your Anni's restoration progress. I'd love to see how your project goes, and what kind of condition it is in as you're getting started. I like the idea that you're pursuiting the ovals first. I wish I had because it's a show-stopper if those aren't done when everything else is. It is important to leave them on the ovals while polishing, but can be removed if you have to do any reveneering, but wait until they're polished. If you removed them, you'll need to fabricate new connecting plates because the old ones will get all bent up while trying to extract the nails.

Consider wearing old clothes or a smock of sorts. The black junk from the white rouge that develops gets thrown about. I wore eye protection, and a mask to keep from inhaling the dust.

After all the grits I've been thru, they weren't worth the effort compared to the process I described above using the buffing/polishing bit and white rouge. Sanding at 220 grit is all that is really necessary to clean up any corrosion, dirt, minor scratches, etc. The keys seam to be maintaining the right amount of persistent pressure and slow movement, while managing the drill's RPMs. I was putting more rouge on the bit about every 10 - 15 minutes. A smeary like black flm will be present in places at unexpected times. Don't worry about it. Just apply pressure with the bit and it will come off and polish up. You will also find that the aluminum will prefer a certain direction of the spinning bit. I found that the spin direction produced better results when perpendicular to the grain of the banding. I bought that tapered bit at Harbour Freight. I think it was $6. The white rouge came with another buffing polishing kit for a drill but that stuff is readily available. It takes more time than most probably have patience for but just know it can be done. I can't do anything about the ball dings, but at least those are shiny now! Someone might have suggestions for the ball dings.

Good luck and please post your progress.
 
Last edited:
The polished pocket hardware looks good.

Will the shine stay? Is a clear sealer needed to prevent re-oxidizing later?

Sorry, if this has been already discussed.

Great job on this project.
 
Hi there,
I'm doing some work on an Anniversary I recently purchased. Your thread is very timely for me. Thanks for your postings.
My leg bandings need some work too, so I'm wondering what polish you're using. It sounds like you've sanded them some with a RO sander to clean them up and have now moved on to polish. I'm also curious what grits you worked your way through in the sanding. Also, did you mask the veneer with tape or something more substantial?

I forgot to address one of your questions. The only reason I did not mask the oval leg veneer is because I plan to replace it. You probably see some grayish marks where the buffing bit got away from me along that beveled edge. I haven't tried this yet, but I plan to use my Dremel polishing bits to attack the bevel. It's just the right size. I just hope the polish will be effective at the weaker torque the Dremel produces. In other words, one can't push down as hard using a Dremel, but theoretically should still do a nice job.
 
The polished pocket hardware looks good.

Will the shine stay? Is a clear sealer needed to prevent re-oxidizing later? Sorry, if this has been already discussed. Great job on this project.

Thanks for the kind comments. It has certainly been a labor of love... since JULY!!! Doesn't look like I'll be able to play on it until after Christmas... the patience part is killing me.

I've been advised to spray a lacquer onto the castings. The advice was given me by the guy who polished them. At first he said to use McGuires carnauba wax to prevent the oxidation. I believe any carnauba wax will be sufficient. As for a spray lacquer, I don't know... I'm sure he's right, but I would expect it to easily run, or be difficult to apply evenly. I presume the lighter the coats the better... and how many??? I'll be talking it over with him later this week.
 
Thanks for filling me in.
I'd be inclined to use paste wax on the castings and not lacquer.
I stopped by a metal polishing shop near me. The owner was very generous and gave me his thoughts on how to proceed on the banding. Mother's aluminum polish and a rag. He cautioned me on too high a polish, thinking that would telegraph the dings and imperfections. He also cautioned me on trying to hammer out the dings, saying it would likely look worse. I'm skeptical on the last point, but he's been in the business for a lot longer than I have. We applied some Mother's polish and it brought the area to a good shine pretty quickly, however not as fine as yours . Judging from your pictures, I'd say our pedestal trims started in about the same condition. I'm feeling lucky, in that my castings are in great shape and only need a little polish.
 
Thanks for filling me in.
... We applied some Mother's polish and it brought the area to a good shine pretty quickly, however not as fine as yours . Judging from your pictures, I'd say our pedestal trims started in about the same condition. I'm feeling lucky, in that my castings are in great shape and only need a little polish.

Hopefully your castings will polish up nicely. Keep in mind that most off-the-shelf automotive aluminum polish (I have the Mother's type too) will say in fine print that it is not to be used on anodized surfaces. The old Brunswick literature will state that these castings are anodized. It hardens them for protection. I had to de-anodize them first. My thread here shows the before and after pretty well. Let me know how it works out if you proceed without de-anodizing.
 
Anniversary Project

Great project, keep up the great work.

Make sure when you assemble the aprons and corner castings you don't crack the aluminum casting tabs. There may be a gap between the casting tab and the apron bracket, I would suggest using a washer to fill the gap.

Good Luck,

Joe
Annv. Apron mounting tab.jpg

Annv. Corner Casting mounting tab.jpg
 
Back
Top