Restoring '46 Brunswick Anniversary - Castings Concern

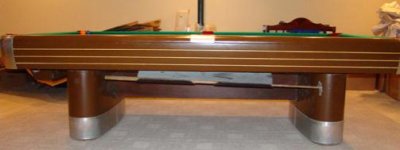
Custom Rail Sites (aka "diamonds")

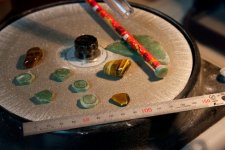
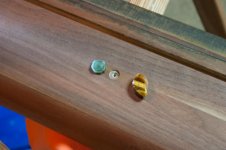
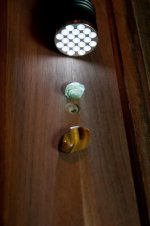
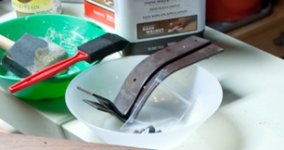
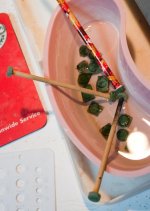
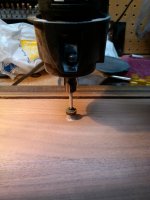
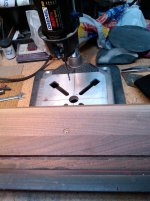
@ Mr. Bond or whomever might be interested... I'd be open to sourcing raw material, cutting and polishing "diamonds" for anyone who is interested in customing their table. It wouldn't be free of course. There's a lot of time involved. Figure 16 - 18 sights per table depending on the rail badging. There are other semi-translucent white-ish materials available. Stay away from opal though unless you only like to "look" at your table... they are much too delicate, but could be layered with a hard clear quartz layer on top for durability... which is something called a "doublet" in the lapidary world.
 
New aluminum banding anchor plates. Lousy photos, but it's hard to take a good photo with a cell phone. I'm taking Veteran's Day off next week so I hope to make LOTS of progress on so many things that remain.
 

Attachments

  • Algoma-20111104-00038 r.jpg
    Algoma-20111104-00038 r.jpg
    14.3 KB · Views: 668
  • Algoma-20111104-00039 r.jpg
    Algoma-20111104-00039 r.jpg
    13.9 KB · Views: 680
Apron pieces and Moosehead bridge pics

In the first photo, you'll see the stark contrast in colors that poplar wood produces. There are two coats of Dark Walnut Danish oil on it. Tonight I'll wet-rub with 400 grit another coat of oil slurry, and wipe it down.

In the 2nd photo, an apron short is shown with a light layer of black paint in one of its grooves to compare with the new apron short that has the danish oil on it, but no paint in the groove. I'm pretty sure I'm still going with black grooves at this point.

The 3rd & 4th photoa are simply the Moosehead bridge that has been oiled. For some, it might be too thick yet. I got a little anxious to oil it after working very carefully to sand the cue rests for a consistent curve. I think it turned out pretty good. Obviously the hole for the stick still needs to be cut. I need to shop for the right size rubber grommet before I drill the hole.
 

Attachments

  • CRW_9098.jpg
    CRW_9098.jpg
    99.8 KB · Views: 656
  • CRW_9102.jpg
    CRW_9102.jpg
    94.3 KB · Views: 654
  • CRW_9105.jpg
    CRW_9105.jpg
    60.1 KB · Views: 644
  • CRW_9104.jpg
    CRW_9104.jpg
    43.8 KB · Views: 644
I believe Tiger's Eye is a 7 on MOH's hardness scale... so it should be durable even as a dome, and as a dome, much more visible when shooting.

I saw 10 ft strands of white LED lights at Lowes for like $10.00 ... would rigging something up from Radio Shack be even cheaper? More or less durable?


I'm afraid that one 10ft strand might not afford you the length needed to get all the lights in place...but then again I've never tried it either.

You probably cant get all the LEDs, wire and batteries for less than $10, but it wouldnt be much more than that. RS has standard 2.0-2.8v LEDs for about 1.69 each. If youre handy with a soldering gun it should be fairly easy.

Tiger eye or not - hmmmm its a tough call. I'm still thinking about lit tiger eyes! lol
 
Last edited:
I'm afraid that one 10ft strand might not afford you the length needed to get all the lights in place...but then again I've never tried it either.

Well, i know it would take a few strands to get everywhere on a 9 ft. table. I'm not liking the idea of having to drill thru the figure 8 nut plate in the center of each rail if I proceed with lighting at all.

You probably cant get all the LEDs, wire and batteries for less than $10, but it wouldnt be much more than that. RS has standard 2.0-2.8v LEDs for about 1.69 each. If youre handy with a soldering gun it should be fairly easy.

Tiger eye or not - hmmmm its a tough call. I'm still thinking about lit tiger eyes! lol

Tiger's Eye is opaque, so the only effective "lighting" would be from its natural chatoyance, refracting the light from the billiard lamp or other existing light from the room, but not from under the stones.

In the event I didn't want to cut and polish Tiger's Eye myself, there is a body piercing company I discovered from doing a Google Image search for Tiger's Eye that provide almost exactly the dimensions I would need... sure would save me the time to cut and polish. http://www.piercemybodystore.com/stone.htm
 
i once owned a few nuggets of tiger eye that would have qualified as subtranslucent, which is part of the reason i thought that backlighting them would be nice - but youre also right, 'typical' tiger eye is for the most part opaque. but then that gave me another idea....if i could get the tiger eye lit from the side(s) - it might not matter if its not translucent all the way thru...

in other words, mount a tiger eye dome a little deeper and drill or cut its mounting hole slightly wider at the bottom than at the top, so the light can 'enter' the stone from around its sides...

think of a common "in ceiling" spot-light fixture, aka 'can'...where the only thing that isnt flush with the ceiling is the bulge of the light bulb itself....

as far as the plates are concerned, you'd only need a hole about the diameter of a toothpick or so. the wire can be very thin...


nice bullwinkle !
 
I made a decision... going with Tiger's Eye and will attempt to craft them in a way as to make them removable... like a domed mushroom; snug, but not too tight. That way, as aiming markers, if they don't do their job (that is, be seen easily enough during play) I can always replace them with the moss agates and continue with the backlighting.
 
Attaching some rail work progress. It took some patience and precision cutting, but managed to remove the mother-of-pearl sites, dig a slight hole, and drill a hole thru the rail. I had to experiment with different Dremel bits to determine what was going to work the best. Though i took Friday off to focus entirely on the table, I spent the morning hours looking for my DD214, just so I could have a free lunch at Applebees :eek:

I used my trim saw to work on the India Moss Agate pre-forms while I wait for my Tiger's Eye prototype that a friend is crafting for me. You will also see one agate button dopped, nicely rounded. Not to the polish stage yet. I'm showing some Tiger's Eye nuggets just to get a flavor for the chatoyance potential. :thumbup:
 

Attachments

  • Algoma-20111113-00048.jpg
    Algoma-20111113-00048.jpg
    78.3 KB · Views: 578
  • Algoma-20111113-00049.jpg
    Algoma-20111113-00049.jpg
    92.3 KB · Views: 582
  • Algoma-20111113-00047.jpg
    Algoma-20111113-00047.jpg
    97.8 KB · Views: 576
  • CRW_9116.jpg
    CRW_9116.jpg
    95.6 KB · Views: 572
  • CRW_9117.jpg
    CRW_9117.jpg
    69 KB · Views: 571
Just one more photo. This is actually self-punishment for two reasons: Not being able to decide on one stone type to replace the sites so I'm laboriously making a set of each, and two, just a little too lazy to run upstairs to grab the tri-pod. I almost always shoot in RAW mode preferring natural light, so when forced to hold the camera still for a 1/2 second exposure with nothing to lean on, and little time to establish any breath-control, here is the result. Blur. :sorry:
 

Attachments

  • CRW_9118.jpg
    CRW_9118.jpg
    55.8 KB · Views: 573
I recently acquired the bridge holders that were originally installed on my Centennial. They are in good enough shape that a thorough cleaning and a little Cabinet Magic may be all I do before installing them. Each of the bridge holders is complete with the original metal brackets.

Do you have any idea what type screw was used to attach the holders to the table?

(I'm guessing 1/4" X 1-7/8" screws.)
 
Hey there... the screws that came off of my bridge holder appear to be 3 original, and one afterthought. Of the three, each has a tiny hex nut. The length of the screws are 11/16ths, the diameter of the threaded portion measures 5/16ths. The screw head is slotted (flathead) and tapered for flush mount. Thread count is 32 per inch. (There is only 1/2 inch of threads on these screws and I counted 16.) The mounting brackets have 4 holes each however. I'm glad you posted something because now I have to go and find some more screws before reassembly.
 

Attachments

  • Bridge holder screws.jpg
    Bridge holder screws.jpg
    21.9 KB · Views: 715
Thanks for the prompt response (and picture) but I'm actually trying to find out what was originally used to attach the bridge holder to the table frame.

Thanks,
Mike
 
View attachment 192624

View attachment 192625

Here is a pic on the 3 hole nut plate. Also, I noticed that the captured nut for the corner casting on my rails looks to be done differently than yours. These differences could be due to a diff between the Cent. and Aniv.

Bob, the 2" round nut plates were used in the first edition Anniversary and Centinennials in the late 40's, the figure 8 nut plate didn't come out until later in the 50's as an improvement to the first edition rail nut plates. Brunswick changed the pocket castings as well from the first edition as well when they changed to the figure 8 nut plate. There's a big difference between the rail skirts being held on with wood screws vs bolts, yet it seems that everyone who has one of the Anniversary's thinks it was built sometime in the 40's.

Glen
 
Thanks for the prompt response (and picture) but I'm actually trying to find out what was originally used to attach the bridge holder to the table frame.

Thanks,
Mike

Here is a photo of the bridgeholder brackets that my Anniversary came with. I don't know if they were made the same for the Centennial. Sorry if I'm not interpreting your inquiry correctly.
 

Attachments

  • CRW_8965 c.jpg
    CRW_8965 c.jpg
    48.5 KB · Views: 690
Here's a photo of the bridge area when I first went to look at this table when it was for sale near Madison, WI. I hope this is helpful. (In any case, it reminds me of how ugly that baby-poop brown paint was and that I'm glad I finally got started on its restoration.)
 

Attachments

  • DSC05809.jpg
    DSC05809.jpg
    13.9 KB · Views: 699
Here is a photo of the bridgeholder brackets that my Anniversary came with. I don't know if they were made the same for the Centennial. Sorry if I'm not interpreting your inquiry correctly.

The bridgeholders and brackets for your Anniversary appear to be identical to the the Centennial bridgeholders and brackets.

After you reattach your brackets to your bridgeholders you will see that you need some sort of screws to attach the bridgeholder brackets to the table frame. I don't have the original screws that were used to do this. I thought that you might have the original screws and was hoping that you could describe them to me.

Thanks

The post from 10:29pm last night describes what came off of mine. Someone must have used that oddball screw in the photo, but it appears 3 of the 4 screws are original. My question is, and it's been some time since the bridgeholder was mounted, is it supposed to hang at an angle like in my most recent photo?
 
Bob, the 2" round nut plates were used in the first edition Anniversary and Centinennials in the late 40's, the figure 8 nut plate didn't come out until later in the 50's as an improvement to the first edition rail nut plates. Brunswick changed the pocket castings as well from the first edition as well when they changed to the figure 8 nut plate. There's a big difference between the rail skirts being held on with wood screws vs bolts, yet it seems that everyone who has one of the Anniversary's thinks it was built sometime in the 40's.

Glen

Hey there RKC... did you intend this for a different thread?
 
The post from 10:29pm last night describes what came off of mine. Someone must have used that oddball screw in the photo, but it appears 3 of the 4 screws are original. My question is, and it's been some time since the bridgeholder was mounted, is it supposed to hang at an angle like in my most recent photo?

Woops... really goofed interpreting your inquiry. I must have re-read this 27 times and am just now getting it. Guess I've been inhaling too many Watco fumes. Now you got me wondering where my screws are that hold the brackets to the frame. I must have them in my dish of hardware. Now I need to re-read RKC's post for possible actual relevence. (One should never post too late at night after too many whiskey sours.):sorry:
 
Agate aiming sight progress

I've managed to pre-form all 17 moss agates. I don't have enough dopping dowels, but will get some more. Pencils are too thick so I need to use the skinny dowels to ensure a non-tapered edge around each. :cool:

Next you'll see the Dremel cutting bit I used for the removal of all 17 mother-of-pearl sights (I cracked them all first using a steel punch... some were so brittle, I could have used my fingernail.

Then there's an image of the drill bit I used to ensure the lights will have a path to move their photons thru the stone.
 

Attachments

  • 17 Agate sites.jpg
    17 Agate sites.jpg
    68.9 KB · Views: 655
  • Dremel bit for sites.jpg
    Dremel bit for sites.jpg
    88.3 KB · Views: 658
  • Drill bit for light hole.jpg
    Drill bit for light hole.jpg
    97 KB · Views: 652
Last edited:
Back
Top