My Home Pool Room Journey

runout1961

Ecclesiastes Ch. 12: 1-7
Silver Member
This thread will document the conversion of our lower level into a home pool room. For those of you who care to follow along, I will periodically document our progress until completed.

My girlfriend and I just closed on a family home that I’ve been going to for my entire life. I have a lot of great memories of this house/property growing up. When the opportunity rose for us to purchase this house, we didn’t hesitate.

Only one problem. The lower level of the home is less than adequate for a pool table. I swore if I were ever able to purchase another home, a pool room would be a big deciding factor. Unlike a vast majority of the “pool room size requirement” charts out there (most of them wrong), I need a minimum 180”x226” for an oversized 8’er (9’ will not fit). Oversized 8’er is 46”x92”. I play with a 60” cue. So for example (for those that do not know), 46” (width of playing surface) plus 120” (full cue on each side) plus 7” of backswing for each side is 180” or 15ft needed for the sides. 18.8’ minimum is needed for the length side with a full cue on each side. I don’t do the short cues.

Everything will be ripped out. Some major things that have to be accomplished to make this work is the load bearing steel I-beam has to be reinforced to remove the lally columns. Beam has to be recessed into the ceiling. The two windows will be closed off to create a utility room. The two water heaters and water well components have to be relocated. The furnace has to be moved down towards the window wall at least 3ft. The bathroom has to be taken in about 17” and reconfigured. Then everything has to be finished out.

And of course a lot of unexpected surprises are bound to pop up that will need to be resolved. This will probably take quite a few months or more to complete.

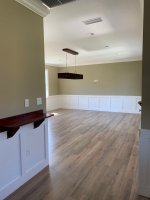
As you can see in the pics below, quite a bit of work has to be done. I will be doing a majority of the work myself as I can. I’m just a regular guy that works his ass off and am only able to work down there on nights and weekends like most people.

The cost of what it’s going to take to get this done is also a deciding factor. We aren’t rich people by any means and will complete things in phases as we can afford to do so.

For those of you who made it this far, I greatly appreciate you taking the time to read along and hope you enjoy seeing the progress as I continue on this journey to hopefully one day, have a comfortable home pool room again.

Stay tuned my friends.

Kind Regards, John

b82aec871e8c2c3add8c1027daeab855.jpg

61090e05692aabf184fcdca0fe51f7d5.jpg

7f5879e52e029959e8608075d9ef6704.jpg

bd376fd7d5cfd243f9f5970a68be6828.jpg

67b962452465f9b70bf20dd481f3cb60.jpg

9e8e653d6776f988f4b7db077c332286.jpg

fbd5665179fdd8864bc0cbb72769f09e.jpg

90adb18ad84a55a924157c61012bf30d.jpg
 
Last edited:

justnum

Billiards Improvement Research Projects Associate
Silver Member
This could be a tv series pool installers that do home restorations.
 

runout1961

Ecclesiastes Ch. 12: 1-7
Silver Member
Thanks for the comments so far guys. Should be a fun project. It will take me quite a while to complete but will be worth it in the end.

I would only be happy with one of four tables. An oversized 8’ Brunswick centennial (dream table), an 8’ diamond pro-am, an oversized 8’ gold crown or 8’ valley bar box with penguin pro cut pockets. Can’t afford a centennial or new diamond any time in the near future so it looks like I’ll be on the hunt for an oversized 8’ gold crown or 8’ valley. The lower level is far, far from finished yet so I have plenty of time to find something.


Sent from my iPhone using Tapatalk
 

289FIA

Active member
I share your excitement. We decided last summer not to sell our home and do a new build project .. but as part of that decision .. decided to build a "stand alone cottage" that for resale would be a guest cottage or in-law suite. Has a front room (pool room) that is 18' * 20'; has a full bath and a kitchenette, and a BR ( 12*12) that will be used for my reloading bench and gear. Get my new Diamond 8' table installed next Tuesday. Bought the last "furniture model" 8' table that Diamond had as they discontinued that line at the end of 2019. This is where I will be spending a LOT of time.
 

Attachments

  • Pool Room From Wet Bar.jpg
    Pool Room From Wet Bar.jpg
    99.3 KB · Views: 229

runout1961

Ecclesiastes Ch. 12: 1-7
Silver Member
I share your excitement. We decided last summer not to sell our home and do a new build project .. but as part of that decision .. decided to build a "stand alone cottage" that for resale would be a guest cottage or in-law suite. Has a front room (pool room) that is 18' * 20'; has a full bath and a kitchenette, and a BR ( 12*12) that will be used for my reloading bench and gear. Get my new Diamond 8' table installed next Tuesday. Bought the last "furniture model" 8' table that Diamond had as they discontinued that line at the end of 2019. This is where I will be spending a LOT of time.

Now that’s an awesome room! Very nice sir.


Sent from my iPhone using Tapatalk
 

289FIA

Active member
Now that’s an awesome room! Very nice sir.


Sent from my iPhone using Tapatalk

Thanks .. think about your lighting. Diamond sells a light box for an 8' table that runs around $900. I built a rustic light box out of pine lumber, stained it Cherry (to match the table), built an escutcheon to attach to the ceiling to hang the box from, and installed an LED wraparound flush mount fixture in the box. Got the fixture from Lowes 6500 Lumens / 4000 Kelvin .. for $119. Used 1/8" ss anchor chain from a marine supply store to hang it .. and used ss turnbuckles (like they use on sailboats for rigging) to hang the chains from .. the turnbuckles are attached to ss shoulder eye bolts in the escutcheon. Made a couple of drink rails notched out to be able to lean cues against so they're not against the wall. Was a fun project over 6 months. Have fun .. we all certainly need some these days!
 

runout1961

Ecclesiastes Ch. 12: 1-7
Silver Member
Thanks .. think about your lighting. Diamond sells a light box for an 8' table that runs around $900. I built a rustic light box out of pine lumber, stained it Cherry (to match the table), built an escutcheon to attach to the ceiling to hang the box from, and installed an LED wraparound flush mount fixture in the box. Got the fixture from Lowes 6500 Lumens / 4000 Kelvin .. for $119. Used 1/8" ss anchor chain from a marine supply store to hang it .. and used ss turnbuckles (like they use on sailboats for rigging) to hang the chains from .. the turnbuckles are attached to ss shoulder eye bolts in the escutcheon. Made a couple of drink rails notched out to be able to lean cues against so they're not against the wall. Was a fun project over 6 months. Have fun .. we all certainly need some these days!

I’ve had the diamond lights before. Great lights but like you, I was going to build my own. I was going to use 1x4 stained pine or walnut with dovetail joints on the ends. Dowels in the middle for the center brace and two 2x4 led flat panels. Pretty simple to do. Had it all planned out. Think I might go another route. Waiting to seal the deal on a table/light package.


Sent from my iPhone using Tapatalk
 

runout1961

Ecclesiastes Ch. 12: 1-7
Silver Member
Was finally able to break away for a couple hours and get a little demo done tonight. You can see the lally column in the pics which is right where the pool table needs to go. The furnace is also a big problem where it sits.

ed23f6c906a5fa4f96335b5edaec344d.jpg

0e1cf58e6958329aa888c51b84f23ed3.jpg

4a115ec8decc0584f9ebff09d686df35.jpg

e03a8c9c9782ba3d332cb2c9829d0aca.jpg

aa5a19dc2a259336a42de58fbb6f8266.jpg


Sent from my iPhone using Tapatalk
 

Captain18

AzB Silver Member
Silver Member
Good luck to you Sir in your project! Look forward to seeing the progress and finished product!
 

runout1961

Ecclesiastes Ch. 12: 1-7
Silver Member
Good luck to you Sir in your project! Look forward to seeing the progress and finished product!

Thank you. I appreciate that. Going to take a while but will be worth it in the end for sure.


Sent from my iPhone using Tapatalk
 

289FIA

Active member
Was finally able to break away for a couple hours and get a little demo done tonight. You can see the lally column in the pics which is right where the pool table needs to go. The furnace is also a big problem where it sits.

ed23f6c906a5fa4f96335b5edaec344d.jpg

0e1cf58e6958329aa888c51b84f23ed3.jpg

4a115ec8decc0584f9ebff09d686df35.jpg

e03a8c9c9782ba3d332cb2c9829d0aca.jpg

aa5a19dc2a259336a42de58fbb6f8266.jpg


Sent from my iPhone using Tapatalk

Nice job ... do you have a rough sketch of the final floor plan to share? Nothing like seeing a plan come together ... enjoy the journey .. it will be worth it.
 

runout1961

Ecclesiastes Ch. 12: 1-7
Silver Member
Nice job ... do you have a rough sketch of the final floor plan to share? Nothing like seeing a plan come together ... enjoy the journey .. it will be worth it.

Thank you. No sketch drawn up. I have everything figured out in my head as far as where things are going to go, be moved to etc. Other than that, just kind of figuring things out and dealing with problems as they come about. I’m in no rush to get this done as fast as possible. Well, I am but there are plenty of other things around the house/property that need to get done as well.


Sent from my iPhone using Tapatalk
 

runout1961

Ecclesiastes Ch. 12: 1-7
Silver Member
I received a friendly private message from a good guy that was looking out for a fellow member and kindly offered his advice which I appreciate. Since I received that message and two others like it, I figured I would post my plan for reinforcing the beam.

I’m by no means a pro or anything like that. Just a regular guy that likes to do things himself and get things done. There’s a company local to me that specializes in reinforcing beams for basements and open concept kitchens and other areas of the home but they wanted to charge $4700 to reinforce the beam. $7700 to recess the beam into the ceiling. So $4700 for a job with less than $1000 in materials. Screw that. I’ll do it myself.

A buddy of mine at work has a sign hanging on his office door that says “common sense just ain’t so common anymore. I wonder if common sense will ever make a comeback”. Lol. But it’s true. Most folks get in way over their heads and such. What I mean by this is I hope people understand and realize the role and importance of lally columns and don’t just go ripping them out before looking into what it takes to support the load of your home.

Basically, to reinforce the beam in order to take out the lally column, I’m going to put a steel plate on each side of the web of the beam. So it will be steel plate, beam web, steel plate. All three will be bolted together with structural all thread. The holes will be a diagonal pattern up and down the entire length of the beam. Each of the two plates have to have a 45 degree chamfer on the edges to accommodate the radius inside the I-beam so the plates will sit nice and flat against the web of the beam before bolting it all together.

My structural/mechanical engineer at work is going to figure out what the thickness of the plates need to be. Then I’ll order the plates from our supplier at work with the holes already drilled according to the ceiling joist pattern and will have the chamfer on the edges that I need for the plate to sit flat on each side of the web.

Then I’ll borrow a mag base drill from work, put one of the plates in place inside the beam, clamp it down and trace out the holes, take the plate down and get to drilling with some good cutting fluid and the mag base drill.

Once the plates are in and torqued down, I’ll weld a bead on the top and bottom of each side where the plate meets the beam at the flange.

Once all that is done, the lally column gets cut out.

There’s obviously a lot more small details to it than this but you get the idea of what I’m going to be doing here or at least what my general plan is anyway.

I was also going to recess the beam into the ceiling but the I-beam runs the entire length of the house. To recess the beam into the ceiling would be the easiest part but we would have to reinforce the garage portion of the beam as well. We’re not ready to do all that. My main priority with this project is to create a nice pool room. The garage will come later.


Sent from my iPhone using Tapatalk
 

DaveK

Still crazy after all these years
Silver Member
I did a similar renovation to fit my 9' table at my previous house. The reinforcement was designed by a licensed structural engineer, needed his blueprints and stamp to get a building permit. The beam was reinforced with a pair of steel channels (C10x20 iirc ... I paid a few hundred for a 40' section and had the supplier torch cut it to length before sending it to me) sandwiching the existing engineered wood beam. I had to jack hammer out one old footing and replace it with a larger footing as the load was increasing a fair bit (too much for the old smaller footing). Are your footings up to the load? The channels rested nicely on the 1" plates that topped the posts and were bolted in place. The mag drill is very handy for drilling the holes ... I used a rotabroach cutter, they are amazing (especially in my milling machine when drilling the 1" plate).

Good luck with your renovation. Lots of room around the table is worth all the hassles.

Dave
 
Top