White dots in the epoxy finish

A little late to the party, but have you tried "nuking" the epoxy for about 20-25 seconds in the microwave?
It makes a huge difference in the viscosity of the epoxy and how it flows.
I don't nuke it, but it is on a candle warmer while it is in the vacuum jar. It isn't thick, I was just comparing it to the other.
 
I will mix about .1 gram of denatured alcohol into 6 grams of BSI 20 min finish epoxy. Let stand in container until finishes bubbling before application (5-10 minutes). Secondary feature is it flows out a little easier but takes longer to set so will need to spin longer.
 
Thanks Chris,
The first coat I have been putting on with a glove to press the epoxy into the grain and then smooth it with a card. I will try the torch. Do you just do one pass or multiple passes? Maybe I should look into a heat gun. Seems like I could have more control.
I just pass it quickly back and forth until I see all bubbles gone.
 
A little late to the party, but have you tried "nuking" the epoxy for about 20-25 seconds in the microwave?
It makes a huge difference in the viscosity of the epoxy and how it flows.
About 15 seconds and the bubbles from stirring disappear directly has been my experience. Then you can let it cool or not before applying.
 
No whities
 

Attachments

  • 20250406_202529.jpg
    20250406_202529.jpg
    208 KB · Views: 49
  • 20250406_211852.jpg
    20250406_211852.jpg
    189.2 KB · Views: 55
  • 20250406_211857.jpg
    20250406_211857.jpg
    125.5 KB · Views: 53
  • 20250406_202523.jpg
    20250406_202523.jpg
    180.7 KB · Views: 51
I'm about to lose my mind with finishing the cue. Yes, I am learning and adjusting techniques with each cue, but these two are trying me.

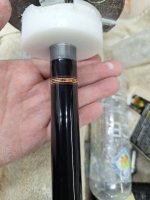
I have had great success on some cues and others not so much. These started out with a Max Clear epoxy base and a Solarez top-coat. The joint is at 0.840" and the sanding mandrel is 0.850"

I am switching out the epoxy with BSI Finish-Cure. The couple of pieces I have used it on so far are great. I also replaced my DIY vacuum chamber with a real epoxy bubble release chamber so hopefully that will help too.

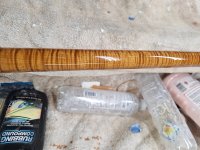
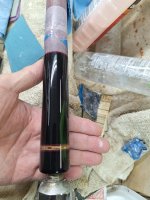
I applied the epoxy, waited a week, applied the Solarez, waited week, and the cues looked great as usual. There were no visible bubbles or defects. I wet sand it down with 150 to near final thickness and start moving to finer grits. On the one, I started to see the tiny dots. I worked up close and tried to sand just past them. Just when I thought it was going to work, I sanded through a spot. That one is now fully sanded back down to start over.

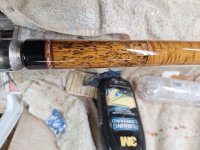
The other was going great. I only saw a few dots at the very end of the butt cap, which I think I might have been able to fix. The rest was looking beautiful. I was at a 1000 grit when I noticed the sand through pictured below.

I know I have to start over on the finish again, but any pointers would be appreciated.

Scott

IMG_2811.jpeg


IMG_2810.jpeg
 
Why don't you use a solarez product to seal the cue? l haveI used both their sealers and love it. I had a learning curve as well. I realized a ceiling light over the cue with 2 uV lights and the cue spinning slow does wonders to harden the solarez.
e670e8a436036b4fca7a662a26d54acc.jpg
65c907a3be62be5d8df51d908957132b.jpg


Sent from my SM-S936U using Tapatalk
 
Do you apply anything prior to the epoxy base coat? How much time before the base coat if anything is applied?

I believe I have my white bubble issue sorted out but I also use different products.
 
Do you apply anything prior to the epoxy base coat? How much time before the base coat if anything is applied?

I believe I have my white bubble issue sorted out but I also use different products.

Bare wood.
The first coat of base I use a glove to press into the pores.
 
Back
Top