Every tip helps.... Thanks SSD and Mike.
You are using an out of date browser. It may not display this or other websites correctly.
You should upgrade or use an alternative browser.
You should upgrade or use an alternative browser.
1st timer
- Thread starter GoldCrown
- Start date
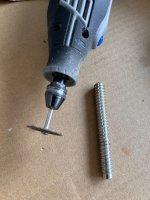
Looks great. There is no real specification on how far the joint screw sticks out. 1.4 is quite long.I have 1.24" from the joint face. Also chamfer the bore so you can face it off without hitting the pin.
View attachment 823659
SSDiver2112
Esscot Custom Cues
Thanks Mike and welcome back by the way.Looks great. There is no real specification on how far the joint screw sticks out. 1.4 is quite long.
Are you mis-quoting me as 1.4" or was it a typo and 1.24" is too long?
My badThanks Mike and welcome back by the way.
Are you mis-quoting me as 1.4" or was it a typo and 1.24" is too long?
It was 1.24. Sorry
And thank you. Happy to be back
SSDiver2112
Esscot Custom Cues
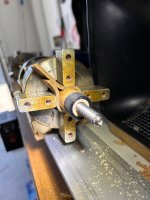
Looks nice and clean. Did you ever get a dial indicator? Leather is nice but can have a slight runout and need adjusting. A collet or if you will be finishing the cue using nothing will have less chance of runout. If the cue is out, the pin is out.Hand tight for now.
boogieman
It don't mean a thing if it ain't got that ping.
Very nice, good job on the chamfer too.Hand tight for now.
")
No indicator at this time. Will final check/eyeball before gluing. Will use a collet or go bare. This cue is a junker...it's a trainer. Next one I'm using a Duff from 1998 with an epoxy 3/8.Looks nice and clean. Did you ever get a dial indicator? Leather is nice but can have a slight runout and need adjusting. A collet or if you will be finishing the cue using nothing will have less chance of runout. If the cue is out, the pin is out.
Thanks...getting good support here.Very nice, good job on the chamfer too.
Last edited:
Get an indicator, it has use while the joint screw is drying.No indicator at this time. Will final check/eyeball before gluing. Will use a collect or go bare. This cue is a junker...it's a trainer. Next one I'm using a Duff from 1998 with an epoxy 3/8.
Thanks...getting good support here.
Not expensive
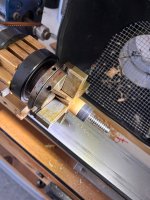
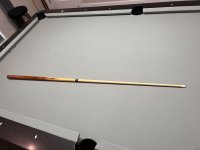
Pin is not glued. Cue is rolling flat. So far I’m satisfied… best is yet to come when I get a (quality) indicator.
Epoxy ..will look at the stuff Mike is using. Anyway just for now...I have 5 & 15 minute epoxy on hand. Will use the 15. The negative pressure from the epoxy... how to avoid it?
Epoxy ..will look at the stuff Mike is using. Anyway just for now...I have 5 & 15 minute epoxy on hand. Will use the 15. The negative pressure from the epoxy... how to avoid it?
Attachments
Last edited:
boogieman
It don't mean a thing if it ain't got that ping.
Glue relief channels cut into the side of the pin and not super thick epoxy. I've also heard somewhere you don't need an absolute ton of epoxy in there, you don't want tons of it pushing out and getting in/on the outer threads, just enough to get the job done. I heard you can use alcohol to clean any that gets on the threads before it sets up... This is a thing I heard, no idea if it's accurate or not as I've never experimented with it nor installed any pins myself. I've also heard you have to be careful with this because hydraulic pressure can split the wood, so I'd do it carefully and slowly.The negative pressure from the epoxy... how to avoid it?
Exactly why I'm asking before I begin. I would hate be almost home and the pin locks up before it seats properly.Glue relief channels cut into the side of the pin and not super thick epoxy. I've also heard somewhere you don't need an absolute ton of epoxy in there, you don't want tons of it pushing out and getting in/on the outer threads, just enough to get the job done. I heard you can use alcohol to clean any that gets on the threads before it sets up... This is a thing I heard, no idea if it's accurate or not as I've never experimented with it nor installed any pins myself. I've also heard you have to be careful with this because hydraulic pressure can split the wood, so I'd do it carefully and slowly.
SSDiver2112
Esscot Custom Cues
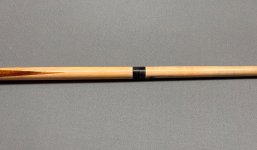
Based on your picture (unless it is on the other side) you need to cut a small relief groove. Mine already have one. Plenty of time to get the pin in with the epoxy you have. Many like that type because it is easier to remove the pin in the future if needed.Exactly why I'm asking before I begin. I would hate be almost home and the pin locks up before it seats properly.
Just put it in slowly. When you feel the back pressure stop and go slower. I hear the bubbles crackling as they escape and the pin turns easier till the pressure builds again.
Cut a groove… in the pin?Based on your picture (unless it is on the other side) you need to cut a small relief groove. Mine already have one. Plenty of time to get the pin in with the epoxy you have. Many like that type because it is easier to remove the pin in the future if needed.
Just put it in slowly. When you feel the back pressure stop and go slower. I hear the bubbles crackling as they escape and the pin turns easier till the pressure builds again.
boogieman
It don't mean a thing if it ain't got that ping.
Yeah. You can do it with a dremel tool or similar. You don't want it where you can see it on the exposed pin. This is a screen grab of one in an A joint, those reliefs are fairly large and done with a cnc cutter:Cut a groove… in the pin?
Here's one from a supplier: https://www.cuefits.com/index.php?route=product/product&product_id=315
Here's a G10 with glue relief in in the barrel part: https://uniqueinc.com/inc/sdetail/3_8_10_joint_pin__black_g_10__pkg_10/2407/11480
The bottom picture here shows a glue relief, different application, but it shows the concept: https://www.dzcues.com/A-Joint.html
Last edited:
Based on your picture (unless it is on the other side) you need to cut a small relief groove. Mine already have one. Plenty of time to get the pin in with the epoxy you have. Many like that type because it is easier to remove the pin in the future if needed.
Just put it in slowly. When you feel the back pressure stop and go slower. I hear the bubbles crackling as they escape and the pin turns easier till the pressure builds again
Thanks BoogYeah. You can do it with a dremel tool or similar. You don't want it where you can see it on the exposed pin. This is a screen grab of one in an A joint, those reliefs are fairly large and done with a cnc cutter:
View attachment 824018
Here's one from a supplier: https://www.cuefits.com/index.php?route=product/product&product_id=315
Here's a G10 with glue relief in in the barrel part: https://uniqueinc.com/inc/sdetail/3_8_10_joint_pin__black_g_10__pkg_10/2407/11480
The bottom picture here shows a glue relief, different application, but it shows the concept: https://www.dzcues.com/A-Joint.html
 ....I have a Dremel...
Last edited:
SSDiver2112
Esscot Custom Cues
Yeah. You can do it with a dremel tool or similar. You don't want it where you can see it on the exposed pin. This is a screen grab of one in an A joint, those reliefs are fairly large and done with a cnc cutter:
View attachment 824018
Here's one from a supplier: https://www.cuefits.com/index.php?route=product/product&product_id=315
Here's a G10 with glue relief in in the barrel part: https://uniqueinc.com/inc/sdetail/3_8_10_joint_pin__black_g_10__pkg_10/2407/11480
The bottom picture here shows a glue relief, different application, but it shows the concept: https://www.dzcues.com/A-Joint.html
Thanks Boo
Got a little worried when I saw that picture. Then I read it better lol.
The glue relief is only on the barrel of the pin where the fit has little tolerance. Just need a way for air and extra glue to escape.
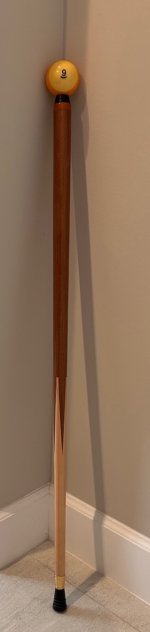
Look like a pool cue!Pin is not glued. Cue is rolling flat. So far I’m satisfied… best is yet to come when I get a (quality) indicator.
Epoxy ..will look at the stuff Mike is using. Anyway just for now...I have 5 & 15 minute epoxy on hand. Will use the 15. The negative pressure from the epoxy... how to avoid it?
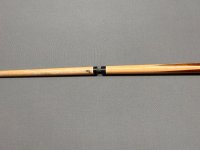
Thanks Chop... Getting there. Going well so far..... here's my back up plan if it fails.Look like a pool cue!

Attachments
I could have gone deeper but it might be okYeah. You can do it with a dremel tool or similar. You don't want it where you can see it on the exposed pin. This is a screen grab of one in an A joint, those reliefs are fairly large and done with a cnc cutter:
View attachment 824018
Here's one from a supplier: https://www.cuefits.com/index.php?route=product/product&product_id=315
Here's a G10 with glue relief in in the barrel part: https://uniqueinc.com/inc/sdetail/3_8_10_joint_pin__black_g_10__pkg_10/2407/11480
The bottom picture here shows a glue relief, different application, but it shows the concept: https://www.dzcues.com/A-Joint.html