
You are using an out of date browser. It may not display this or other websites correctly.
You should upgrade or use an alternative browser.
You should upgrade or use an alternative browser.
5/16-14 Piloted Joint Construction
- Thread starter GBCues
- Start date
www.cuesmith.com
Spend the money on his book, it's a great place to start. You'll refer back to it constantly. It's well worth the money.
PS - the info you're looking for is in the book.
Spend the money on his book, it's a great place to start. You'll refer back to it constantly. It's well worth the money.
PS - the info you're looking for is in the book.

www.cuesmith.com
Spend the money on his book, it's a great place to start. You'll refer back to it constantly. It's well worth the money.
PS - the info you're looking for is in the book.
:embarrassed2: I have Chris's book. I thumbed through the joint section but didn't see the piloted joint construction. Guess I will look again :embarrassed2:

Hi,
You just need to have the 5/16-14 insert, Tap for the 5/16-14 Insert thread, 1/2 drill bit. Drill 1/2" hole, Tap the hole, Install insert. Depending on the type of pilot, you can bore the hole to hold the brass lip and then taper down to fit the size of pilot on the butt. Hope this give you an idea.
Duc.
You just need to have the 5/16-14 insert, Tap for the 5/16-14 Insert thread, 1/2 drill bit. Drill 1/2" hole, Tap the hole, Install insert. Depending on the type of pilot, you can bore the hole to hold the brass lip and then taper down to fit the size of pilot on the butt. Hope this give you an idea.
Duc.
:embarrassed2: I have Chris's book. I thumbed through the joint section but didn't see the piloted joint construction. Guess I will look again :embarrassed2:
:embarrassed2: I have Chris's book. I thumbed through the joint section but didn't see the piloted joint construction. Guess I will look again :embarrassed2:
I'm pretty sure he addresses it, but if not, install the insert same as a flat face insert, only you'll have the pilot sticking out. You can then do any trimming that may be needed to make the pilot fit.
If you need any help just PM me.

1/2" hole?
1/2" hole?
I was about to respond to that when I seen that you beat me to it. For most of the standard inserts I drill a 3/8 hole then open it just slightly with a boring bar so as to insure it is straight and then I tap with a 7/16-14 tap.
Dick
Thanks Dick, at least you caught it and explained the proper procedure (as par usual) before someone had some 1/2" holes in their shaft wood.
GE, if you have the 3rd edition of Chris's book, turn to page 94.
GE, if you have the 3rd edition of Chris's book, turn to page 94.
Last edited:
Guys,
Thanks for all the replies. I was thinking that I simply needed to leave some of the insert exposed, but the more I looked at it, the more I was unsure.
I'll check my book on page 94 when I get home from work.

Gary
OOPS - I just noticed I posted this in the wrong forum - should be in "Ask the CueMaker" - I'll have to see if I can get it moved. Sorry about that
Thanks for all the replies. I was thinking that I simply needed to leave some of the insert exposed, but the more I looked at it, the more I was unsure.
I'll check my book on page 94 when I get home from work.
Gary
OOPS - I just noticed I posted this in the wrong forum - should be in "Ask the CueMaker" - I'll have to see if I can get it moved. Sorry about that
Last edited:
If you want to leave the end exposed for a pilot if you need one then you can. In Chris's DVD where he shows how to do an insert, I believe he faces the pilot off even with the face of the shaft.
To quote Chris: " I don't like these things, I just cut them off".
To quote Chris: " I don't like these things, I just cut them off".
Still no joy.
I bought my copy of Chris's "The Cue Building Book" from a fellow AZ'er - he was upfront that the title page and first page of the Table of Contents had been lost - no problem, the rest of the book is in great shape. But that means I can't be certain it is version 3.
Chapter 18 which discusses joint and pin installation indeed begins on page 94. I had read through that before I began this thread, even though I wrote "thumbed through". I went through it again and I still don't see anything about a piloted joint.
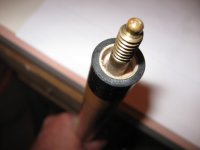
But let's make certain I'm using the correct term. Below is a picture of the butt I'm trying to mate up to. It did not come with any shafts for me to copy/learn from.
I haven't purchased any inserts yet, but am familiar with what they look like. So is it simply a matter of carefully fitting the insert, leaving about a 1/4" out to snug into the butt?
I REALLY appreciate everyone's help.
Gary
I bought my copy of Chris's "The Cue Building Book" from a fellow AZ'er - he was upfront that the title page and first page of the Table of Contents had been lost - no problem, the rest of the book is in great shape. But that means I can't be certain it is version 3.
Chapter 18 which discusses joint and pin installation indeed begins on page 94. I had read through that before I began this thread, even though I wrote "thumbed through". I went through it again and I still don't see anything about a piloted joint.
But let's make certain I'm using the correct term. Below is a picture of the butt I'm trying to mate up to. It did not come with any shafts for me to copy/learn from.
I haven't purchased any inserts yet, but am familiar with what they look like. So is it simply a matter of carefully fitting the insert, leaving about a 1/4" out to snug into the butt?
I REALLY appreciate everyone's help.
Gary
Attachments
Last edited:

Man, that's your problem right there. Change that pin.

Most Schon type joints have the brass rim of the insert and some of the wood sticking out acting as the pilot.
To do this leave the shaft 1/4" longer than normal, epoxy in the insert leaving the brass rim sticking out of the wood, then trim the shaft joint face back a bit leaving the wood part around the insert. You can round the brass edge with a file while spinning in the lathe if you want.
I prefer an pilot insert made of phenolic rather than brass.
It gives a good tight thread fit (brass is kind of a sloppy thread fit) and also a nice custom touch.
Unique Products sells them but they can be easily made from phenolic rod as well.
Cut the Phenolic rod, bore a suitable hole in the shaft, epoxy in the phenolic leaving 1/4" sticking out, drill, bore, tap, then trim to finished size.
To do this leave the shaft 1/4" longer than normal, epoxy in the insert leaving the brass rim sticking out of the wood, then trim the shaft joint face back a bit leaving the wood part around the insert. You can round the brass edge with a file while spinning in the lathe if you want.
I prefer an pilot insert made of phenolic rather than brass.
It gives a good tight thread fit (brass is kind of a sloppy thread fit) and also a nice custom touch.
Unique Products sells them but they can be easily made from phenolic rod as well.
Cut the Phenolic rod, bore a suitable hole in the shaft, epoxy in the phenolic leaving 1/4" sticking out, drill, bore, tap, then trim to finished size.
Still no joy.
I bought my copy of Chris's "The Cue Building Book" from a fellow AZ'er - he was upfront that the title page and first page of the Table of Contents had been lost - no problem, the rest of the book is in great shape. But that means I can't be certain it is version 3.
Chapter 18 which discusses joint and pin installation indeed begins on page 94. I had read through that before I began this thread, even though I wrote "thumbed through". I went through it again and I still don't see anything about a piloted joint.
But let's make certain I'm using the correct term. Below is a picture of the butt I'm trying to mate up to. It did not come with any shafts for me to copy/learn from.
I haven't purchased any inserts yet, but am familiar with what they look like. So is it simply a matter of carefully fitting the insert, leaving about a 1/4" out to snug into the butt?
I REALLY appreciate everyone's help.
Gary
That pin is made for a different type of insert. It uses a longer insert that has the threads drilled out on the end. In that way the shaft will drop down onto the pin and then only a couple of twists and the shaft and butt will tighten up. Sort of like a poor mans quick disconnect. First, you must check the thread count as it may not be a normal thread count. If it is a 5/16-14 you may be able to use a standard insert by installing it as you usually would for a piloted joint as we have been talking about and then drilling the threads out of the end of the insert as the shaft will not go completely onto that pin as it's not threaded completely inside the joint.
Dick
Last edited:
Thanks guys..my bad...it's a 3/8 drill bit. lol..

> My conclusion is pretty much the same as Dickie's,and would like to expand on his ideas by adding that for the best possible accuracy,make the insert on JUST the OD,leaving it solid,then centerdrilling and preparing the inside AFTER it's in the shaft.
Just leave the OD of the pilot a few thou bigger than normal,screw it in with pliers,then take a couple light cuts on the pilot,then sand it clean and deburr to get to final size. From there,unless you change the tailstock or crash with the drill bit or boring bar,or screw up the tapping phase,you just about have to run dead-nuts.
I learned that here,so I'm passing it on . Tommy D.
Just leave the OD of the pilot a few thou bigger than normal,screw it in with pliers,then take a couple light cuts on the pilot,then sand it clean and deburr to get to final size. From there,unless you change the tailstock or crash with the drill bit or boring bar,or screw up the tapping phase,you just about have to run dead-nuts.
I learned that here,so I'm passing it on
. Tommy D.
> . . . . From there,unless you change the tailstock OR crash with the drill bit OR boring bar,OR screw up the tapping phase,you just about have to run dead-nuts.
I learned that here,so I'm passing it on
Man, that's a lot of "OR's" !!! And each one of them means "Oh Sh**!!"
But's that's how we learn. :smile:
 :frown:
Thanks!
Gary

I prefer the cnc'd inserts with the locating barrels on them. Similar to the uni-loc insert.
Have a look at this.
I would bore some threads out of the insert just enough to screw down into the pilot. Make sure it fits well, THEN install it in the shaft.

http://www.cuestik.com/store/product.asp?ITEM_ID=5767&DEPARTMENT_ID=95
Have a look at this.
I would bore some threads out of the insert just enough to screw down into the pilot. Make sure it fits well, THEN install it in the shaft.
http://www.cuestik.com/store/product.asp?ITEM_ID=5767&DEPARTMENT_ID=95
> My conclusion is pretty much the same as Dickie's,and would like to expand on his ideas by adding that for the best possible accuracy,make the insert on JUST the OD,leaving it solid,then centerdrilling and preparing the inside AFTER it's in the shaft.
Just leave the OD of the pilot a few thou bigger than normal,screw it in with pliers,then take a couple light cuts on the pilot,then sand it clean and deburr to get to final size. From there,unless you change the tailstock or crash with the drill bit or boring bar,or screw up the tapping phase,you just about have to run dead-nuts.
I learned that here,so I'm passing it on
Well, that's one way and I'm sure there are many.
The simplest way I've found is to first confirm that the chamfer at the entrance to the insert is concentric with the internal threads. After that, it's cake. Install it in the shaft as usual.
You'll use that chamfer with your live-center (tail-stock) to cut the pilot, your ring-work and the joint-end of the shaft to size. Shoot it & deliver it.