CNC Inlay Machine Design

Have a look at older Deckel Milling machines.A lot had adjustable tables. They could be adjusted for milling tapers and compound angle milling. Usually +- 15 deg on the X axis(long axis) and upto 30 deg on the short axis(y).
But an easier solution is to mount a lathe onto the machine bed, and make that to be adjustable in the heights at the feet. This allows you to incline or decline the assembly.

Neil,
Yes, I remember one of the last designs Darrin Hill shared with us here had a vertically tilting table.
I had asked Darrin once whether he found 8080 extrusions to be accurate enough to build with or whether he milled them before using them in his machines. He responded that he thought they were plenty straight and accurate enough "out of the box" for him to use. Hence, my affinity for them as well. I'm not knocking anyone's advice against them, just saying why I lean toward the designs that feature them in the construction.
Thanks for your input.
Gary
 
1st pic = Bad: Once I placed my dovetail on my Y plate I could no longer access the mounting bolts for the Y plate or my Y lead screw nut mount.

2nd = Good: The dovetail mounts to the front of the Y plate. All bolts are accessible AFTER assembly. Also widened the two plates mounted on top of the Y rail pads so there are two fasteners under the Y plate. Also accessible AFTER asembly.

3rd = Band aid: Had to add end gussets to support my X axis from flexing.
 

Attachments

  • X1.JPG
    X1.JPG
    28.7 KB · Views: 664
  • X2.JPG
    X2.JPG
    29.2 KB · Views: 673
  • CNC1.JPG
    CNC1.JPG
    42.8 KB · Views: 684
cnc inlay design

Before you make you final descion on materials. Make sure you look at all the
tolerances on them. (straightness/twist/tolerances)
If you look at gantry routers, there is a price point where aluminum extrusions go away and other materials are substituted.
If the foundation of the machine isn't correct, you'll spend the
rest of your time trying to figure out why your machine isn't doing what you want.
Accuracy is a fickle mistress. She's not cheap. You alone must decide how much accuracy you need.

Side note! I wouldn't recommend milling anodized extrusions. Hard on tooling, and
even with coolant, you will still generate enough heat to affect the flatness of the final
product.
 
save money save time

I have do a lot of reading on here and other forums and found for cue works inlaying taper
Unique Products, Inc, Bludworth , build the best cnc almost turn key . I also was think just Build Your own but cost would start about $2000 just for base frame and the motors,control box for good usa for $800. So i Gave up on Build cause design changed the build just was to much for me working fulltime and just building cues for fun.
But i did more read online and found to me the best cnc for me portable 3 axis at a low price heres the link .

PS i ve been setting it up to inlay and taper, also be able to do a number of other things
3x4 so 36 in by 48 in

http://cncmogul.com

hope you like the info

Buchanan Custom Cues
 
round rails

This has been a great thread considering I am looking to do the same thing. I just have a couple of questions. Steve had mentioned not using round rails and I have come across a deal on 1" supported round rails with 6" long beatings I was wanting to use on my X axis. Are they that much of a problem to use? I know the UN supported rails will flex but what do you guys think about these? Also about what oz motor are most of you using on your machines?
Thanks for any help,
Donnie

Donnie

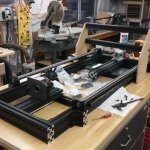
I really do prefer the square rails as opposed to round rails. Supported rails are certainly much better than round, and you can build an excellent machine with them. But, if I have a choice I will choose the square rails. The are much shorter in height so the machine can be much more compact. They are stronger, will support more load, and will last longer than round rails. They are readily available on ebay for pretty much the same money as the round ones, so It's kind of a no brainer.

On to motors. Ounces per inch is a measurement for holding torque. Most of the time, a motor with a big holding torque will have a high impedance and won't like to spin very fast. We don't really need to go fast building cues, but I promise you that if you build a machine that can only move at 20 inches a minute, you will regret it. You will end up trying to move it too fast and losing steps.

In a properly setup and run stepper system, you should pretty much never miss steps.

I strongly recommend Gecko drives and motors.

The G540 is a small 4 axis motherboard and drives combination that will handle 50 volts and 3.5 amps. I have at least a half dozen of them in my shop right now, and am adding 4 more.

The G203v drives are absolutely fantastic. They will handle 70 volts and 7 amps so they will drive strong fast motors. I have 2 of these on my inlay machines and they run perfectly. I will be adding another inlay pocket machine soon and will use another G203v setup. The drives are individual and require a motherboard and all the related hardware so they are more difficult to setup. But they are good.

I use the same motor for either drive, the 400 ounce motors from Gecko. They're cheap, have excellent linearity, and work very well with either drive. They are rated at about 5 amps, but still work well on only 3.5 amps with the G540.

I recommend reading all the support information on their website. Here's a link to the support page:
http://www.geckodrive.com/support.html
You can't help but learn a lot about CNC systems by reading this. I've been doing it for over 8 years, and I still go back and read parts again. Especially when I'm trying to figure something out.

Well, I hope that helps

Shoot Straight!
 
Royce,
Thanks for taking the time and giving me some great ideas. I have done some reading on the G540 but I actually did not know Gecko had steppers. I am still doing a lot of research but I hope to be getting close. So many ideas, designs and so on... Hard to nail down one final plan.

Thanks again!
 
Well, it's been a while, (and I knew it would be), but my CNC inlay machine is starting to take shape. What you see in the pictures is the first prototype I put together. The base of the machine is fixed, but I was still tinkering around with the gantry. Right now the gantry uprights here are MDF, but they will be 3/8" thick 6061 aluminum. The .pdf of the side elevation is the final design. Long axis (X-axis for me) travel will be 29". Short axis (Y-axis) will be 16", and the Z-Axis travel will be 4".
8020 aluminum extrusion construction, primarily.
Gecko G540 controller. Still deciding on the CAM software.
More pictures to come, but here's what I have now.
Gary
 

Attachments

  • Base Frame.jpg
    Base Frame.jpg
    77.6 KB · Views: 410
  • Prototype1 #1.jpg
    Prototype1 #1.jpg
    91.2 KB · Views: 402
  • Prototype1 #2.jpg
    Prototype1 #2.jpg
    86.7 KB · Views: 385
  • Side Elevation.jpg
    Side Elevation.jpg
    73.5 KB · Views: 328
Last edited:
Gary

That look pretty nice!

All in all, you'e done a great job.

As a machine builder who has stubbed his toe a time or two, I have a couple of recommendations. Certainly not criticism, just sharing a couple of things I've learned the hard way.

For your gantry uprights, I strongly recommend using 1/2" jig plate instead of the 3/8" extruded 6061-t6. I'd even consider going to 5/8". The uprights do more than carry your cut load. They also provide tremendous damping for vibration. It's better to go too thick than too thin. Mic-6, also known as jig plate is cast in sheet and cut flat. You really need the uprights to have very consistent thickness, and the extruded plate just doesn't do it.

Also, you should consider adding a bottom connecting plate between the gantry uprights. Yes, you'll have to put some feet on the ends of the machine and make room for it to travel under your frame, but it will tremendously stiffen the gantry.


Every design has it's soft points, and with gantry routers it's the gantry stiffness. At least it is for me anyway. By using the better grade and thicker materials as well as the bottom connector plate, your gantry will be much much stronger. And that's a good thing. I know we're not cutting steel and our cut loads are very low, but that flex will happen just on the change of direction. And when you're in the corner of an inlay pocket you just don't want any flex to allow the cutter outside it's intended path. .001" of momentary flex doesn't seem like much, but it will make a difference. And a weak gantry will easily flex that much on direction changes. Remember, it will be carrying around 20 to 50 pounds of router and rails and screws and stepper motor, etc.


Just some friendly thoughts. It looks great, and you will enjoy it tremendously.


Shoot well!

Royce
 
On a friends machine, he had some trouble with it occasionally. It turned out, that he did not have all the cables correctly shielded and grounded. There was interference getting to some cables, and being the primary causes.
The lesson is that you can buy the correct shielded cable that is used in commercial cnc machines, and it really should be used in the home ones as well. They did it for a reason.
It is looking really good what you have done so far.
Neil

I am just too slow at typing compared to Royce. A support underneath does make the whole thing a lot stiffer and will pay dividends in the repeatability and accuracy on the Y axis .
 
Last edited:
CNC design

That's a great looking machine. Looks like a lot of thought went into it.

Can't say enough good things about Cast plate. It's much more stable than formed 6061. Anytime you machine 6061 it tends to move. Just like wood it has internal stresses(from the extruding/forming process) that are released when you remove material.

A simple test you might try on your ballscrews is to put an test indicator on the very end. Run your gantry back and forth. The end of the ballscrew shouldn't move along the axis. If it does, you have slop in the mounts. Course the end of the screw must be machined flat. Sometimes they are just saw cut.
 
Guys,
Thanks for all the input - it would be a far less sophisticated machine if it weren't for this forum and the generosity of members here with their ideas and experience.
Royce, adding legs to clear a bottom brace will not be hard, I think I will add that brace. I looked into the Mic-6 and it is not terribly expensive, so I'm checking with my supplier and others for availability.
Neal, I have some shielded cable, thanks for that tip.
I've still got a ways to go, and then there is the CAM learning curve to tackle.
But it's all fun as well as educational.
Gary
 
Royce: You had told me "For your gantry uprights, I strongly recommend using 1/2" jig plate instead of the 3/8" extruded 6061-t6. I'd even consider going to 5/8". The uprights do more than carry your cut load. They also provide tremendous damping for vibration. It's better to go too thick than too thin. Mic-6, also known as jig plate is cast in sheet and cut flat. You really need the uprights to have very consistent thickness, and the extruded plate just doesn't do it."
Steve: You had told me: "Can't say enough good things about Cast plate. It's much more stable than formed 6061. Anytime you machine 6061 it tends to move. Just like wood it has internal stresses(from the extruding/forming process) that are released when you remove material. "

Needless to say, I was a little skeptical, but I went ahead and priced out the Mic-6. In the meantime, I ordered some 1/2" 6061 Aluminum plate to prototype my gantry uprights. After carefully cutting, drilling, and tapping most of the necessary holes, I went to mount my uprights. I have two blocks on each square rail. I found that when I snugged up the screws attaching the uprights to the blocks, the blocks would tighten up on the rails, even freeze up. After much cussing and wondering "what the [expletive deleted] " I remembered both your recommendations. Below is what I found:

As you can see, the Al plate is bowed between 1/32" and 3/64" across a mere 6" span. So when I try to tighten my uprights against the rail blocks, the blocks get pulled out of alignment. I was really surprised it was SO much bowed. Anyway, I'm in limbo until I can get the Mic-6 delivered. I've got other tasks to work on in the meantime.
Thanks again for your input and hopefully this lesson I learned will save someone behind me some time, aggravation, and money.
:thumbup:
Gary
 

Attachments

  • 20140701_173527.jpg
    20140701_173527.jpg
    79 KB · Views: 494
Royce: You had told me "For your gantry uprights, I strongly recommend using 1/2" jig plate instead of the 3/8" extruded 6061-t6. I'd even consider going to 5/8". The uprights do more than carry your cut load. They also provide tremendous damping for vibration. It's better to go too thick than too thin. Mic-6, also known as jig plate is cast in sheet and cut flat. You really need the uprights to have very consistent thickness, and the extruded plate just doesn't do it."
Steve: You had told me: "Can't say enough good things about Cast plate. It's much more stable than formed 6061. Anytime you machine 6061 it tends to move. Just like wood it has internal stresses(from the extruding/forming process) that are released when you remove material. "

Needless to say, I was a little skeptical, but I went ahead and priced out the Mic-6. In the meantime, I ordered some 1/2" 6061 Aluminum plate to prototype my gantry uprights. After carefully cutting, drilling, and tapping most of the necessary holes, I went to mount my uprights. I have two blocks on each square rail. I found that when I snugged up the screws attaching the uprights to the blocks, the blocks would tighten up on the rails, even freeze up. After much cussing and wondering "what the [expletive deleted] " I remembered both your recommendations. Below is what I found:

As you can see, the Al plate is bowed between 1/32" and 3/64" across a mere 6" span. So when I try to tighten my uprights against the rail blocks, the blocks get pulled out of alignment. I was really surprised it was SO much bowed. Anyway, I'm in limbo until I can get the Mic-6 delivered. I've got other tasks to work on in the meantime.
Thanks again for your input and hopefully this lesson I learned will save someone behind me some time, aggravation, and money.
:thumbup:
Gary


Gary

Well, I'd be lying to you if I told you that I hadn't have pretty much the exact same thing happen to me.

The extruded stuff is great if you machine every mounting surface relative to each other. It's just not flat or consistent enough for a good machine.


Thanks for the update, and the kudo's

Royce
 
damn, not sure how I missed the updates. Machine looks great! I do have some constructive criticism and hope you will not take offense to it.

Why would you feel the need to run the long axis slaved? It appears from the pictures that the ballscrews are around 25mm diameter. One screw coupled with a 380oz. motor and the g540 will be way more than adequate to drive the long axis assuming you have everything aligned properly. Royce making the suggestion to add the feet and the bottom brace will immediately afford you the simple relocation of a single screw to the bottom center of the machine. The other Major advantage is that you will be able to have actual access to the 4th axis instead of being forced to waste it on the slave. Now WHEN and not IF in the future you want to use a real cnc indexer you wont have to scrap your electronics and go searching for a complicated 5 axis bob to run a 4 axis machine. I'd also consider using 3/4" cast plate for the gantry uprights as well as 3/4" for the bottom connector plate.

just my opinion, I know that with experience and ambition you'll want to push the envelope a little more and your really restricting yourself with this setup.

Jake,
No offense taken at all! I welcome all the input from you guys who have walked this path before. You make a good point about slaving or not slaving the long axis with respect to saving a G540 axis. I was working from a base design that had them slaved. Other designs have them single, as you suggest. My thinking was that it would be easier to get the alignment dead nuts with dual drives, but having gotten this far, I realize that it has to be dead nuts no matter what.
I'm definitely adding the bottom brace, so I'll get out the sketch pad and see what it would take to go to a single drive.
I don't want to start a debate/argument, so if anyone else has input on the single versus dual drive, I'd like to hear it. PM if you like.
Thanks everyone for the tips and guidance.
Have a Happy and Safe 4th of July! :thumbup:
Gary
 
Cnc

If you go single, I'd go in the middle between the rails. You can do offset, but risk
skewing under a heavy load. As you are finding out, every thing in cnc design is give and take.
25mm ball screw has plenty capacity. The extra diameter will stiffen the set up(that's a good thing).
For reference a 32mm ball screw easily handles 2550lbs of thrust.
 
Jake,
No offense taken at all! I welcome all the input from you guys who have walked this path before. You make a good point about slaving or not slaving the long axis with respect to saving a G540 axis. I was working from a base design that had them slaved. Other designs have them single, as you suggest. My thinking was that it would be easier to get the alignment dead nuts with dual drives, but having gotten this far, I realize that it has to be dead nuts no matter what.
I'm definitely adding the bottom brace, so I'll get out the sketch pad and see what it would take to go to a single drive.
I don't want to start a debate/argument, so if anyone else has input on the single versus dual drive, I'd like to hear it. PM if you like.
Thanks everyone for the tips and guidance.
Have a Happy and Safe 4th of July! :thumbup:
Gary


Gary

I'm glad that Steve pointed this out because I didn't clarify it in my original post. I would definitely go with a single screw.

Here's the deal. Slaving two axis together isn't really that big of a deal. Mach3 handles it pretty well. Until, that is, you get to a homing routine. Homing slaved axis is quite a bit different than a single. I know of those who have done it, and they all pretty much fought the homing routine. I have 2 gantry machines that use a single screw, and both run very well. One is my inlay pocket machine with the rotary axis on it, and the other is my inlay parts machine. This machine uses a 2 station vacuum hold down system and cuts all the parts and pockets in the inlay slabs. We can go inlay inside of inlay inside of inlay all with no issues. And this is with our infinity inlay technique with razor sharp points. Go to our website to get a peak at some of the inlays in our cues. All were done on these two machines with a single axis screw.

I hope that helps!

Royce
 
[...] And this is with our infinity inlay technique with razor sharp points. Go to our website to get a peak at some of the inlays in our cues. All were done on these two machines with a single axis screw.

I hope that helps!

Royce


I always love reading ad copy, Royce. In part (about your "infinity inlay technique") OB's ad copy reads:"... a sharpness that hasn't been achieved until now." Really?

Below are a few photos of cues I've built over the years. From the top they begin with the mid-90's, and the last one is from a few years ago. I'm petty sure when you're inlaying into material that can't be "filled" (such as silver inlaid into ivory, for example) and you've reached a perfect convergence of the line, you've achieved just about the most "sharpness" possible. 'Nuff said?

TW

Wingsbuttdetail.jpg


Snakewoodbutt.jpg


Tipdetail_zpsde77676d.jpg
 
Really wasn't meant to be ad copy, but I am proud of what we're doing. It was really meant to help Gary.


Nice cues, Thomas. As always, your work is outstanding. I'm glad that you're a custom guy, and I'm a production guy.


Shoot straight!


Royce
 
Back
Top