I don't know about the other million thread followers, but I for one always look forward to reading about how you thriftily scored many of the products in this showcase billiard room. What kind of a deal did you get on the glass shelves???
You are using an out of date browser. It may not display this or other websites correctly.
You should upgrade or use an alternative browser.
You should upgrade or use an alternative browser.
Custom Pool Room
- Thread starter dsoriano
- Start date
I don't know about the other million thread followers, but I for one always look forward to reading about how you thriftily scored many of the products in this showcase billiard room. What kind of a deal did you get on the glass shelves???
Well I didn't get a great GREAT deal on the shelves but I did get a good deal. Of all the glass shops I called here in Austin the average price was in the $300 for the 8 shelves. One place even quoted me $600! But one of my good friend's brother-in-law works in glass and I ended paying $130. Which isn't bad.:thumbup2:
Dont forget to add the most important piece to that bar. I remember somewhere in these 300 posts the wife wanted a wine rack in the middle. Valentines is almost here fella.
Man! I live for your updates, but I die a little every time you post one! Because I know I would never be skilled enough to do something like this myself and I'm having to fight back my jealousy and replace it with happiness for you!
This is just an amazing thread! I have your airline ticket and room ready for when you come to start on my playroom!
This is just an amazing thread! I have your airline ticket and room ready for when you come to start on my playroom!
Dont forget to add the most important piece to that bar. I remember somewhere in these 300 posts the wife wanted a wine rack in the middle. Valentines is almost here fella.
Yeah thats another detail I've been needing to get done. The holdup is me buying a 3.5" hole saw. I’m looking forward to building that for her.
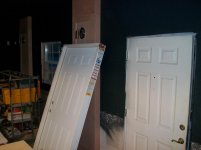
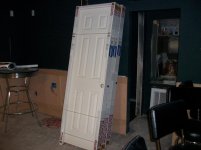
Doors!!!
I was able to pick up the 3 interior doors and the new exterior door. The door I have now wasn't to my liking. It leaked everytime it rained. Instead of pacthing it up I figured it's not worth taking a chance.
I was able to pick up the 3 interior doors and the new exterior door. The door I have now wasn't to my liking. It leaked everytime it rained. Instead of pacthing it up I figured it's not worth taking a chance.
Attachments
This was an exciting week. I picked up the 52" ceiling fans. I chose a set without lights of course and in the satin finish to match all of the other fixtures in the room. I'll be installing these with a 12" exttension pole. .jpg")
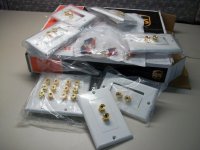
I also received my (3 pairs) speakers in the mail this weekend from www.parts-express.com. I had an option of free shipping 10 days or pay extra and get them in 2. I chose the free shipping and still got them in 2 days! I should be getting the wall plates in the mail soon too.
I'll have to wait to install all this for the reason that the room is really dusty at the moment.
.jpg")
.jpg")
I also received my (3 pairs) speakers in the mail this weekend from www.parts-express.com. I had an option of free shipping 10 days or pay extra and get them in 2. I chose the free shipping and still got them in 2 days! I should be getting the wall plates in the mail soon too.
I'll have to wait to install all this for the reason that the room is really dusty at the moment.
Dont forget to make extra copies of those keys from that new door you'll be installing. Email me when you get copies and ill give you my address ") . Ill need a place to stay when I am in the Austin area this summer. Just remember to have the bar fully stocked and the free will donation jar on the oak bar.
. Ill need a place to stay when I am in the Austin area this summer. Just remember to have the bar fully stocked and the free will donation jar on the oak bar.
. Ill need a place to stay when I am in the Austin area this summer. Just remember to have the bar fully stocked and the free will donation jar on the oak bar.Just wanted to thank you for sharing your massive project with all of us. I have been watching for a month or so and love every update. You are very talented. :thumbup:
dave
Thanks, Dave for the kind words, I'll keep posting.
Speeking of posting I got home yesterday and noticed I received my wall plates in the mail. Woo-Hoo!
Don't know when I'll be putting these up but I'm looking forward to it. At this stage there are so many little details that need time and attention that a small 30 min project can feel overwhelming.
Attachments
Those are fun!!!
Wow
Thats bad ass brother..... I am converting my garage into one What i have used for my table light you might want to try are t-8 2ftx4ft- 4 bulb troffer light and i use two of them 8 bulbs total screw them together and build a nice box around the fixture nice and no shadows... My next fixture will be a 8 bulb t5. Good luck with your build...
Thats bad ass brother..... I am converting my garage into one What i have used for my table light you might want to try are t-8 2ftx4ft- 4 bulb troffer light and i use two of them 8 bulbs total screw them together and build a nice box around the fixture nice and no shadows... My next fixture will be a 8 bulb t5. Good luck with your build...
Cue Rack
Well I didn't get any work done this past weekend due to the nasty weather (stayed in and spent time with the family). But before the weekend on Thursday night my son and I went out back and started to build the Cue rack. I'm teaching him how to work with power tools. So far he's learned how to use the skill saw, jig saw, miter saw, finish nail gun and table saw. He's hasn't mastered them yet, but one day.......
I started by ripping the side partitions and then cut the top and bottom sections. I used a 7/8" bit for the shaft holes and a 1-1/8" bit for the butt seats. I sued solid stock oak for the front facing.


I then cut the pieces for the bottom box section and trimmed it with a 3/4x3/4 cove. I also added the oak veneer to the edges.
I then built the side box rails and attached them to the bottom section with glue and wood screws from underneath. I did the same for the top section. When I ripped the side pieces for the box rails I cut the inside pieces a 1/4" less to accommodate for a mirror backing, which I'll install after I stain the rack.


I chamfered a 45deg edge to the front face of the side boxes just to add a little detail.

Well I didn't get any work done this past weekend due to the nasty weather (stayed in and spent time with the family). But before the weekend on Thursday night my son and I went out back and started to build the Cue rack. I'm teaching him how to work with power tools. So far he's learned how to use the skill saw, jig saw, miter saw, finish nail gun and table saw. He's hasn't mastered them yet, but one day.......
I started by ripping the side partitions and then cut the top and bottom sections. I used a 7/8" bit for the shaft holes and a 1-1/8" bit for the butt seats. I sued solid stock oak for the front facing.
I then cut the pieces for the bottom box section and trimmed it with a 3/4x3/4 cove. I also added the oak veneer to the edges.
I then built the side box rails and attached them to the bottom section with glue and wood screws from underneath. I did the same for the top section. When I ripped the side pieces for the box rails I cut the inside pieces a 1/4" less to accommodate for a mirror backing, which I'll install after I stain the rack.
I chamfered a 45deg edge to the front face of the side boxes just to add a little detail.
Last edited:
Cue rack #2
I cut two openings so I can drill the rack into the top plate using 3" screws. You'll notice these on the last picture. I attached a 3/4" board backing th the rack for this reason.
To hide the cut-outs I'll be adding 4-1/4" crown molding.


For the butt seat holes I cut round pieces of green felt and inserted them in the holes. after I stain the rack I'll apply spray adhesive and they will really sit in the holes cleanly. The adhesive will suck them down and the edges will look lcean and sharp.


I temporally installed it to the wall so it wouldn't get banged up. You can see the cut-outs in the top section. As for the bottom, its opened underneath so I can attached it later with 3" screws to the wall studs.
This rack is huge. Its 2" shy of 6' and fit in between the wainscotting and the ceiling perfectly. When I add the chair-rail around the room on top of the wainscotting, it will wrap around the bottom of the rack making it look built in.

I cut two openings so I can drill the rack into the top plate using 3" screws. You'll notice these on the last picture. I attached a 3/4" board backing th the rack for this reason.
To hide the cut-outs I'll be adding 4-1/4" crown molding.
For the butt seat holes I cut round pieces of green felt and inserted them in the holes. after I stain the rack I'll apply spray adhesive and they will really sit in the holes cleanly. The adhesive will suck them down and the edges will look lcean and sharp.
I temporally installed it to the wall so it wouldn't get banged up. You can see the cut-outs in the top section. As for the bottom, its opened underneath so I can attached it later with 3" screws to the wall studs.
This rack is huge. Its 2" shy of 6' and fit in between the wainscotting and the ceiling perfectly. When I add the chair-rail around the room on top of the wainscotting, it will wrap around the bottom of the rack making it look built in.
Last edited:
Thumbs Up
dsoriano: I just seen these photos and WOW... What a nice room. You are doing some beautiful work. A lot to be proud of. Love the stain glass with the lights. Would like to do that in my game room. If I can figure out where to put one. Did you have that stain glass specially made up? Don't know if I over looked a post but what kind of table do you have? Best of Luck with your game room, it is really beautiful.
dsoriano: I just seen these photos and WOW... What a nice room. You are doing some beautiful work. A lot to be proud of. Love the stain glass with the lights. Would like to do that in my game room. If I can figure out where to put one. Did you have that stain glass specially made up? Don't know if I over looked a post but what kind of table do you have? Best of Luck with your game room, it is really beautiful.
Last edited: