cutting inlay pockets with tiny cutters

dzcues

newbie
Silver Member
There are a few here who are doing some incredible work & I know the difficulty in doing it well. Lately there have been a few well disciplined and on-topic how-to threads. Maybe we can all benefit from a discussion on this topic.

When roughing an irregular pocket with a larger cutter, the amount of stock left is not even, depending on the contour you're cutting, and has led (me) to cutter breakage when a miniscule finish cutter gets buried in a tight corner and is suddenly removing .010" instead of .002".

My solution to this is to always cut my finish contour first, using the offsets that I know from experience will work, then go in with a roughing cutter and clean out the pocket. I do this to guarantee a consistent chip load on the finish cutter to minimize deflection...and breakage. If need be, I can run the finish cutter through once again afterwards but I usually run a test pc first so it isn't a regular problem.

My questions:

What is your approach to this? Rough first, then finish?

Do you ramp or step your finish cutter down to depth... or take final cut at full depth?

For that matter, do you ramp or step your roughing cutter down... or cut at full depth?

Feed rates you use with an .010 or .015 cutter...and at what depth?

I'm curious what you guys are using for spindles. I realize that makes a difference in minimizing runout. See HERE for an old webpage describing my spindle setup.

 
I'd love to hear how others deal with it too!

When roughing an irregular pocket with a larger cutter, the amount of stock left is not even, depending on the contour you're cutting, and has led (me) to cutter breakage when a miniscule finish cutter gets buried in a tight corner and is suddenly removing .010" instead of .002".

I'm using one of the Wolfgang spindles on a Taig CNC mill.

I just finished dealing with this problem myself. I went through $60 worth of .020" cutters dealing with a tight inside corner.

003.JPG

I rough first with a .035" cutter and then I was trying to do the finish cut at full depth. I ended up making the finish cut by stepping down in three passes.

I'm ready to reprogram all my inlays to make multiple passes, but, before I do, I'm curious how others deal with this problem.
 
Last edited:
I rough first, then finish. I step the rough cut. I don't cut that fast. Usually only 10ipm on the rough and 5 on the cleanup. When doing silver, I do 8 on the rough and 2 on the cleanup. I calibrated my machine running at 100ipm's and it was extremely accurate. I then changed the settings in Mach3, so my rapid was maxed at 20.

I leave a .002" border if there's room for the cleanup, which I cut at full depth in both directions. The ring pockets in the other thread, I could only leave .0005" for the cleanup. If I was cutting a larger part (most of my parts are small), I would rough it with a .0313, leaving a .005" border, then do a profile cut, leaving .002" with a .0156 and clean that up with a .010. Obviously, the cleanup will depend on the part. If it's a circle, there's no need to cleanup with the smaller cutter.

The fastest I ever really cut is 12, but I can cut silver with a .010" bit at that speed. I'm sure I could go faster. I just don't see the need. When I step, I step at the diameter of the cutter. If I don't have to bump it up too much to save a step, I will do that. The dot pockets in the other thread are .060" deep and I did them in 3 steps with a .0156" cutter at 10 / 5.

As for Spindles, I have an NSK NR50-5100 ATC. I run it at 50K RPM's. That's what the spindle is rated for. My controller and motor are rated for 60K.
 
How about using a "safe" size cutter to do as much of the pocket possible in your design (pocket/inlay) and then using "rest machening" on your CAM?
That clean up the arrows or sharp corners with the smaler size end bits in multiple passes.
That's my plan, but I do not speak out of experience since I have been rebuilding my machene for quite some time now Bob.

Kent
 
Last edited:
Each size mill has it's limits on depth and speed. I cut what I think is 70% of the mills breaking point on dark material and slow that down on light colored materials. I never push the endmills. I use the same setting with or without a tool change. On some small inlays I cut the finish contour and pop the center out with a chisel. Saves time and machine wear.

You'll laugh at this but I mostly use a modified Dremel tool for my spindles. I have 4 Dremel's and switch motors instead of bits. One Dremel for each size .030",.020", .015" and .010". I built a custom high RPM spindle for my .005" mills and will eventually build one for each size. Once I figure out what the .0??" mill is actually cutting I never remove the mill until it gets dull (this reduces the oops and other stupid reasons we break bits). I record the cut size and every inlay is designed to fit that exact cut size. This saves time and no test cuts are needed until the mill is changed. Every inlay in designed to fit one cue and the bit I'm cutting with so the programs are erased after the cue is finished. I save the drawing and make a new tool path if something happens or JP's are built to match.

Just because your using a .015" mill doesn't mean it's cutting that size. The cut size needs to be measured and every inlay needs to be designed around the actual cut size.


I always ramp. It's simple and no reason to draw the tool path without it.

I added a plumb line to my X axis that helps center and it's 5" behind spindle center. I used to fight finding center and recently started measuring. I'll copy and paste the post from a different thread. It's a basic description and it works in my shop perfect every time and only take a few minutes.


Position the spindle over the point you want the inlay. Don't spend much time centering perfect because it's never perfect. Start the spindle and slowly lower so it cuts a tinny hole (.010" deep works great). Move the spindle to allow enough room to measure from the hole to the edge of the point wood. Zero the caliper and measure the opposite side. Divide that measurement by 2 and you know how far you need to move your spindle and what direction. I move the spindle forward a tinny bit and make a second hole to double check it's perfect and make sure I didn't adjust it the wrong direction. This system works for centering on rings or when an inlay needs replacing. Center the spindle over the inlay as best as possible. Cut the tinny hole in the center of the inlay and measure forward/backward and left/right. Move each axis the appropriate amount. It's simple and takes the guess work out of centering. Works everywhere.

I mounted a 5 times magnifying lamp over my CNC and it has made life easy for my old eyes. This is a must and I can't believe I didn't do this when I started cutting with a CNC.

I have a motor with a pulley next to my rotary table for turning on my CNC. When I need to turn something I mount a live center in the rotary axis and use a small belt from the motor to the live end and it spins the piece with a variable speed control.

I mostly color the glue to match the darker material. If I use fillets colored glue has to be used.


This is all I can think of to share. If it helps anybody it was worth the time to type it. It's crazy how much time it takes to play on the forums. I need to make some dust.
 
Last edited:
I almost always rough cut first, then finish. I like to take about .003 off with the final cut.
I run .02 cutters at 6ipm stepping about .06 per cut if the tool is buried. When running a finish cut with an .02 I'll usually run at least double that speed, cutting full depth.
.015 cutters I slow down to 5ipm and .03-.04 doc (full depth being .06-.08). Finish at full depth, and 12ipm or so.
I run an NSK Planet 500 air spindle. It's actually a precision grinder, but works great for small cutters. I'm guessing I get around 50,000 rpms out of it.
I've posted this here before, but it was a long time ago:
http://sheldoncue.com/inlay.swf.html
Here's another quicky:
http://sheldoncue.com/pock2.swf.html

Sometimes when I'm putting inlays on top of inlays, I am forced to do the finish cut first, with no cleanup passes - to avoid tearout on very thin spots. The pockets are never as clean or precise, but it can be dealt with by modifying the parts slightly and doing a little cleanup by hand on the pockets.

Cool Sheldon - that was exactly what I was trying to explain :-)
I have understood that this is called "Rest machining" where the tool paths
not accessible with the "safe" size endmill is autimatically calculated when you choose a smaller endmill.
Boy I love those rendering thingys - it's pure fun looking at the simulation :grin:
K
 
Sheldon, what software are you using for your programming and simulation?
Thanks Neil
 
Claification

I've read all the responses and I'm still a little confused. I'd like to make sure that I understand correctly.

It appears that most of you cut in multiple steps rather than plunging the cutter to full depth and making one cut. As I've found from my own experience, this definitely prevents the problem Bob described in his original post dealing with cutters buried in tight corners and breaking from the increased tool pressure.

What is not entirely clear concerns the "final pass" (at full depth) that some have described.

For example. I've rough cut my pocket using multiple passes to get to full depth. I change to my finish cutter and again make multiple passes to get to full depth. Now I'm going to make a "final pass" at full depth. Is this final pass actually offset from the previous path and programmed to actually remove a planned amount of material, or is it simply a "cleanup" pass using the same programmed path (perhaps just in the opposite direction) as the "stepped" cuts?

Hope I've made myself clear:o

you rough cut your pocket to your final depth with a wall left for final cleanup sized .001 to .0015. then pocket the big radius left by the rough cut with your finish cutter to final depth leaving a .001 to .0015 wall.then do two cleanup passes to the wall.


bill
 
I always hog to full depth using .0313 cutters in steps. I usually cut in increments the same as the tool diameter. For the .0313 tool, I use .03 depth passes and so on, to final depth. I leave .001 for the clean up. If I have severe corners that leave a lot of material for clean up, I run a pass on the corners using a .025 cutter as a final pass. Again, stepping down the depth equal to the diameter of the tool. (.025 per pass depth). This takes out a lot of the left material in the corners and reduces tool breakage. Then do the final clean up passes with whatever tool you wish, using the tool diameter/ depth per step method.
For speeds, I usually run around 18 IPM on the rough cuts and 4 to 6 IPM on the finish cuts depending on the material. I am running a Wolfgang spindle at 24,000 rpms.
 
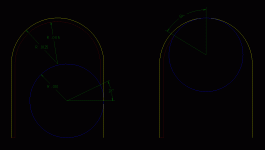
Maybe this sketch will better show the problem with a full depth cut in a tight corner: the left pic shows the amount of cutter engagement when an .020 dia cutter is taking a .001" cut on a straight section. The right pic shows the same .020 cutter when it is taking the same .001" cut in the middle of an .0125 radius.

More than double the cutter engagement - meaning much more tool pressure the small cutter has to deal with in tight corners compared to straight sections.

If there is cutter runout, the load will be applied to only one side of the cutter, effectively halving its life.

And if this contour was roughed with a 1/32 cutter, it would have removed absolutely none of the material in that section.

Stepping the finish cut will ease the load on the cutter but can sometimes degrade the accuracy of the pocket by placing most of the cutter wear in the "step depth" area of the cutter. And if the same approach is used on the inlay, you have compounded the problem. Of course, installing a fresh cutter purely for finishing should solve the problem but I always seem to lose track of which cutters are finish & which are rough.

I will have to look into the "rest" machining Sheldon mentioned. Still haven't heard what software he's using but the rendering looks like mastercam.

As usual, there are several different approaches to this dilemma and I thank all who've replied.
 

Attachments

  • cutter engagement.gif
    cutter engagement.gif
    13.6 KB · Views: 712
Just discovered the "remachining" function in MC (per Sheldon's post) & did a sample toolpath. It calculates what has already been machined & what still needs to be machined, subtracts the two & generates another toolpath for tool #2. Pretty easy to do though processing the nci takes some time. I'll have to try this out soon!

Thanks for pointing out this function, Sheldon.

looks like you found the magic button.good work!

bill
 
Bobcad will do this also.

It won't do it automatically, but all you need to do is drop a line out from the corners and select it as a new pocket. Then just machine that pocket with the smaller cutter.

You can even do this twice if need be. On large inlays like floating points, you can rough with a .125", do first clean up with a .03125", and finish with a .020".

Man, I can't wait until I have a tool changer!
 
Let me through this in the mix.

I have used as large as .125" bits and as small as .0156" bits. I have not used anything smaller. If I where going to, I would avoid sending the smaller diameter cutter around the entire inlay. There is no need to send it crashing into anything. I would simply find the areas that needed a small diameter cutter and break the lines of the pocket geometer in small pieces in that area. This way I can select the corner with two small lines and profile it. This will cut down on the time the cutter is actually cutting and you can control your feeds. You will rapid from one corner to the next above the part. This will reduce cycle time while allowing you to slow down your cut where you need it. You may actually finish sooner than you would otherwise. I should point out here that I would have already profiled completely with a .020 cutter in a clockwise direction. I also would use arc slowdown to slow down in the corners. This is a feature that Bobcad 23 has added. It is also fair to point our that not all endmills are the same quality. Precise bits are the only ones that I will use.

Jim.

I can see your point on something like floating points but I'm only talking about small, delicate inlays...where a trip around the whole perimeter isn't a big deal.

I have, on occasion, done exactly what you describe - isolate the tight spots & create separate programs - but the remachining function (which I just found) automatically takes care of that.

You said you cut in a clockwise direction but you didn't say if that was for an inlay or a pocket. I always climb mill pockets - in a counter clockwise direction - to avoid the cutter's tendency to "dig in" in the corners when conventional milling. It is the preferred method unless you have backlash problems. With finish cuts this shallow it might not make a difference...I just do it because I've done it that way all my life. I still suspect it would make a difference in tight corners though, simply due to the increased cutter load as shown above.

MC doesn't have an "arc slowdown" function but it has a highspeed function for exactly the same purpose. I suppose should look into that, too. I just learned about the "remachining" function yesterday. Maybe today brings more new tools!

Thanks!
 
Cut direction

You said you cut in a clockwise direction but you didn't say if that was for an inlay or a pocket. I always climb mill pockets - in a counter clockwise direction - to avoid the cutter's tendency to "dig in" in the corners when conventional milling. It is the preferred method unless you have backlash problems. With finish cuts this shallow it might not make a difference...I just do it because I've done it that way all my life. I still suspect it would make a difference in tight corners though, simply due to the increased cutter load as shown above.

FWIW -

On the Precise Bits web site, they recommend doing rough cuts using climb milling and doing the light finish cuts with conventional milling.

http://www.precisebits.com/tutorials/inlay_parts.htm
http://www.precisebits.com/tutorials/inlay_pocket.htm
 
FWIW -

On the Precise Bits web site, they recommend doing rough cuts using climb milling and doing the light finish cuts with conventional milling.

http://www.precisebits.com/tutorials/inlay_parts.htm
http://www.precisebits.com/tutorials/inlay_pocket.htm

Yes, I've seen that & I respectfully disagree with that. It goes against all conventional wisdom regarding sound machining practices. In fact, most high speed CNC machinists NEVER conventional mill a profile.

That said, I realize you can sometimes get a nicer finish in some woods if you conventional mill but you still have to deal with cutter pull in corners. In my experience, I am perfectly satisfied with the finishes I get climb milling and my profiles are more accurate than if I conventional milled them.

Sounds like another topic for discussion but I'd like to hear from people with a "real" machining background. No offense intended but many cuemakers only know what they learned from other cuemakers, who may or may not have any real machining experience.

A simple way to approach this is to machine 2 identical, .100" deep rectangular pockets using a 1/32 dia cutter. Keep the corner radii small, say .017" and use the same offsets. Leave .002" per side for a full depth finish cut. Check your sizes & closely inspect your corners. The conventionally milled pocket will invariably be larger & the corners will likely have a slight "divot". The divot may or may not be objectionable in a large inlay but if you're doing thin wall outlines on tiny inlays, the divot will stick out like a sore thumb. I don't care if you do this on a CNC or a Bridgeport...the results will be the same (assuming no major backlash problems).
 
Back
Top