I've searched the forum and cannot find what I am looking for. Due to the nasal problems I have had lately, we are reworking our dust collection system. I'd like some ideas on how some of you guys attach and/or adapt the hose to the machine. I'm not interested in the system, just how it terminates at say, your main engine lathe or your sanding lathe. I would like to see the hoods and such. It would be a great help to me (and probably others) if you could post some pics. I'd really appreciate it.
You are using an out of date browser. It may not display this or other websites correctly.
You should upgrade or use an alternative browser.
You should upgrade or use an alternative browser.
Dust collection ideas
- Thread starter ratcues
- Start date
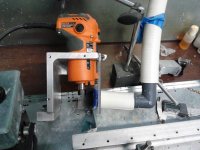
I have posted these before, so you may have seen them already. This was a hawaiian punch jug. My router bracket was a perfect fit inside the width of the jug. It takes about 10 minutes to cut a hole in the jug for the router, cut a hole in the top of the jug for the 4" flex hose (tape isn't necessary if it is a tight compression fit inside the jug), cut access out of the bottom to put the bracket inside (prior to installing the router, and leave that lip for jug strength), cut a hole for the mounting bolt, and of course access holes for the stock.
The entire assembly is removed from my compound as one unit and hung on the wall in seconds. The jug lasts many months before I replace it with a new jug.
Obviously, my router bracket fitting perfectly was lucky, and my method of compound attachment allows the entire router to be encapsulated in the jug. For shaft turning, 98% collection, except for heavy cuts. For roughing in butt stock, heavy chips do escape out of the holes the stock fits through, but the primary purpose of dust collection is DUST collection. This works great for that.
I have posted these before, so you may have seen them already. This was a hawaiian punch jug. My router bracket was a perfect fit inside the width of the jug. It takes about 10 minutes to cut a hole in the jug for the router, cut a hole in the top of the jug for the 4" flex hose (tape isn't necessary if it is a tight compression fit inside the jug), cut access out of the bottom to put the bracket inside (prior to installing the router, and leave that lip for jug strength), cut a hole for the mounting bolt, and of course access holes for the stock.
The entire assembly is removed from my compound as one unit and hung on the wall in seconds. The jug lasts many months before I replace it with a new jug.
Obviously, my router bracket fitting perfectly was lucky, and my method of compound attachment allows the entire router to be encapsulated in the jug. For shaft turning, 98% collection, except for heavy cuts. For roughing in butt stock, heavy chips do escape out of the holes the stock fits through, but the primary purpose of dust collection is DUST collection. This works great for that.
That is inventive but to me it is a big pain in the assssssss to set up everytime you want to turn something round.
I have a small exhaust fan to the outside that keeps the dust from the shop migrating into the house. I only use my dust collector on the drum sander, the band saw, and the cue monster box. I always wear a VOC dual filter mask any time I am cutting anything in the shop. When I am turning anything on the lathe using a router, I just let the chips hit the wall and fall to the floor..... I clean it up when it is about a foot deep. Needless to say, my shop is dusty everywhere.
Kim
How is it a pain in the ass? It taks 10 seconds to pull the unit off the wall, 10 seconds to secure it to the compound, and 20 seconds to put your stock in. Set your depth and make chips. Once the router is set up, it is one unit and the steps are the same as if the dust collection jug wasn't there at all.
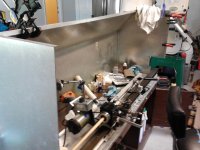
when I am hoging I use the rear discharge and cut from behind
and run the lathe on reverse keeps the dust from getting thrown up in the air. If I am
cutting from the front I can use the side mount and I have a hinged peice I can put on the
metal hood and a little fan in front seems to keep most of it right there
and run the lathe on reverse keeps the dust from getting thrown up in the air. If I am
cutting from the front I can use the side mount and I have a hinged peice I can put on the
metal hood and a little fan in front seems to keep most of it right there
Attachments
Last edited:
I've searched the forum and cannot find what I am looking for. Due to the nasal problems I have had lately, we are reworking our dust collection system. I'd like some ideas on how some of you guys attach and/or adapt the hose to the machine. I'm not interested in the system, just how it terminates at say, your main engine lathe or your sanding lathe. I would like to see the hoods and such. It would be a great help to me (and probably others) if you could post some pics. I'd really appreciate it.
Here's mine home made:
http://forums.azbilliards.com//attachment.php?attachmentid=264603&d=1362688659
http://forums.azbilliards.com//attachment.php?attachmentid=264601&d=1362688636
Last edited:
Yes the vacuum hose hangs from a ceiling hook with surgical rubber tubing which allows the hose to easily follow the movement of the router.
Harbor Freight
So I am setting up a new system in my shop also so I purchased a harbor freight 2HP collector. Everything is going smooth except the plumbing. My plan is to have 1 trunk and with every piece of equipment have a drop with a slide gate. Well this would be great plan until I realized that harbor freight doesn't sell the "Y" adapters separately. So I went to Home depot to buy some and the PVC fittings are 4"ID and the pipe is the same so it is not compatible. Does anyone have a source for the 4" fittings that would work or another solution?
Thanks,
Have you looked at Woodcraft? They have T's and Y's and W's (triples).So I am setting up a new system in my shop also so I purchased a harbor freight 2HP collector. Everything is going smooth except the plumbing. My plan is to have 1 trunk and with every piece of equipment have a drop with a slide gate. Well this would be great plan until I realized that harbor freight doesn't sell the "Y" adapters separately. So I went to Home depot to buy some and the PVC fittings are 4"ID and the pipe is the same so it is not compatible. Does anyone have a source for the 4" fittings that would work or another solution?
Thanks,
http://www.woodcraft.com/category/1002170/dust-collection.aspx
HTHelps
Gary

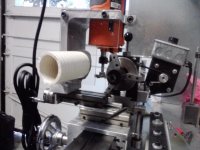
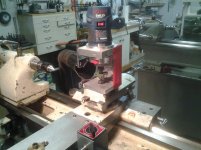
This how I finally configured mine for the Atlas lathe I use for tapering. I used clear lexan and acrylic for all the sides to allow as much light and sight as possible. Using the 4" attachment is the best way to go, if you have the room. I just use canvas tape to closeup around the dowels I'm cutting at that time.
I also have installed some led lights inside as once you start, it can be hard to look in and see whats going on. The last two pics show no light and with the light.
Dave


I also have installed some led lights inside as once you start, it can be hard to look in and see whats going on. The last two pics show no light and with the light.
Dave


Ryan, In you original post you mentioned "Nasal Problems"... Dust collection will certainly help (it will really help keep the shop clean), but if you want to breath better you might consider something like this. :thumbup: Just a suggestion... and you probably already use one anyway.

Here is my dust collection unit.
Showoff....

I wish I had one like that except about 1/4 that size.
Dave
Ryan, In you original post you mentioned "Nasal Problems"... Dust collection will certainly help (it will really help keep the shop clean), but if you want to breath better you might consider something like this. :thumbup: Just a suggestion... and you probably already use one anyway.
View attachment 288336
I wear one pretty much all day. It really sucks but its a necessary evil.
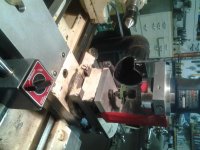
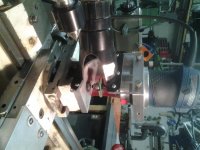
I have had really good success with my setup, if I am getting good suction from the dust collector I get little to no dust on the machine. I have found the secret is to have the intake directly inline with the chips coming off the cutter. You don't need to enclose the whole cutter.
Attachments
Last edited:
I posted the pics from my tab, I am not sure why they turned. Sorry
The reason to enclose it fully is to get the fine dust that you cannot see. An open frame like yours will catch the larger particles, but will still have a large amount of very fine dust (about .5 - 1 micron) floating thru the air that wont show on the surfaces until it builds up enough, but will cause a serious health issue. A handy tool to have is the one that measures the particules in the air. An example is:http://www.pmeasuring.com/particleC...15406d177ba5&gclid=COu_-O3k77gCFUyk4Aod9D8Afg
Measuring when nothing is running and then measuring once you start to cut, it's amazing the amount it increases and yet you can't see them...
Dave
Measuring when nothing is running and then measuring once you start to cut, it's amazing the amount it increases and yet you can't see them...
Dave