SSDiver2112
Esscot Custom Cues
I had an idea and decided to try an experiment. Thought I would share. I have seen some great seamless ferrules. Most people say use epoxy. Some say wood glue if you can do super clean threading.
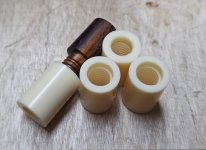
Currently I do not have live threading capabilities. Using epoxy with slip-on or compression threads often leaves a visible glue line. The ferrule is flush and as tight as possible. There is nothing wrong with the ferrule, it is just a visual problem. From experience and reading AZB, the end grain absorbs the epoxy and creates the line.
I had two ideas.
Result


Currently I do not have live threading capabilities. Using epoxy with slip-on or compression threads often leaves a visible glue line. The ferrule is flush and as tight as possible. There is nothing wrong with the ferrule, it is just a visual problem. From experience and reading AZB, the end grain absorbs the epoxy and creates the line.
I had two ideas.
- Use wood glue to seal the end grain to block the epoxy.
- Add white resin pigment to the epoxy to blend it in.
- Just epoxy
- Wood glue seal and epoxy
- White epoxy
- Wood glue seal and white epoxy
Result
- Epoxy as usual has a visible line
- Wood glue seal at first appeared to not work. I noticed the ferrule did not seat flush while clamped.
- White epoxy looks way better, but it also may have been slightly off.
- Wood glue and white epoxy looks the best