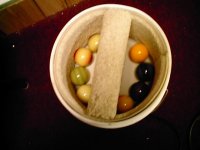
I finished the homemade ball polisher I was going make over a month ago today and I have to say so far it works great! You can polish 8-10 balls at a time it's fast and quiet and is better than doing it by hand or spending $300-$600 for one. Total cost $25.00 + polish. Total time 2 hrs drive time included. Thanks skins for the plans! I am using the Arimath ball polish because I have like 3 bottles of it. Any one looking for an inexpensive ball polisher should try this.
You are using an out of date browser. It may not display this or other websites correctly.
You should upgrade or use an alternative browser.
You should upgrade or use an alternative browser.
Finished my Ball polisher
- Thread starter Strokerz
- Start date

Post some instructions or are you selling them?
Homemade Ball Polisher
I think there might be a link here somewhere with instructions ....memory is failing
My recollection is that you need an everyday car polisher, round plastic bucket with a lid, some plush/pile carpeting, glue, razor blade and, something (at least in this example) like a 3/4" piece of plywood for a divider!?
If possible, please refine the parts list with a little instruction. Thanks")
I think there might be a link here somewhere with instructions
....memory is failing My recollection is that you need an everyday car polisher, round plastic bucket with a lid, some plush/pile carpeting, glue, razor blade and, something (at least in this example) like a 3/4" piece of plywood for a divider!?
If possible, please refine the parts list with a little instruction. Thanks
Here's how I built it, I got these instructions from skins.TannerPruess said:Post some instructions or are you selling them?
Materials
5 gal bucket Lowes $5
10 inch orbital car polisher with round handel K-mart $20.00
Short nap carpet Free from friend who owns carpet company
3m spary glue had some alreday but cost bout $10 a can and lasts forever
1 piece of 2x6 scrap wood or plywood would work also
some long wood screws
The pics I am posting are from my model. Skins plans called for you to use zip ties to hold the polisher in the bucket but I found I didn't need them mine fit pretty snug so I didn't use them but you could
Tools
Carpet knife
Power drill
Power saw
1st step
Cut hole in the bottom of the bucket for plug
put polisher in upside down with the cotton pad on the wheel of the polisher
I switched the on/off switch to the on position
measure your carpet and cut to length. Use spray glue to hold it in place. When gule is dry take your 2x6 cut it to length mine was about 11 1/4 inch
Take carpet cut it to cover top and both sides if wood. Use spray glue to hole carpet to the wood.
Take the carpet covered wood and put in the bucket. Make sure it fits snug but dosen't touch the pad of the polisher but it just sits about 1/4 inch above it. Then take your wood screws and fron the ends screw the wood to the bucket. I used one screw on each end it holds just fine. Your ready to polish. I turn on the machine put the balls in 4 on each side and put a few drops of ball cleaner on the balls while they are spinning. I am thinking about making a cabinet for it to sit in out of plywood to make it look more professional
") I use an extension cord pluged into a power strip for the on/off switch. It takes about 3-5 minutes depending on how dirty the balls are. About 2 minutes for our sets. Any questions feel free to ask
I use an extension cord pluged into a power strip for the on/off switch. It takes about 3-5 minutes depending on how dirty the balls are. About 2 minutes for our sets. Any questions feel free to ask
Last edited:

Wouldn't it work better if there were some downward pressure on the balls? How about a lid with a piece of wood as a divider, maybe a 2x2 attached to the lid, instead of the divider wood in the bucket?
Attached to the underside of the lid and the wood would be some sort of material to polish the balls.... lambs wool, felt, foam, carpet, other?
Might need to drill some holes in the bottom of the bucket to somehow tie down the orbital polisher.
Other ideas?
Attached to the underside of the lid and the wood would be some sort of material to polish the balls.... lambs wool, felt, foam, carpet, other?
Might need to drill some holes in the bottom of the bucket to somehow tie down the orbital polisher.
Other ideas?
I will snap some pics of mine tomorrow....we built with the buffer but I built a box out of wood to hold it. Added an on/off switch. And made a clear plexiglass top with handle to close off the top. You will see in the pics of mine that I added a small piece to the middle of the plexiglass that polished the balls in the middle of the polisher. Mine will hold a full rack of balls and works like a charm.
TheHole said:I will snap some pics of mine tomorrow....we built with the buffer but I built a box out of wood to hold it. Added an on/off switch. And made a clear plexiglass top with handle to close off the top. You will see in the pics of mine that I added a small piece to the middle of the plexiglass that polished the balls in the middle of the polisher. Mine will hold a full rack of balls and works like a charm.
Waiting and wishing for pics and such! Thanks.
im going to have my home table set up soon as tax season is over. Not knocking your plans, it seems like a cool idea and a great way to save some money, which im all for. My question is, is that something you really need or is it just a cool gadget. Can i just polish my balls by hand (man that sounds dirty). Do my balls really need polishing, or can you just wipe em down lol.
We have 11 sets of Super pro balls and it is time consuming to polish all 11 sets by hand. 2 or 3 sets not so bad but 11 once or twice a week yeah I needed a polisher. I had see these plans posted here so i decide to give it a whack. Turned out good I'm happy got $25 invested in athing that makes my life a little easier Cleaner balls longer cloth life better playing conditions!
Cleaner balls longer cloth life better playing conditions!scottycoyote said:im going to have my home table set up soon as tax season is over. Not knocking your plans, it seems like a cool idea and a great way to save some money, which im all for. My question is, is that something you really need or is it just a cool gadget. Can i just polish my balls by hand (man that sounds dirty). Do my balls really need polishing, or can you just wipe em down lol.
Either way I suppose is fine as long as their clean I guess. but the polish makes them look real shiny. Nice for tourneys and such!
scottycoyote said:im going to have my home table set up soon as tax season is over. Not knocking your plans, it seems like a cool idea and a great way to save some money, which im all for. My question is, is that something you really need or is it just a cool gadget. Can i just polish my balls by hand (man that sounds dirty). Do my balls really need polishing, or can you just wipe em down lol.
I made one several years ago and the weight of the balls was enough pressure.JimS said:Wouldn't it work better if there were some downward pressure on the balls? How about a lid with a piece of wood as a divider, maybe a 2x2 attached to the lid, instead of the divider wood in the bucket?
The divider (in my case, I had individual pockets) keeps the balls in place spinning madly against the cleaning pads.
Fred
Thats another idea instead of the divider a series of pockets the size of the ball so they could spin individualy would shine them better I think. Kinda like the Diamond designCornerman said:I made one several years ago and the weight of the balls was enough pressure.
The divider (in my case, I had individual pockets) keeps the balls in place spinning madly against the cleaning pads.
Fred
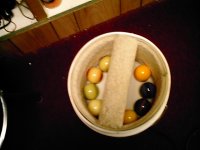
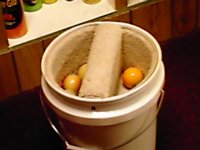
So i'm working on making a ball polisher for a pool room across town I'm almost finished except for installing the divider when a bright idea hits me. hey try it with out the divider and see what happens. So I do and I have to say I am pretty happy with the result I think it works better this way then with the divider. The balls spin better abd faster and the carpet lining contacts more surface with the balls. With the divider you had to as some of us have noticed here ya might have to jossle the balls a bit by hand to get the to move around alot with the divider. This way they move freely. I know your gonna say won't the balls rub against each other? Not really at all. I fuigered they would but they stay pretty evenly spread when doing 8 balls at a time. Total time for a rack about 4 minutes. I will post pics tonight of it in action. .
S
Scottster
Guest
On mine, I built a top polisher.
I used a 3" diameter clear plastic "trinket" holder (Walmart craft section) and then but (8) 4" dowells and screwed them to the trinket holder.
Initially, I was going to use it to space the balls apart. But after gluing the carpet to the dowells, there wasn't enough room. So instead, I used the spare buffing cover that came with the orbital polisher, and stretched it over the contraption, creating a lid.
I thien put 8 balls in the polisher, put the top on and add 4 balls for weight. It works incredible, and the balls stay in place. They dont rub each other.
this is great, thanks