Is It Safe to Have Amateurs Dismantle a Gold Crown?

JC

Coos Cues
Probably not relevant here but if you're going to re use the cloth leave it completely stapled to the center slate and just pull the staples from the end slates and fold it over on top of the center slate. damned near impossible to reattach the side pockets with used cloth but it's fairly easy if you only unstaple the corners.
 

Mike the Beginner

AzB Silver Member
Silver Member
Just a thought. After spending “a huge amount” to build your room, is the effort and potential downside, whatever it may be, really worth quibbling over another $500?
Well, it's sort of complicated. There's only one installer/mover/mechanic in my very rural area. And for insurance reasons he is no longer doing the actual lifting and moving. And he is quite a long distance away from me. So what I am looking at is TWO trips from him, one to take the table apart and another trip on another day to put it back together, plus hiring a moving company in the middle to do the actual moving. The seller is a builder who has built whole houses by himself and is handy with tools, and he thinks if we work slowly and carefully and tag 'n' bag everything we can get it dismantled, and then his two burly college-age sons are going to be here over Christmas to help carry the slates, and he has a giant pickup truck. And I am only two and a half miles away from him on a 25-mph paved road. So we are thinking of dismantling and moving it ourselves to have it ready for the installer who can then make one trip and get it all set up (same guy who set it up for the seller four[?] years ago and it plays very nicely). Plus I am $4k over budget on this project already.
 

Mike the Beginner

AzB Silver Member
Silver Member
The slate is pinned. Do not lift up on the slate until they are apart.
You will be very disappointed in yourself. Many people have moved GC and not known about that, which is why you see slates that are super bondoed at the seams.
I realize on an old GC there is a possibility the slates are pinned. We will proceed very gingerly until we know what's up.
 

Mike the Beginner

AzB Silver Member
Silver Member
pool shed for AZB.jpg

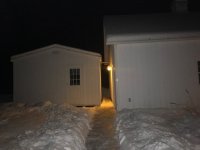
Trim has yet to be done. Shed was intended to have pink insulation, plywood walls, a homemade light, and painted subfloor. What it actually has is spray foam insulation, drywall, the brass pool table light you see here, and the nice commercial carpet remnant arrives next week. The wire sticking out of the wall is for the stereo. Heck, I spent $400 on PAINT.

Interior measurements wall to wall are 14'7" by 19'4". It was ordered at 16x20', but the width measurement is made at the outer edge of the overhang and then you have to account for the thickness of the walls and drywall. The subfloor is a full inch thick and the 2x6's across the skids are set 12" on center in the middle 8' to hopefully give it a little more solidity. Would be better on a concrete slab but y'know how it is, I can only have what I can afford.

Oh, and it originally was not going to have a Gold Crown. Yeah, I am slightly out of control....:cool:
 

Attachments

  • pool shed and barn.jpg
    pool shed and barn.jpg
    34.7 KB · Views: 131
Last edited:

trentfromtoledo

8onthebreaktoledo
Silver Member
View attachment 578362
Trim has yet to be done. Shed was intended to have pink insulation, plywood walls, a homemade light, and painted subfloor. What it actually has is spray foam insulation, drywall, the brass pool table light you see here, and the nice commercial carpet remnant arrives next week. The wire sticking out of the wall is for the stereo. Heck, I spent $400 on PAINT.

Interior measurements wall to wall are 14'7" by 19'4". It was ordered at 16x20', but the width measurement is made at the outer edge of the overhang and then you have to account for the thickness of the walls and drywall. The subfloor is a full inch thick and the 2x6's across the skids are set 12" on center in the middle 8' to hopefully give it a little more solidity. Would be better on a concrete slab but y'know how it is, I can only have what I can afford.

Oh, and it originally was not going to have a Gold Crown. Yeah, I am slightly out of control....:cool:
Cant Wait to see your outcome! You are surely a detail oriented guy, I am sure the table is gonna be even more awesome than the room!

TFT
 

Lawnboy77

AzB Silver Member
Silver Member
Probably not relevant here but if you're going to re use the cloth leave it completely stapled to the center slate and just pull the staples from the end slates and fold it over on top of the center slate. damned near impossible to reattach the side pockets with used cloth but it's fairly easy if you only unstaple the corners.
It may not be relevant, but it sure is a great idea and glad you shared that. I would of never thought of that, thanks. I'll have to store that one away for future reference. You guys over here in the mechanics forum rock!
 

fastone371

Certifiable
Silver Member
View attachment 578362
Trim has yet to be done. Shed was intended to have pink insulation, plywood walls, a homemade light, and painted subfloor. What it actually has is spray foam insulation, drywall, the brass pool table light you see here, and the nice commercial carpet remnant arrives next week. The wire sticking out of the wall is for the stereo. Heck, I spent $400 on PAINT.

Interior measurements wall to wall are 14'7" by 19'4". It was ordered at 16x20', but the width measurement is made at the outer edge of the overhang and then you have to account for the thickness of the walls and drywall. The subfloor is a full inch thick and the 2x6's across the skids are set 12" on center in the middle 8' to hopefully give it a little more solidity. Would be better on a concrete slab but y'know how it is, I can only have what I can afford.

Oh, and it originally was not going to have a Gold Crown. Yeah, I am slightly out of control....:cool:
That will be nice when finished. You guys sure have a lot of snow!!!
 

JC

Coos Cues
It may not be relevant, but it sure is a great idea and glad you shared that. I would of never thought of that, thanks. I'll have to store that one away for future reference. You guys over here in the mechanics forum rock!
I wish I was smart enough for that to occur to me but I was just on slate packing duty when it happened in front of me and I thought "why didn't I ever think of that" :).
 

Mike the Beginner

AzB Silver Member
Silver Member
It may not be relevant, but it sure is a great idea and glad you shared that. I would of never thought of that, thanks. I'll have to store that one away for future reference. You guys over here in the mechanics forum rock!
Yes. absolutely, and I really appreciate that tip JC. We are going to try that. The cloth is newish so we're going to try to preserve it during the move. Thanks again for the great advice.
 

JC

Coos Cues
Yes. absolutely, and I really appreciate that tip JC. We are going to try that. The cloth is newish so we're going to try to preserve it during the move. Thanks again for the great advice.
The only down side is that it can complicate leveling but that can be worked out.
 

ThinSlice

AzB Silver Member
Silver Member
Yes. absolutely, and I really appreciate that tip JC. We are going to try that. The cloth is newish so we're going to try to preserve it during the move. Thanks again for the great advice.
IMO I wouldn’t bother trying to save the cloth. Not worth the headache and if you have it apart it’s really best to recover it. It will last MANY years and you will be much more pleased with the results.


Sent from my iPhone using AzBilliards Forums
 

Mike the Beginner

AzB Silver Member
Silver Member
UPDATE 1: Well, we dismantled and moved the upper part of the table today--rails, skirts, and cloth. No problems. We opted not to use that suggestion of leaving the cloth attached to the center slate because the mechanic who's going to be putting it back together again said he preferred if we didn't. Slate is in good condition! Cloth is essentially new, put on two years ago and hardly played on. It's Championship Invitational. It was fun seeing how it all goes together. They don't build things like they used to.

Rug went in on Monday and looks great.

Seller is a great guy, really nice of him to help me get the table out of his house. He said he was happy AND sad to see it go.
 

Mike the Beginner

AzB Silver Member
Silver Member
Here is a reference to the Gold Crown III Service Manual

Take your time. The slates are about 215 lbs. Best if you can move them with a hand truck or dolly, though two able-bodied individuals can carry them. If using a cart/dolly/hand truck, slide the slates off the sides of the frame, and rest the side edge on the floor, to stand each slate upright. This saves unnecessary lifting. I like to stack components face-to-face, and wrap everything together with stretch wrap. I then wrap all components with mover's blankets, and stretch wrap again. Maybe a couple of quart and gallon storage bags, and a small box for hardware. I generally use a 27 gallon storage tote, which fits everything, including pockets, castings and ball return tray.

If it's not already marked, be sure to mark each slate location. The frame should be factory stamped.

Be careful that you don't bend the ball return rails. Absolutely remove them from the frame. In fact, my first step is to remove the pockets. Second is to remove the ball return.

Might as well continue the procedure:
- Remove hardware securing the ball return tray to the frame
- Remove rail bolts (middle bolt on foot rail requires a shallow socket and ratchet, accessed from the ball storage tray)
- Remove rail top assembly, flip it upside-down, and rest it back on the table (lift head end first to clear the slate, then slide the assembly toward the foot end of the table to clear the ball return tray, then lift the foot end above the table)
- Remove the corner brackets that secure the aprons together
- Remove the bolts that secure each apron the the rail top assembly, as well as the small bolts that secure the end aprons to the ball storage tray
- Remove the bots that secure the ball storage tray (you may or may not wish to separate the ball return tray from the ball storage tray)
- Remove the castings from the rails, by removing the bolts that secure each
- Remove the cloth (make sure that there are NO staples on the underside of each slate)
- Remove screws that secure slates to the frame. These are in-set from the screws that hold the slates to the liners (DO NOT REMOVE THESE)
- Remove slates (Gold Crown III slates should not have alignment dowels)
- Remove inner frame support members
- Remove end frame members (4 bolts total)
- Remove side frame members (4 bolts total, securing members to pedestals)
Geoff, we used your checklist when we started dismantling the table today, as well as the service manual. Thanks again for taking the time, you did us a nice favor and we appreciate your kindness. Thanks to all the others in this thread as well.
 
Last edited:

fastone371

Certifiable
Silver Member
UPDATE 1: Well, we dismantled and moved the upper part of the table today--rails, skirts, and cloth. No problems. We opted not to use that suggestion of leaving the cloth attached to the center slate because the mechanic who's going to be putting it back together again said he preferred if we didn't. Slate is in good condition! Cloth is essentially new, put on two years ago and hardly played on. It's Championship Invitational. It was fun seeing how it all goes together. They don't build things like they used to.

Rug went in on Monday and looks great.

Seller is a great guy, really nice of him to help me get the table out of his house. He said he was happy AND sad to see it go.
How can someone have a Gold Crown in their house and not use it???
 

Mike the Beginner

AzB Silver Member
Silver Member
add2-2.jpg

All done! The slates WERE pinned, but I knew to look for them because of this thread (thanks). I was very fortunate to have a seller who took an active part in helping to move this. I could never have done it otherwise. Big thanks to Mac G. and his sons Ian and Mac.

Thanks for all the great help in this thread, too, I'm grateful. Mechanic arrives on the 11th of January to set it up. I'll post a further update then.

Mike
 

ThinSlice

AzB Silver Member
Silver Member
View attachment 579258
All done! The slates WERE pinned, but I knew to look for them because of this thread (thanks). I was very fortunate to have a seller who took an active part in helping to move this. I could never have done it otherwise. Big thanks to Mac G. and his sons Ian and Mac.

Thanks for all the great help in this thread, too, I'm grateful. Mechanic arrives on the 11th of January to set it up. I'll post a further update then.

Mike

Awesome! Soon you will be enjoying it. You can assemble it all the way to the slates. Leaving the rails and skirts off. That will make the installers job much easier and quicker.


Sent from my iPhone using AzBilliards Forums
 

bradsh98

Bradshaw Billiard Service
Silver Member
All done! The slates WERE pinned, but I knew to look for them because of this thread (thanks). I was very fortunate to have a seller who took an active part in helping to move this. I could never have done it otherwise. Big thanks to Mac G. and his sons Ian and Mac.

Thanks for all the great help in this thread, too, I'm grateful. Mechanic arrives on the 11th of January to set it up. I'll post a further update then.

Mike
Nice work.

The slates are pinned, because this table is not a Gold Crown III. It looks to be a Gold Crown I, that someone has stripped and refinished. I like the frame design of the I and II's better anyway. The biggest issue you will have with a I, as opposed to a III, will be if you need to replace the cushions. Modern day K55 cushions are not a direct replacement.. Not a huge issue, but there are several different solutions, all with different outcomes. If you would like more information, I would be happy to expand on it. With any luck though, your current cushions are in good shape.

It sure looks like you're going to have a nice room to play in. I'm looking forward to seeing the end result. You've also got a pretty good looking friend there.
 

fastone371

Certifiable
Silver Member
Nice work.

The slates are pinned, because this table is not a Gold Crown III. It looks to be a Gold Crown I, that someone has stripped and refinished. I like the frame design of the I and II's better anyway. The biggest issue you will have with a I, as opposed to a III, will be if you need to replace the cushions. Modern day K55 cushions are not a direct replacement.. Not a huge issue, but there are several different solutions, all with different outcomes. If you would like more information, I would be happy to expand on it. With any luck though, your current cushions are in good shape.

It sure looks like you're going to have a nice room to play in. I'm looking forward to seeing the end result. You've also got a pretty good looking friend there.
A GCIII would have had the bronze finish on the the cast pocket surrounds and feet, correct??
 

trentfromtoledo

8onthebreaktoledo
Silver Member
A GCIII would have had the bronze finish on the the cast pocket surrounds and feet, correct??
it is surely not a GC3. The leg stretcher bolts are a give away. and also can see one of the flanges that is mounted on the top of the apron. It is a GC1. GC2 even has some of the bronze color parts, feet and ball storage metal.

TFT
 

ThinSlice

AzB Silver Member
Silver Member
Or a hybrid. Which is also common. Makes no real difference unless you are selling it and want a table that is authentic.


Sent from my iPhone using AzBilliards Forums
 
Top