You are using an out of date browser. It may not display this or other websites correctly.
You should upgrade or use an alternative browser.
You should upgrade or use an alternative browser.
Just a couple tips
- Thread starter pulzcul
- Start date

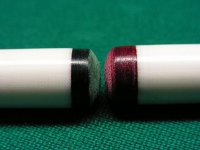
It looks like maybe you did these tip jobs yourself? You'll want in the future to take care and center the tips carefully. The Superpro tip was glued on pretty off center. Look at the crown...you'll notice the layers are not centered. As the layers get smaller you see that they are cocked off to one side. It should look like a bullseye or target with the smallest or center bullseye should be dead center. Also I see some chips along the ferrule face where the tip meets the ferrule. Take a few very small passes and go slowly...that will clean up the chipped line and give give a nice flat, clean edge. Not trying to harass you...just offering a couple helpful tips.:wink:
Not trying to hijack your thread but I wanted to share a pic of the layers centered. This is the best pic I could find. Notice how when the layers get smaller on the crown they stay centered. When you glue on the tips make sure that you have the same amount of tip hanging off the ferrule edge all the way around. I know sometimes its easy to glue one on off center but you think its ok because there is still tip covering the ferrule...I'd rather cut that tip off and start over. Also notice the clean ferrule edge where it meets the tip. I hope this helps.:smile:
Attachments
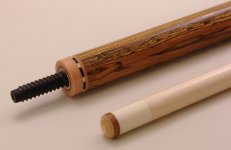
I love this picture. Thought you might too. Tiger Emerald and a super pro
Very Cristmasy!!
Very Cristmasy!!
that is exactly what I was thinking, then i scrolled down and saw your post, Great minds think alike!!!
I really like the photography, those are cool pics. thanks for sharing them
It looks like maybe you did these tip jobs yourself? You'll want in the future to take care and center the tips carefully. The Superpro tip was glued on pretty off center. Look at the crown...you'll notice the layers are not centered. As the layers get smaller you see that they are cocked off to one side. It should look like a bullseye or target with the smallest or center bullseye should be dead center. Also I see some chips along the ferrule face where the tip meets the ferrule. Take a few very small passes and go slowly...that will clean up the chipped line and give give a nice flat, clean edge. Not trying to harass you...just offering a couple helpful tips.:wink:
Why tip manufacturers don't sell 14MM holed/slotted tip holding jig, I have no clue.
It'd cost two layered tips.
It looks like maybe you did these tip jobs yourself? You'll want in the future to take care and center the tips carefully. The Superpro tip was glued on pretty off center. Look at the crown...you'll notice the layers are not centered. As the layers get smaller you see that they are cocked off to one side. It should look like a bullseye or target with the smallest or center bullseye should be dead center. Also I see some chips along the ferrule face where the tip meets the ferrule. Take a few very small passes and go slowly...that will clean up the chipped line and give give a nice flat, clean edge. Not trying to harass you...just offering a couple helpful tips.:wink:
Sorry, I disagree with your analysis. If the layers are consistently thick and parallel to the face of the ferrule, it doesn't matter how much overhang there is on one side of the shaft. Once the sides of the tip is trimmed, one has no clue how much overhand there was initially. That isn't the problem. Either:
1. Some of the layer thicknesses are not consistent, causing the pattern when the tip is properly domed. (I have seen this in super pro...they are great tips, but they are cheap after all)
2. The back of the tip was sanding too much and at an angle causing the layers to be angled in relation to the face of the ferrule, causing the pattern.
3. The crowning job is not true, more was taken off on one side than the other causing the pattern.
Kelly
Edit: I do know that super pros are slightly pre domed, so gluing it on off center, and not removing ENOUGH material when crowning could cause the problem, but technically that is problem number 3. If one glues it on and then does zero crowning, then I agree with your analysis...but I assume a crowning job was done to the tip in the pic.
Last edited:
Varney Cues said:When you glue on the tips make sure that you have the same amount of tip hanging off the ferrule edge all the way around. I know sometimes its easy to glue one on off center but you think its ok because there is still tip covering the ferrule...I'd rather cut that tip off and start over.
This has got to be the dumbest statement I've seen in a long time. Please reconsider this one, Mr. Cuemaker :speechless:
Amigos
Eric, I was thinking the same thing if you guys don't MIND.
cool! cool! "country"
that is exactly what I was thinking, then i scrolled down and saw your post, Great minds think alike!!!
I really like the photography, those are cool pics. thanks for sharing them
Eric, I was thinking the same thing if you guys don't MIND.
cool! cool! "country"
This has got to be the dumbest statement I've seen in a long time. Please reconsider this one, Mr. Cuemaker :speechless:
How so? I'm speaking of tips that are crowned/domed already like the Superpro pictured or like some of the Talisman. When they are already crowned, care needs to be taken to center the tip for the install to be as was intended for the tip. How would you feel if you were watching someone work on your shaft & say they glued your new tip with it flush on one side and all the excess hanging off the other? Sure...you can trim it down far enough that it'll look ok...but that was not what was done to the tip in the picture. Also consider this...many tips are compressed with the edges being much firmer than the center...like Elkmaster, Lepro, etc. Now what happens when you install it off center? The softer hitting exact center is now cocked over to one side & the tip may very well hit differently depending on how its rotated & where the cueball is struck. Just my opinion...but I'll stand by it.
It looks like maybe you did these tip jobs yourself? You'll want in the future to take care and center the tips carefully. The Superpro tip was glued on pretty off center. Look at the crown...you'll notice the layers are not centered. As the layers get smaller you see that they are cocked off to one side. It should look like a bullseye or target with the smallest or center bullseye should be dead center. Also I see some chips along the ferrule face where the tip meets the ferrule. Take a few very small passes and go slowly...that will clean up the chipped line and give give a nice flat, clean edge. Not trying to harass you...just offering a couple helpful tips.:wink:
Your input is ok with me. Yes i did do them myself. But I used a willard tipper/cutter and the tip was centered. It even trimmed well. I didn't even notice the darn thing was off center till you said something. My guess was the tip was cut off center from the beginning. I'll look closer in the future. Thanks Don
Sorry, I disagree with your analysis. If the layers are consistently thick and parallel to the face of the ferrule, it doesn't matter how much overhang there is on one side of the shaft. Once the sides of the tip is trimmed, one has no clue how much overhand there was initially. That isn't the problem. Either:
1. Some of the layer thicknesses are not consistent, causing the pattern when the tip is properly domed. (I have seen this in super pro...they are great tips, but they are cheap after all)
2. The back of the tip was sanding too much and at an angle causing the layers to be angled in relation to the face of the ferrule, causing the pattern.
3. The crowning job is not true, more was taken off on one side than the other causing the pattern.
Kelly
Edit: I do know that super pros are slightly pre domed, so gluing it on off center, and not removing ENOUGH material when crowning could cause the problem, but technically that is problem number 3. If one glues it on and then does zero crowning, then I agree with your analysis...but I assume a crowning job was done to the tip in the pic.
Ah but I have to disagree. All of your points are well taken had that been the case but actually it wasn't over sanded or misaligned. As it turns out the tip was mis cut from the start I just didn't see it till you guys noticed. Don
It looks like maybe you did these tip jobs yourself? You'll want in the future to take care and center the tips carefully. The Superpro tip was glued on pretty off center. Look at the crown...you'll notice the layers are not centered. As the layers get smaller you see that they are cocked off to one side. It should look like a bullseye or target with the smallest or center bullseye should be dead center. Also I see some chips along the ferrule face where the tip meets the ferrule. Take a few very small passes and go slowly...that will clean up the chipped line and give give a nice flat, clean edge. Not trying to harass you...just offering a couple helpful tips.:wink:
The chips are from the Willard 'tapered' cutter. If you go in to far the blade catches the ferrule. I'm using a magnifying glass now to see better and get it just right. Trial and error. Thanks again for the input. Don
The chips are from the Willard 'tapered' cutter. If you go in to far the blade catches the ferrule. I'm using a magnifying glass now to see better and get it just right. Trial and error. Thanks again for the input. Don
I know what you mean...many, many, many years ago...I used a Williards as well. Its like using a pencil sharpener to trim the tip. When grinding the ferrule face flat, try using a lighter touch and that will help keep the ferrule face edge cleaner without the chips....some of the linen base ferrules are rather brittle. And a very close eye is needed to make sure you don't sharpen the ferrule as you trim the tip. Just to clean things up a bit...you can use superglue gel to fill in the the ferrule/tip seam and then sand flush. If tips are something you do often or enjoy doing...give serious consideration to one of the Hightower small lathes or the Unique Travel tipper. I really like the Travel tipper if tips & ferrules are all you need to do. It'll easily pay for itself rather quickly just doing work for friends. This will allow for an absolute top notch professional job and no ferrules will be harmed.:wink:
Last edited:
The chips are from the Willard 'tapered' cutter. If you go in to far the blade catches the ferrule. I'm using a magnifying glass now to see better and get it just right. Trial and error. Thanks again for the input. Don
Be on a lookout for some old Sears/Atlas mini-lathe on Craigslist in your area.
Sometimes widows just give them away.
That's how Kevin got his first Atlas. He dated the widow though.

Be on a lookout for some old Sears/Atlas mini-lathe on Craigslist in your area.
Sometimes widows just give them away.
That's how Kevin got his first Atlas. He dated the widow though.
LMAO. You have to hit it to get it!:grin:
LMAO. You have to hit it to get it!:grin:
That's how I got my first Logan. She was a good cook too.:grin: