Logo transfers

bob_bushka

AzB Silver Member
Silver Member
To my understanding cuemakers can make their own logos on a computer and print them out as transfers which applique to the cue. Anybody doing this? I guess it takes a special paper and I want to know what it is and how to apply them transfers. If anyone is doing this please PM it to me.

Thanks
 
I used to do that before I started signing them.. I went to a graphic artist by my shop and had him make them for me. It is called a vinyl transfer. You need to use the thinest avaiable. I think it is 2 mil thickness! I used clear with black lettering. It worked really good. I started signing them because it makes the cue more personal!!! My customers like it better also!
 
To my understanding cuemakers can make their own logos on a computer and print them out as transfers which applique to the cue. Anybody doing this? I guess it takes a special paper and I want to know what it is and how to apply them transfers. If anyone is doing this please PM it to me.

Thanks

Look up Micro Mark small tool specialists www.micromark.com/decalling.html. Their catalog has everything for putting decals on models.

Regards,
Stoney
 
To my understanding cuemakers can make their own logos on a computer and print them out as transfers which applique to the cue. Anybody doing this? I guess it takes a special paper and I want to know what it is and how to apply them transfers. If anyone is doing this please PM it to me.

Thanks

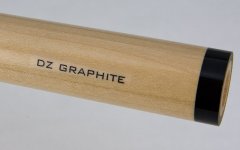
I mainly use decals on my Graphite shafts. Like Mase, I buy mine at http://www.decal-paper.com/inkjet.html

Their procedure follows:

Step #1: Design your decals using any graphic software program. (Use 8 1/2 " x 11" sheet BEL INK JET Decal Paper or cut sheet into half if desired.)


Step #2: Set your printer as follows:


Resolution = Best
Paper = Photo Gloss
(Print your decal on the glossy side of BEL INK JET Decal Paper.)


Step #3: Spray your printed sheet evenly with Krylon Acrylic Crystal Clear High Gloss spray until the sheet has a shine (2-3 coats). Allow 30 to 60 minutes to dry and set. (This product is available at any craft or hardware store such as Loews, Home Depot, Ace Hardware, Walmart, etc. Any acrylic clear coat spray will work.)


Step #4: Cut out your image using a standard pair of sharp household scissors.


Step #5: Place decal into a cup of clean water for 45-60 seconds and remove when the thin decal film begins to slip along backing. (Discard backing material after the decal has been removed)


Step #6: Apply decal to clean surface; ceramic, glass, metal, plastic, soap, candles, mylar balloons, model trains, planes, cars, etc.


Instead of using Krylon, I use the same automotive clear I use on my cues.
 

Attachments

  • IMG_5685a.jpg
    IMG_5685a.jpg
    74.7 KB · Views: 348
These are called waterslide decals. If you are doing black or a dark color decal on a light colored background that will work fine. However, if you need a white decal to put on a dark background (dark wood, or black butt cap, etc.) then you need a special printer. If anyone needs something like that let me know I can make them for you.
 
Back
Top