:: My First Tip Change (by hand) - How do i improve? ::

LuckyStroke

Full Splic Addict
Silver Member
I watched that video and decided I couldn't trust myself changing a tip with those methods. Not being critical of the methods, I just know me :eek:. Macallan gives you balls? No kidding man. How do you go from a house cue to a southwest? Lol

Seriously, I think you did a good job. If your pictures weren't so damn good you wouldn't see any imperfections.

Ben
 

Celtic

AZB's own 8-ball jihadist
Silver Member
Doing tip jobs by hand takes for ever but most of the absolute best tip installations I have had were done by hand with old school Tweeten glue.

Back when I did my own I would prep the tip surface with sandpaper, clean it extremely well to get rid of al the dust, and then apply the Tweeten on the tip and the ferrule and let the glue set on both for a few minutes to stiffen abit and soak into the tip and ferrule. I would then apply the tip and hold it on with elastic bands. I would store the shaft tip down on a piece of cardboard overnight while the glue hardened as I never liked working on the tip until it was completely attached.

After that sanding of the side of the tip was done with a flat piece of wood that I glued two grits of sandpaper to. Tip tools that trim the sides of the tip I always found put too much rotational stress on the tip and could make it come loose. I also always sanded downward towards the ferrule and not up towards the top of the tip so as to not risk delaminating the tip.

The final bit of sanding was done with ever increasingly fine grit sandpaper simply folded over on itself and held in a half moon shape. Eventially you can get it dead flush with ultra fine grit sandpaper. Then I burnished the hell out of it until the shaft was almost too hot to touch.

The tips came out phenomenally well, but this took HOURS. But those tip jobs are the ones I played until the tip was a nub and when it finally came time to take those tips off it was a gigantic PITA as they were so well glued on. Many "pro" tip jobs I had when I went to take the tip off to replace it I found sections where the tip meets the shaft often have blue chalk residue where you can tell the tip was not attached to the ferrule as it should have been. That type of small imperfection has a big effect on the "feel" and sound of a cue and the feedback you get when you shoot.

Your tip job there looks pretty good TBH. I am not sure I would ever bother to buy a cue repair lathe to only deal with my own cues. I might do one tip job every year, even when I was playing a lot.
 

The Renfro

Outsville.com
Silver Member
I have an old copper beryllium scraper that was my grand dads that will hold a very very keen edge... I use it on a block of wood to do all of my intial trimming around the sides... It is very long so it rides down the the side of the shaft and ferrule and it takes about 2-3 minutes to get the initial overhang off.... I've used nothing but it and sand paper when I was hard up and couldn't get my cue to my repair guy..... Took a piece of pvc and split it to make a shaper by glueing the sand paper in it.... I just hauled a south bend 40" metal lathe home a month ago so those days will be over sooon =)
 

x3dnd3x

Trainee Chalk Collector
Silver Member

x3dnd3x

Trainee Chalk Collector
Silver Member
For someone who's doing it by hand for the first time, I would say its a very good start. Most starters actually face the same issue which is maintaining the ferrule FLAT. Not alot of issues when it comes to trimming/shaping the tip.
 

AlexandruM

AzB Silver Member
Silver Member
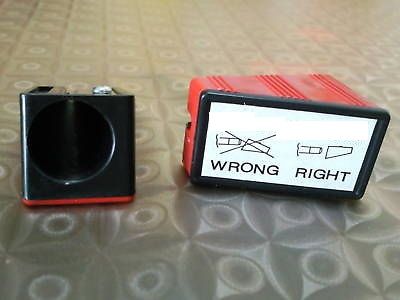
Yup I actually used this yesterday and they work great.

This is the best little tool to trim down tip flush with ferrule. Then burnish with a thick piece of leather. I have used Locktite brand Ultra Gel glue for a long time and have never had a tip come lose or off......

I think using this tool you can't obtain two parallels sides of the tip, the tip will be thinner at the top than at the base.
 

Jive

Professional Racker
Silver Member
I think using this tool you can't obtain two parallels sides of the tip, the tip will be thinner at the top than at the base.

Nope it won't i used it yesterday and it was really good. You don't use it like a normal sharpener but you need to level the top to be parallel with the shaft. It's cheap and great!
 

AlexandruM

AzB Silver Member
Silver Member
Nope it won't i used it yesterday and it was really good. You don't use it like a normal sharpener but you need to level the top to be parallel with the shaft. It's cheap and great!

Hmm, I'll try it next time when i put a new tip, I have that tool but used it once and it sharpened the tip, I think I used it wrong.

PS You did a great job for your first time.
 

Jive

Professional Racker
Silver Member
Hmm, I'll try it next time when i put a new tip, I have that tool but used it once and it sharpened the tip, I think I used it wrong.

PS You did a great job for your first time.

If you sharpened the tip that means you had the sharpener resting on the table the the blade is slanted. The Blade side (top side) should be parallel with the shaft.
 

Inaction

AzB Silver Member
Silver Member
It has been years since I installed my own, here is my method.

Sand the bottom of the tip to make it flat and so it has a better surface for the glue.

Cut into the tip with a utility knife so the super glue goes into the tip a bit more. More flat sanding needed after this step.

Apply super glue, let it set a few seconds and apply the tip. Hold tight for about 30 seconds before releasing. Let dry about 30 minutes.

I used a utility knife to trim the sides of the tip. Then color the sides with a Sharpie.

Polish the sides with a dollar bill, or a twenty if you are a money player.

I don't think I ever had one come off early.
 
Top