I do remember seeing yours. What are all the screws at the bottom of the bucket?skins said:you might have got the idea from me...............
one bucket, 20$ orbital buffer (harbor freight), 3m spray glue,carpet, piece of wood, some long wood screws, tie straps.............
You are using an out of date browser. It may not display this or other websites correctly.
You should upgrade or use an alternative browser.
You should upgrade or use an alternative browser.
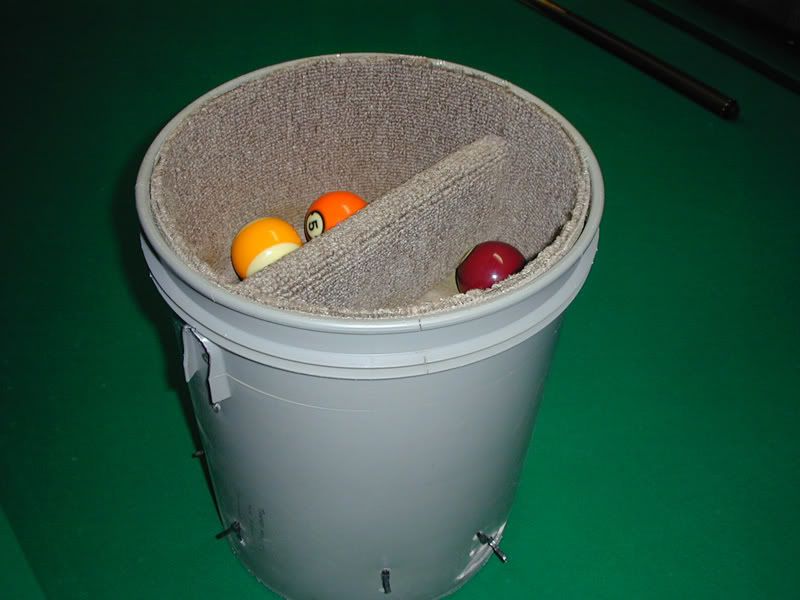
My home-made ball polisher.
- Thread starter mattman
- Start date
I see the real benefit of having dividers would be the fact you are using more surface space of the polishing bonnet. The down fall is that you couldn't easily remove the polisher....in case you wanted to wax your vehicle, unless you made it is such a fashion you could do so.
If you notice, I cut the yardstick, and drilled a small hole in each side. I twisted a piece of wire in the holes so the yardstick can't come out. Untwist one wire, slide out the yardstick and you have your polisher.
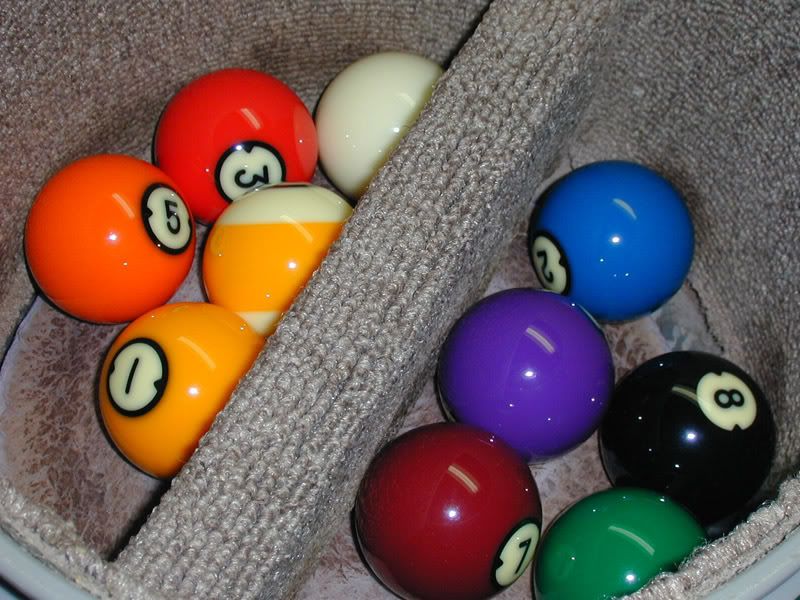
Now, the real reason I did this is to prevent the balls from rolling around in a circle. The paint roller forces a more random roll.")
Now, the real reason I did this is to prevent the balls from rolling around in a circle. The paint roller forces a more random roll.
I saw a very similar one in Louisville at the Derby City Classic. It was on display and made by Diamond (cost something like $600) The main difference was instead of just having a board as a seperator making two compartments, they had a board laid down horizontal on top of the buffing pad with round holes cut in it for each ball to sit in, if this makes sense? Kind of like the way a chamber of a revolver holds bullitts.
I got my design from skins and modified it. I made mine with the divider to start but took it out and it seems to do a better job with out it. The balls spin very fast and polish up great. With the divider it seems like I needed to agitate the balls by hand every now and then to get them to jumble around and get completely polished. Mine does 8 at a time and works great. ive been using it for about 6 months and polish 11 sets of balls 2 times a week, It's holding up very nice and I have about $25 invested in it total and about and hr to put it together. Great design for any one with an home table that wants a cheap polisher or for a room on a budget ya cant go wrong
Same question...
I have the same question for DawgAndy...
frankncali said:Do you use these at the same time or not?
I have the same question for DawgAndy...
S
Snoogi
Guest
Great scott..this really looks wonderful..skins said:you might have got the idea from me...............
one bucket, 20$ orbital buffer (harbor freight), 3m spray glue,carpet, piece of wood, some long wood screws, tie straps.............
Whether can pot balls or not another thing but me gonna make one for myself first..
They rarely touch while being polished seems like 8 balls is enough to space them out so they usually only touch when ya first start the polisher. Very little if any contact. 6 months + with ours and its still goin strong, We also use the Arimath ball cleaner polish, works great and you use very little.mattman said:Yeah...I though about putting some diverders in it to keep the balls from touching each other, but didn't want to spend that much time on it when it's 100+ degrees outside. Most of the time, they run around in a circle with a gap between them. I promise that the balls endure much more impact with each other on the table than in the contraption.
Contact Cement
Mattman
Thanks for the design. Does any old contact cement work or did you buy a specific brand or type?
Stephen
mattman said:I spent $6 for some contact cement from Home Depot and glued in on there.
Mattman
Thanks for the design. Does any old contact cement work or did you buy a specific brand or type?
Stephen
Yeah...I think about any kind of glue would work, even if you have some elmers laying around. I think I hot glue gun would work better. It would probably be easier to remove to replace the carpet after time. Somebody on here used some spray adhesive.thelanz said:Mattman
Thanks for the design. Does any old contact cement work or did you buy a specific brand or type?
Stephen
Yeah....I think you will have to change it over time, but it might be a while. Like I stated above, you might consider something less permanant, so that you could easily replace the carpet.JimS said:Doesn't the polish accumulate on the carpet causing a sticky surface and require replacement of the carpet at regular intervals?
I guess I'm just going to have to build one.
I seen a picture of one on here that had one of those very large paper clamps holding the carpet to the bucket.
Strokerz said:I got my design from skins and modified it. I made mine with the divider to start but took it out and it seems to do a better job with out it..... With the divider it seems like I needed to agitate the balls by hand every now and then to get them to jumble around and get completely polished.
i don't have this problem at all......

JimS said:Doesn't the polish accumulate on the carpet causing a sticky surface and require replacement of the carpet at regular intervals?
I guess I'm just going to have to build one.
sure it will accumulate over time but then again it will also "embed" itself in the porous surfaces like the buffer pad and carpet and after it does it will alow you to polish the balls by just spraying a very tiny bit of Windex or other glass cleaning solution on the balls as they are spinning. this will "awaken" the old polish and make the balls polish even better. if you use it allot, i would take the buffer out of the bucket once a year, replace the buffer pad, and "re-season" it from the start. if you use it occasionally, who knows how long things will work good. it has the potential to last a long time. good luck.
mattman said:I do remember seeing yours. What are all the screws at the bottom of the bucket?
those aren't screws, they're tie straps that aren't trimmed yet. i use 6, 2.5 inch decking screws for the center wood divider. 3 per side..... you can use any longer wood screws you'd like but i like decking screws.
how many?
How many of them tee shirts have you given out for ball cleaning ?--Leonard
I hope you know I'm kidding
Njhustler1 said:Here's a pic of my home-made ball polisher:
http://a1.vox.com/6a00c225256c85f21900c2252583f9604a-200pi
How many of them tee shirts have you given out for ball cleaning ?--Leonard
I hope you know I'm kidding
Last edited:
skins said:sure it will accumulate over time but then again it will also "embed" itself in the porous surfaces like the buffer pad and carpet and after it does it will alow you to polish the balls by just spraying a very tiny bit of Windex or other glass cleaning solution on the balls as they are spinning. this will "awaken" the old polish and make the balls polish even better. if you use it allot, i would take the buffer out of the bucket once a year, replace the buffer pad, and "re-season" it from the start. if you use it occasionally, who knows how long things will work good. it has the potential to last a long time. good luck.
Sounds like an experienced reply. Thanks.
And maybe the spray-on glue would be a good idea. My experience is that it's not extremely sticky and would allow the carpet to be pulled off if/when needed.
I"m making the mental movie of the process involved in making mine. Sounds like fun fabricating this. Gotta do it.
skins said:those aren't screws, they're tie straps that aren't trimmed yet. i use 6, 2.5 inch decking screws for the center wood divider. 3 per side..... you can use any longer wood screws you'd like but i like decking screws.
I guess I missed the part where the function of the tie straps is explained. What are they for? Maybe the polisher has a round handle on the top and this these straps tie it down so it doesn't spin?
how about this for the top.
to maximise the area used to polish (and so speading up the polishing time).
how about this.
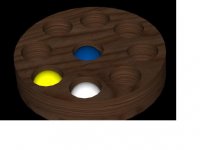
use 3 pieces of 1" plywooth , so u the total thickness is bigger then the size of a poolball. then cut the plate round = the innerdiameter of the bucket.
with a ***** (dont know the word) u cut the round holes in the wood.
put carpet around the inside of the freshly cut out tubes from the plywood.
put the balls in the wholes and turn the machine on.
something like this.
ps maybe the balls will spin less quick as there is more friction :s
no idea really. at least your balls will never tough eachother, its a easy spacing system to make..
what u think will work best?
u could even add a round top with carpet that once the balls put in place, u cover it with.
like that u have polishing effects beneath, above and 360? around.
easy to make , stable as u can use as much screws as u want to fix the circel.
my 0.2c. ill be making one this week sounds like a fun and cheap project.
to maximise the area used to polish (and so speading up the polishing time).
how about this.
use 3 pieces of 1" plywooth , so u the total thickness is bigger then the size of a poolball. then cut the plate round = the innerdiameter of the bucket.
with a ***** (dont know the word) u cut the round holes in the wood.
put carpet around the inside of the freshly cut out tubes from the plywood.
put the balls in the wholes and turn the machine on.
something like this.
ps maybe the balls will spin less quick as there is more friction :s
no idea really. at least your balls will never tough eachother, its a easy spacing system to make..
what u think will work best?
u could even add a round top with carpet that once the balls put in place, u cover it with.
like that u have polishing effects beneath, above and 360? around.
easy to make , stable as u can use as much screws as u want to fix the circel.
my 0.2c. ill be making one this week
sounds like a fun and cheap project.Attachments
Last edited:
A "hole-saw" and yes, they make them in all sizes....they just attatch to the end of a drill.Solartje said:with a ***** (dont know the word) u cut the round holes in the wood.
The only problem I see with this is I doubt the balls would spin well, if at all. Now, if you made it to where the bottom was stationary and the plywood spun, that would work. If you just like building and want it to look professional, this might be the ticket. Although, I think it's way over designed. There is nothing wrong with the balls touching each other and as already stated, they don't touch each other all that much anyway.