My drawing below may look somewhat confusing at first, but I'll try to explain exactly what the drawing is describing.
...........................
.
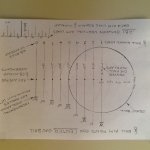
The drawing shows verticle lines as aim points for Center CB. Each line represents a 1/8 ball overlap.
Many folks visualize a ball overlap. The problem by aiming that way is your OB always looks smaller.
The further away the OB the smaller it looks.. and by visualizing a overlap how precise is it actually?
Picking a known aim point for Center CB would be more precise.. The drawing shows OB aim points.
Numbers on top of each line shows a cut angle for that line (The incremental overlapping cut angles)
Those cut angles are within 1.5 degrees of the actual cut angle, but they are just easier to remember.
AzBforums member AtLarge posted actual cut angles in the Main forum. Let's do an OB comparison.
Line number.. Drawing angle.. Actual angle.. Angle difference
1.................... 0....................... 0.................... 0
2.................... 7...................... 7.2................. -.2
3................... 15..................... 14.5............... +.5
4................... 22..................... 22................... 0
5................... 30..................... 30................... 0
6................... 40..................... 38.7................ +1.3
7................... 50..................... 48.6................ +1.4
8................... 60..................... 61................... -1.0
9................... 90..................... 90................... 0
The numbers in my drawing are easier to remember... The short lines under 0, 15, 30, 50 & 90 are ball quarters.
The horizontal fractions, inside the OB, show the 1/8 ball overlaps for each of the 5 corresponding vertical lines.
The ruler (bottom right) shows 5 aim line spacings.. These 5 aim point spacings are used inside & out of the OB.
Aim lines are more precise inside of the OB... Center 0*... OB edge 30*... 1/2 way between 0 &30 is 15 degrees.
You'll need to project center CB & the OB center line to the rail and then compare it to your pocketimg line angle.
When your pocket angle is found just aim your center CB at the known vertical aim line for your pocketing angle.
Another thought that may help when using inside CB spin.. Aim at a vertical line next to the pocketing angle line.
Never aim your CB center beyond the 90* line. :-) ... Play well... Carl
Note:
To hit the 5 outside vertical aim points exactly is hard but it's a good reference for CP2CP aiming.. Inside the OB
aim points are easier because you use the OB center and OB edge as guides to "see" your aim lines 1, 3 and 5.
.
...........................
.
The drawing shows verticle lines as aim points for Center CB. Each line represents a 1/8 ball overlap.
Many folks visualize a ball overlap. The problem by aiming that way is your OB always looks smaller.
The further away the OB the smaller it looks.. and by visualizing a overlap how precise is it actually?
Picking a known aim point for Center CB would be more precise.. The drawing shows OB aim points.
Numbers on top of each line shows a cut angle for that line (The incremental overlapping cut angles)
Those cut angles are within 1.5 degrees of the actual cut angle, but they are just easier to remember.
AzBforums member AtLarge posted actual cut angles in the Main forum. Let's do an OB comparison.
Line number.. Drawing angle.. Actual angle.. Angle difference
1.................... 0....................... 0.................... 0
2.................... 7...................... 7.2................. -.2
3................... 15..................... 14.5............... +.5
4................... 22..................... 22................... 0
5................... 30..................... 30................... 0
6................... 40..................... 38.7................ +1.3
7................... 50..................... 48.6................ +1.4
8................... 60..................... 61................... -1.0
9................... 90..................... 90................... 0
The numbers in my drawing are easier to remember... The short lines under 0, 15, 30, 50 & 90 are ball quarters.
The horizontal fractions, inside the OB, show the 1/8 ball overlaps for each of the 5 corresponding vertical lines.
The ruler (bottom right) shows 5 aim line spacings.. These 5 aim point spacings are used inside & out of the OB.
Aim lines are more precise inside of the OB... Center 0*... OB edge 30*... 1/2 way between 0 &30 is 15 degrees.
You'll need to project center CB & the OB center line to the rail and then compare it to your pocketimg line angle.
When your pocket angle is found just aim your center CB at the known vertical aim line for your pocketing angle.
Another thought that may help when using inside CB spin.. Aim at a vertical line next to the pocketing angle line.
Never aim your CB center beyond the 90* line. :-) ... Play well... Carl
Note:
To hit the 5 outside vertical aim points exactly is hard but it's a good reference for CP2CP aiming.. Inside the OB
aim points are easier because you use the OB center and OB edge as guides to "see" your aim lines 1, 3 and 5.
.
Attachments
Last edited:

")
