You are using an out of date browser. It may not display this or other websites correctly.
You should upgrade or use an alternative browser.
You should upgrade or use an alternative browser.
PETE TONKIN..Amboyna Burl
- Thread starter tikkler
- Start date
Amboyna Burl cue
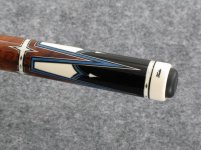
I just wanted to take the time to point out that the points where machined out of a solid block and slid over the forearm and butt sleeve so there is no seam where the points and bridges meet. With this method we can keep the figure in the Amboyna burl in alighment through out the whole cue.
Also the veneers in the chevrons on top of the minor points were bent the hard way with steam so the color would match the veneers in the major points.
Thanks for looking and all the nice comments.

Hey
Pete, Can you give us all a little more insight into the building of this cue
I just wanted to take the time to point out that the points where machined out of a solid block and slid over the forearm and butt sleeve so there is no seam where the points and bridges meet. With this method we can keep the figure in the Amboyna burl in alighment through out the whole cue.
Also the veneers in the chevrons on top of the minor points were bent the hard way with steam so the color would match the veneers in the major points.
Thanks for looking and all the nice comments.
View attachment 231177
Pete, Can you give us all a little more insight into the building of this cue
Amboyna Cue Construction
Steve, I would be happy to do that the best way to explane it would be to post some pictures of your monster cue and of Brian's cue they are at differnt stages and the pictures would help explane it.
If it's ok to post the pictures I will put some thing together.
Take Care,
Pete
Pete, Can you give us all a little more insight into the building of this cue
Steve, I would be happy to do that the best way to explane it would be to post some pictures of your monster cue and of Brian's cue they are at differnt stages and the pictures would help explane it.
If it's ok to post the pictures I will put some thing together.
Take Care,
Pete
Hey
Pete, I think that would be great for all of us to get a chance to see....please do it.
Steve, I would be happy to do that the best way to explane it would be to post some pictures of your monster cue and of Brian's cue they are at differnt stages and the pictures would help explane it.
If it's ok to post the pictures I will put some thing together.
Take Care,
Pete
Pete, I think that would be great for all of us to get a chance to see....please do it.
Point construction
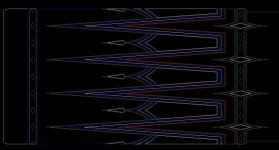
Now the chevron minor point caps have been put in and the pockets for the point veneers and bridges have been cut. To cut the miter on the bridges it is a compound angle so you have to put them in a fixture in the A axis and index + 45 deg to cut one side and -45 deg to cut the second miter.


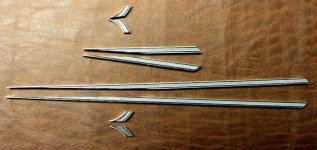
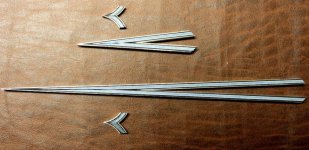
These are the veneers and chevron caps for the cue with the ivory points they are mitered and ready to go in to the cue.


Now the chevron minor point caps have been put in and the pockets for the point veneers and bridges have been cut. To cut the miter on the bridges it is a compound angle so you have to put them in a fixture in the A axis and index + 45 deg to cut one side and -45 deg to cut the second miter.


These are the veneers and chevron caps for the cue with the ivory points they are mitered and ready to go in to the cue.


Point construction
I hope the pictures help a little to explane how the one piece points are construced. If anyone has any questions I will do my best to answer them. The only thing I will not tell is how the point block was machined it took me a year to figure out how to get the square core out of the point block this was the biggest piece of the puzzle.
I hope the pictures help a little to explane how the one piece points are construced. If anyone has any questions I will do my best to answer them. The only thing I will not tell is how the point block was machined it took me a year to figure out how to get the square core out of the point block this was the biggest piece of the puzzle.
Pete, This is the greatest post I have ever seen since I have been on here. showing all this detail on how you are constructing your incredible cues is just out of this world. thank you so much for giving all of us this insight into your work.
I second this! Pete, thank you very much for giving a peek into the build process...I for one find it absolutely fascinating!
Steve, your pictures are pretty much second to none...kinda like your collection! :wink:
Cue Construction
Steve, Thank you for asking and allowing me to put up pictures of your cues that are still under construction. I enjoy doing doing stuff like this and I truly feel it is good to educate people to what is under the surface.
Some times a cue can look very simple but can be very complex to build and go unnoticed.
Pete, This is the greatest post I have ever seen since I have been on here. showing all this detail on how you are constructing your incredible cues is just out of this world. thank you so much for giving all of us this insight into your work.
Steve, Thank you for asking and allowing me to put up pictures of your cues that are still under construction. I enjoy doing doing stuff like this and I truly feel it is good to educate people to what is under the surface.
Some times a cue can look very simple but can be very complex to build and go unnoticed.
Last edited:
Hey
Adam, anytime my friend......how cool is that to see the behind the scenes at Petes shop. we never get to look at this kind of detail on how he makes these great cues. I wish more people would show this kind of detail
Great post and it was awesome to look at this cue first hand.....
Steve invited me over his house to check out his collection......wowwww is an understatement....thanks again Steve it was great
Adam, anytime my friend......how cool is that to see the behind the scenes at Petes shop. we never get to look at this kind of detail on how he makes these great cues. I wish more people would show this kind of detail
Great cue Steve. Pete, you outdid yourself. Truly a beautiful cue. Congrats on a great addition and a great build.


