After cleaning the Porper B Chuck, I have found it difficult to realign the chuck concentric to the mounting plate. Anyone that has overcome this problem please share your knowledge. Thanks, Raildriver
You are using an out of date browser. It may not display this or other websites correctly.
You should upgrade or use an alternative browser.
You should upgrade or use an alternative browser.
Porper B Chuck Alignment
- Thread starter Raildriver
- Start date
Eric Wynne
Banned
Referring to the aluminum indexable backplate , you can snug the chuck bolts and adjust slightly with a index setup ... Also the 3 set screws that secure backplate to spindle can be adjusted for less runout . I got it to .0005 runout ...
Porper Chuck
Sounds like a plan. Better than I was coming up with in my own pea-brain. :grin-square:Thanks
Sounds like a plan. Better than I was coming up with in my own pea-brain. :grin-square:Thanks
Sounds like a plan. Better than I was coming up with in my own pea-brain. :grin-square:Thanks
The way Porper recommends adjusting the chuck on a B-lathe is with a Dial Indicator. Snug but do not tighten the chuck to the back plate, place a Dial Indicator on the side of the Chuck and check the run out. Since the bolts holding the chuck are only snug, lightly tap the chuck with a rubber mallet. Check with a Dial indicator for run out, and continue to tap the chuck until you have alignment!!
Take care
I agree with Craig almost totally except for one point.
I don't care how much R/O is on the circumference of the chuck, I want to know what's going on in the jaws.
A method that I use to check this is exactly as Craig describes except that I chuck onto a short length of 5/8" - 3/4" tool steel rod an indicate IT'S R/O.
Thanx Craig, you saved me a lot of writing.
i have 2 porpers around my shop i use for secondary operations both have rear chucks i ground a a steel rod on a centerless grinder then i put the rod through both chucks you must losenen the all the bolts on both front and rear chucks
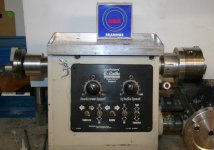
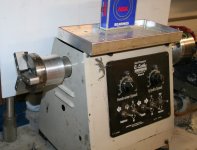
not too lose i put a gauge on both front and rear steel sticking out from the chuck maybe 1/2" from the jaws using a small ball pean hammer to slightly tap on the chuck til you have zero run out then snug bolts at this time i turn on the lathe at a slow speed and the needle should not move it is very possible to get zereo run out from this machine now here is the catch .... both bearings should be good the bigest reason these lathes have runout is there bearings go bad also causing the through spindle to wear out if this has happened you need to replace bearings and through spindle some thing i have done on both my machines now they have zero run out and you really need that if you doing cue work
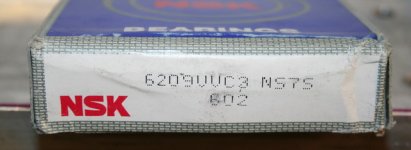
nsk bearing number 6209vvc3 ns7s 602
i am enclosing some pictures also my phone number if you need some help...lee
517 677 1468 cell
not too lose i put a gauge on both front and rear steel sticking out from the chuck maybe 1/2" from the jaws using a small ball pean hammer to slightly tap on the chuck til you have zero run out then snug bolts at this time i turn on the lathe at a slow speed and the needle should not move it is very possible to get zereo run out from this machine now here is the catch .... both bearings should be good the bigest reason these lathes have runout is there bearings go bad also causing the through spindle to wear out if this has happened you need to replace bearings and through spindle some thing i have done on both my machines now they have zero run out and you really need that if you doing cue work
nsk bearing number 6209vvc3 ns7s 602
i am enclosing some pictures also my phone number if you need some help...lee
517 677 1468 cell
Attachments
Porper Run-Out
Thanks everyone. Cue repair/building is hard enough much less having to fight with a machine too. I really appriciate you guys and this website. :grin:Raildriver
Thanks everyone. Cue repair/building is hard enough much less having to fight with a machine too. I really appriciate you guys and this website. :grin:Raildriver
I agree with Craig almost totally except for one point.
I don't care how much R/O is on the circumference of the chuck, I want to know what's going on in the jaws.
A method that I use to check this is exactly as Craig describes except that I chuck onto a short length of 5/8" - 3/4" tool steel rod an indicate IT'S R/O.
Thanx Craig, you saved me a lot of writing.
Thanks KJ, I totally agree your method certainly makes more sense, and it would also be more accurate.
Take Care
The best thing I did to this lathe was lock the backing plate to the spindle then reface it and mount the chuck. I personally don't like the feature of a somewhat adjustable backing plate on a light duty lathe like this. It's a great machine and works well for me.
chuck
this is also what I did Mike. I couldn't believe how far out it was before I faced it off. Pat Diveney
The best thing I did to this lathe was lock the backing plate to the spindle then reface it and mount the chuck. I personally don't like the feature of a somewhat adjustable backing plate on a light duty lathe like this. It's a great machine and works well for me.
this is also what I did Mike. I couldn't believe how far out it was before I faced it off. Pat Diveney
dave sutton
Banned
I agree with Craig almost totally except for one point.
I don't care how much R/O is on the circumference of the chuck, I want to know what's going on in the jaws.
A method that I use to check this is exactly as Craig describes except that I chuck onto a short length of 5/8" - 3/4" tool steel rod an indicate IT'S R/O.
Thanx Craig, you saved me a lot of writing.
i was bored last night and didnt want to make dust so i did this instead.
not .0005 tho:sorry: cough(showoff)
excellent advice
Face
Mike,
I did the same but in a different way. I turned a piece of round stock in the metal lathe and slid the backing plate on. Almost a press fit then I faced both the front and back mounting plates. More time consuming and you need a big lathe but the payback is worth it.
All good info here.
John
The best thing I did to this lathe was lock the backing plate to the spindle then reface it and mount the chuck. I personally don't like the feature of a somewhat adjustable backing plate on a light duty lathe like this. It's a great machine and works well for me.
Mike,
I did the same but in a different way. I turned a piece of round stock in the metal lathe and slid the backing plate on. Almost a press fit then I faced both the front and back mounting plates. More time consuming and you need a big lathe but the payback is worth it.
All good info here.
John
Mike,
I did the same but in a different way. I turned a piece of round stock in the metal lathe and slid the backing plate on. Almost a press fit then I faced both the front and back mounting plates. More time consuming and you need a big lathe but the payback is worth it.
All good info here.
John
I took my chuck off & faced the mounting plate while on the lathe so I knew it would be dead nuts square to center. A thread on mounting plate will never be right unless it's faced after install.
With my self centering chucks, I set up a bar in the 4 jaw chuck. Trimed it to clean up so all of the chucks could close onto it,( 1 at a time).
Then I close the 3 jaw chuck onto the turned bar. I then skim the back face of the chucks. This way the back of the chuck runs true to the average of the jaws so there is a minimum of swash.
You then still need to check it for zero when you remount it on your spindle.When done correctly, you should be able to put a test bar into the chuck, dial in zero at the jaw end and still be zero 4 inches out.
Neil