I ran across this old picture I took years ago and thought I would share it with the group.
I have to say that the Elkmaster tip has been the bane of my existence.

An interesting side note, this picture this was taken after the shaping of the tip.
Bryan )
)
I have to say that the Elkmaster tip has been the bane of my existence.
An interesting side note, this picture this was taken after the shaping of the tip.
Bryan
)

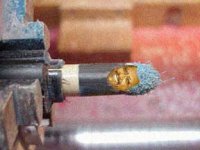
 Is this what happens when a tip becomes delaminated?