Restoring '46 Brunswick Anniversary - Castings Concern

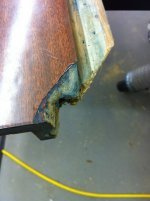
I know the wood veneer part is just a thin layer on thin plywood. I understand now what you both are trying to get across (just remove the decorative veneer portion).

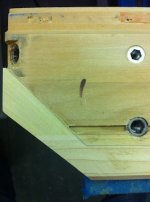
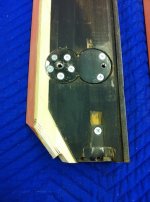
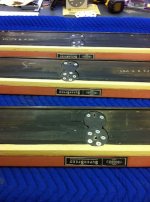
I've attached a photo of a new, built-to-order unclad oval leg. These hollow spaces really do exist on the originals, which I believe explains why they were nailed down every couple of inches. Regardless, I will be chemically stripping one of the ovals to see what kind of condition the veneer is in. I still think it would be easier to just do a rough sanding of the existing veneer, then adhere new veneer to the ovals, and re-band around them. I do have to make new connectors because they got all bent up trying to remove them without damaging the bands.

Yep you got it then, you're right it would be easier changing the band as long as it's made some way you could add a 1/2" to 1" without it being noticeable.

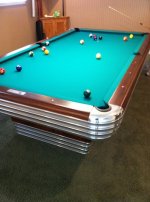
I took off all my rails and pockets last night, ripped that trash I loosely referred to as my original cloth off, and put your old simonis on same as the old stuff just friction fit with the rails holding it on and no staples, not really even tightened down much.

Wow, night and day difference. I didn't get the rails fully recovered yet, but just with the bed cloth changed it's great... Thanks again, words don't describe the difference in how it plays, it's like an actual brunswick gold crown now.:thumbup:

Then after a little playing today I feel like an amateur who can't seem to keep the tip of the cue from molesting the cloth, little blue spots cropping up...
I never noticed when it wasn't my table, never had my own table...

I guess I have to find some better chalk in the right color and learn to play more carefully.
 
Last edited:
Be very careful sanding the veneer. There isn't much to sand. If someone restored this table before, they probably sanded most of the top layer anyway. Don't attempt to remove all the scatches because you will sand through the veneer.

I recommend striping with Citri strip. Very low odor and washes off easily. Wear gloves. It will remove paint and the finish Brunswick originally used.

That frame was made to take the plywood of your choice (match to your table). To bend the plywood, make vertical relief cuts 3/4 of the way through the back of the ply with a table saw or circular (skill) saw. Bend, glue and nail the ply around the radius. Make the joints at the flatter spots on the frame. I recommend taking your time and do several fit up before using glue and nails.
 
See link... which restoration do you think most closely represents original color?

Be very careful sanding the veneer. There isn't much to sand. If someone restored this table before, they probably sanded most of the top layer anyway. Don't attempt to remove all the scatches because you will sand through the veneer.

I recommend striping with Citri strip. Very low odor and washes off easily. Wear gloves. It will remove paint and the finish Brunswick originally used.

That frame was made to take the plywood of your choice (match to your table). To bend the plywood, make vertical relief cuts 3/4 of the way through the back of the ply with a table saw or circular (skill) saw. Bend, glue and nail the ply around the radius. Make the joints at the flatter spots on the frame. I recommend taking your time and do several fit up before using glue and nails.

Thanks for the tips... on one of the oval legs, the veneer is damaged thru the finish veneer layer (you could see it in one of the photos I posted), so that leg will need to be recovered... it's a matter of whether or not I remove the original layer first, or just adhere new veneer over the top of it. The head end oval is in better condition and will be chemically stripped to determine its condition. As for whether a previous attempt at restoring this table occurred, based on what i've seen (and also evidenced in a previously posted photo) the person who painted the legs, did not even remove the stretcher first, it's just a topcoat over the original finish, and then they didn't paint the stretcher. It's all kinda odd.

ChevyBob... since you're staying up with all this Anni stuff, do you happen to know how dark the stain was finished in these Anni's originally? Here's a link to show many different depths of hue... which do you think was the closest to original? http://www.billiardrestoration.com/Antique-Pool-Tables/anniversary.htm
 
I don't know if I would adhere over the old. I think it would be a hard route to go. I wouldn't make a complete plan of action until you've stripped the paint to see how much work you have ahead of you.

I have no idea how dark the original was. I went with what I thought was good looking. If you could get a scrap piece of the same wood type, you can test different stains. Remember, sand the test piece the same way as your table. The color will still be different due to the age of the wood.
I would go light at first. I had some spotting (dots) occur with my rosewood rails. The dots were compression marks from ball hits. The poplar stretchers were well dinged too. I was hoping to stain them but changed to paint after sanding them and seeing the dings.

I wish I lived closer to you. I'd come over to help you out.

Such a nice gesture... that was nice to read after a hard week of strep throat and feeling like every once of me was getting wacked with a pool cue. Yeah, TN and WI are not particularly convenient. I love this project though and continue to project a vision in my brain of what this table will look like when done. Hopefully I'll be patient enough to get it to play as good as she'll look! Again, thanks for the thought!
 
Thanks for the tips... on one of the oval legs, the veneer is damaged thru the finish veneer layer (you could see it in one of the photos I posted), so that leg will need to be recovered... it's a matter of whether or not I remove the original layer first, or just adhere new veneer over the top of it. The head end oval is in better condition and will be chemically stripped to determine its condition. As for whether a previous attempt at restoring this table occurred, based on what i've seen (and also evidenced in a previously posted photo) the person who painted the legs, did not even remove the stretcher first, it's just a topcoat over the original finish, and then they didn't paint the stretcher. It's all kinda odd.

ChevyBob... since you're staying up with all this Anni stuff, do you happen to know how dark the stain was finished in these Anni's originally? Here's a link to show many different depths of hue... which do you think was the closest to original? http://www.billiardrestoration.com/Antique-Pool-Tables/anniversary.htm

Bob did and amazing job on his table....the pics we took did no justice to how good the table looks standing next to it.
I'll try to put some pics up of his table and the last anniversary that I refinished.

All the hard work your putting in to the table..I would like to install new sub-rails and spec the rails with what ever size pockets you want.
If your going to do the work yourself...I recommend using brunswick super-speed cushions...feel free to call me and I'll help you out with the spec's.
 

Attachments

  • IMG_0645.jpg
    IMG_0645.jpg
    16.6 KB · Views: 811
  • IMG_0962.JPG
    IMG_0962.JPG
    57.7 KB · Views: 823
Why do you reccomend brunswick superspeed cushions? Just curious, I've seen deals on them but I thought I heard other people say they don't last or aren't of the same quality as others. I'd like to tighten my pockets and change the angles I'm not liking the funnel shape pockets, but other cushions are a lot more money...
 
Last edited:
Why do you reccomend brunswick superspeed cushions? Just curious, I've seen deals on them but I thought I heard other people say they don't last or aren't of the same quality as others. I'd like to tighten my pockets and change the angles I'm not liking the funnel shape pockets, but other cushions are a lot more money...

The tables a Brunswick...he's putting a lot of work in restoring it to original...plus I like how the super speed cushion plays better than any other cushion...but that's just me.....I don't have to be right.

Brunswick had trouble with the super speed cushions way back in the 90s....I have used a lot of sets in the past 15 years and have not had the first call that the cushions went bad or hard.
The artemis cushion is a great cushion...made much cleaner and 100% rubber.
I'm just old school....Brunswick table.....Brunswick cushions.
 
perfectpocketz said:
Bob did and amazing job on his table....the pics we took did no justice to how good the table looks standing next to it.
I'll try to put some pics up of his table and the last anniversary that I refinished.

All the hard work your putting in to the table..I would like to install new sub-rails and spec the rails with what ever size pockets you want.
If your going to do the work yourself...I recommend using brunswick super-speed cushions...feel free to call me and I'll help you out with the spec's.

I went to your website, and could see on the homepage that anni but there weren't any other hyperlinks that I could find. I'd REALLY like to see more photos of a fine Anni restoration.

As for my rails, they certainly need attention. Still undecided on if I'll proceed with new Artemis (will delay completion) or re-use my original BBC Monarchs with thicker facings. I don't want to cheap out on this fine table, but project cashflow has become stagnant at present until I can continue donating plasma again.

As for pocket opening dimensions, what would be considered half-way between stock/original and Diamondized (pro-pockets)? Before disassembly, I could barely get two balls past the nips, but two won't drop... they get stuck just below the surface... and I never measured them for some reason I cannot come up with (or excuse for that matter.)
 
Here is an article that's a good read I found here when I was looking for this info on my table. It says 4.25 openings and 40Degree bevel, which would be exactly two balls wide at the mouth. Not sure on the sides or the downangle.

I think it's interesting though in how it explains just how much pocket angle and shelf depth play a role in calculating a tough pocket, according to the article. I don't really get how a math formula like that would work, doesn't make sense to me, but interesting...

I looked that up because the more I play on mine the more I see that balls want to rattle out rather than rattle into the pockets. Makes you wonder if pro cut openings wouldn't make the game easier in sime ways rather than harder if balls all the sudden stopped rattling in the jaws less often and droppinga higher percentage of the time.

http://www.azbilliards.com/rogerlong/roger2.php
 

Attachments

  • diamondpocket.jpg
    diamondpocket.jpg
    49.7 KB · Views: 755
Oregonmeds said:
Here is an article that's a good read I found here when I was looking for this info on my table. It says 4.25 openings and 40Degree bevel, which would be exactly two balls wide at the mouth. Not sure on the sides or the downangle.

I think it's interesting though in how it explains just how much pocket angle and shelf depth play a role in calculating a tough pocket, according to the article. I don't really get how a math formula like that would work, doesn't make sense to me, but interesting...

I looked that up because the more I play on mine the more I see that balls want to rattle out rather than rattle into the pockets. Makes you wonder if pro cut openings wouldn't make the game easier in sime ways rather than harder if balls all the sudden stopped rattling in the jaws less often and droppinga higher percentage of the time.

Good article. I learned something from it, that's for sure. I know there have been a lot of posts from the mechanic kings about pocket geometry... I'll proabably revisit some of those as well to come up with my happy medium. To get the table done, I keep leaning towards reusing my Monarchs until a day comes along that will allow me to get the rails recalibrated. Greg at Perfect Pocketz and another gent has offered to do my rails if I ship them in, but that is a lot of weight and substantial cost despite the HUGE benefits. Hopefully my patience will hold out a bit longer so I can continue donating plasma to get the restoration cash flowing again. I'd like to see some more photos of your progress some time.
 
Thanks for the compliments Mark.

My rails were warped and twisted. If you noticed (in the pic Mark posted) my rails are one piece (No side pocket castings). Mark cut off and replaced the subrails in his shop and replaced them with the proper dimensions for the Artimus cushions. I won't post what he does because his livlihood depends on it, but those rails on my table are straight as an arrow. I can cut a fozen ball then length of the rail without the ball coming off the rail. If you saw the rails before Mark's work, then you would know how strong that really is.

By the way, I started working at a very early age in a cabinet shop. I know a good finish job when I see it. Mark's work is top notch.

Mark, I'm in Atlanta today through Sunday. If I get time and a kitchen pass, I'll see if I can drop by. I'll call.
 
i have to apologize... there have been a few posts where I mention "Greg" at Perfect Pockets, but I meant to type "Mark Gregory"... me fingers move faster than my brain.

He and Jack Z (and I know there are many others) both do excellent work... no doubt that they are worth every penny for their expertise.
 
Good article. I learned something from it, that's for sure. I know there have been a lot of posts from the mechanic kings about pocket geometry... I'll proabably revisit some of those as well to come up with my happy medium. To get the table done, I keep leaning towards reusing my Monarchs until a day comes along that will allow me to get the rails recalibrated. Greg at Perfect Pocketz and another gent has offered to do my rails if I ship them in, but that is a lot of weight and substantial cost despite the HUGE benefits. Hopefully my patience will hold out a bit longer so I can continue donating plasma to get the restoration cash flowing again. I'd like to see some more photos of your progress some time.

I don't have new progress to show other than your bed cloth on. I've played on it quite a bit rather than work on it, looking for funny rolls and testing my level. I'm still off somehow or there are rolls I have to deal with or both. I really am looking at making one of those Fred Flintsone palm sanders and blocking my slate, just what my crushed vertibrae need...Need to get my hands on a machinists level to see what's going on first though, a carpeters level is useless and those are all I have.

I received that brand new free milliken superpro cloth to put on it from JBCues, and will be in for a lot of work redoing all that myself, but have to figure out this level or "blocking it flat" issue before I can put it on. I really can't tell what's going on with the slate other than it rolls funny a little in places, but I can't see why, it's like working blind not having the proper tools.
 
Last edited:
.Need to get my hands on a machinists level to see what's going on first though, a carpeters level is useless and those are all I have.

the leveling guide is sticky on this forum by RKC ...

i got a machinist level for like $30 on ebay but it is a must.

follow the leveling guide ....and you should be golden ....it took be about 4 hours to go through the whole thing ....but when it was done the table was perfect ....

don't even think about using a ball to level the table ....your ball is unlikely to be a perfect sphere
 
Thanks, I tried to do what I could with what I had, but yes there's no choice you must have one I can testify to that. :)

I know they're not that much money, it's the money I'm already short every month just to live on that's the real issue...
I'll get one, just a matter of time is all.
 
I replace the complete sub-rail on the tables that I do....also change the floating nut plate on the GC's to the diamond inserts. Makes the table play a lot better....no matter what cushions I put on the table.
Calibrating the rails to the cushions makes all the difference in the play of the tables.
Some pics of rail repairs I've done.....if you decide to send me your rails....with all your hard work in the table....the table will be 100% perfect....I guarantee.

Anniversary rails...GC3 rails
 

Attachments

  • IMG_0846.JPG
    IMG_0846.JPG
    51.5 KB · Views: 677
  • IMG_0865.JPG
    IMG_0865.JPG
    67.8 KB · Views: 689
  • IMG_0885.JPG
    IMG_0885.JPG
    60 KB · Views: 682
  • IMG_0866.JPG
    IMG_0866.JPG
    69.2 KB · Views: 679
  • IMG_0884.JPG
    IMG_0884.JPG
    63.5 KB · Views: 674
Here is an article that's a good read I found here when I was looking for this info on my table. It says 4.25 openings and 40Degree bevel, which would be exactly two balls wide at the mouth. Not sure on the sides or the downangle.

I think it's interesting though in how it explains just how much pocket angle and shelf depth play a role in calculating a tough pocket, according to the article. I don't really get how a math formula like that would work, doesn't make sense to me, but interesting...

I looked that up because the more I play on mine the more I see that balls want to rattle out rather than rattle into the pockets. Makes you wonder if pro cut openings wouldn't make the game easier in sime ways rather than harder if balls all the sudden stopped rattling in the jaws less often and droppinga higher percentage of the time.

http://www.azbilliards.com/rogerlong/roger2.php
In the picture you posted here, the pocket opening at the mouth is slightly more than 4 1/2" from point to point, which is why the two balls being 2 1/4" each equaling 4 1/2" sit just inside the points of the pocket by more than 50% of the balls, no way it's 4 1/4" at the opening;)
 
I replace the complete sub-rail on the tables that I do....also change the floating nut plate on the GC's to the diamond inserts. Makes the table play a lot better....no matter what cushions I put on the table.
Calibrating the rails to the cushions makes all the difference in the play of the tables.
Some pics of rail repairs I've done.....if you decide to send me your rails....with all your hard work in the table....the table will be 100% perfect....I guarantee.

When I was still shooting in 8-ball leagues at a place in Herndon VA (Breaker's Billiards, "In the Clock Tower!"), they had all Connolly Ultimates, 6 legged Chiricahua model with 2 inch slate - all 9 footers of course. Connelly boasted of 5 bolts per rail. I believe the claim was, other things being equal, the tighter the rail is to the slate, the better/faster the ball is off the cushion. When you mention changing the floating nut plate on GC's, would that impact performance in like manner?

Also, I've been notified I can finally start donating plasma again (tomorrow), so I'll have to see how fast i can bank some more restoration money and make a decision as to whether or not to have the subrails extended sooner rather than later. I wonder what all that weight would cost to ship. Walnut is heavy.
 
Back
Top