DIY UV finishing booth

Dave-

I used that Solarez perhaps 3 weeks or a month ago.

I just looked at it about an hour ago as a matter of fact. Still shiny. :smile:

I thought it was a terrible smell. I've been around nasty chemicals since before we knew enough to use caution so now a days I really try to keep my head down.

I'll stick to epoxy for now. I get good results with it.

Edit: Now that I think of it, it was low viscosity compared to what I usually use, but much more viscus than auto clear.
Robin Snyder
 
Last edited:
Solarez is good for surf boards. For cues? Not much. I still have a small can here . Too freaking thick and does not level like a thin epoxy. Never mind the smell.

About them UV's, how much safer are they compared to auto clear ? You have to deal with that UV lamp. I hope you automate the flashing process Dave.
Put in some conveyor or actuator in an enclosed box while you're away from the thing.
 
Solarez is good for surf boards. For cues? Not much. I still have a small can here . Too freaking thick and does not level like a thin epoxy. Never mind the smell.
l
About them UV's, how much safer are they compared to auto clear ? You have to deal with that UV lamp. I hope you automate the flashing pros ton of cuescess Dave.
Ey alPut in some conveyor or actuator in an enclosed box while you're away from the thing.

Good points.

There is no finish that is the be all to end all all. They all have their idiocricies that must be understood and mastered concerning many details over time and finishing a ton of cues.

The bottom line is, if you can inspect the cue years after it has been finished and it still has a super clear wet look with high luster without shrinkage at inlay, ring and connection areas, then you got it. The percentage of cue makers that have achieved this level is very small.

IMO, you can't make any judgment of any coating and application, wet sanding and buffing procedure without a long test of time. From my experience cure times of substrate and subsequent coating layers is the key when using automotive clear. UV while it hardens very fast it has other permutations that have to be considered.

Like Kane was told by his master, "Grasshopper, when you can walk on the rice paper and not leave a mark, only then shall you have learned".

From the cue at finished taper turn dimension to the final wax application there is a ton of performance factors and detailed steps to perform. Not to mention the choice of products and chemistry. Every one of them is critical.

Rick
 
Last edited:
Good points.

There is no finish that is the be all to end all all. They all have their idiocricies that must be understood and mastered concerning many details over time and finishing a ton of cues.

The bottom line is, if you can inspect the cue years after it has been finished and it still has a super clear wet look with high luster without shrinkage at inlay, ring and connection areas, then you got it. The percentage of cue makers that have achieved this level is very small.

IMO, you can't make any judgment of any coating and application, wet sanding and buffing procedure without a long test of time. From my experience cure times of substrate and subsequent coating layers is the key when using automotive clear. UV while it hardens very fast it has other permutations that have to be considered.

Like Kane was told by his master, "Grasshopper, when you can walk on the rice paper and not leave a mark, only then shall you have learned".

From the cue at finished taper turn dimension to the final wax application there is a ton of performance factors and detailed steps to perform. Not to mention the choice of products and chemistry. Every one of them is critical.

Rick
I have no clue why you even quoted my post .
I was just questioning the safety advantage of UV.
 
With all due respect to everyone.....Before this gets derailed by people that haven't even approached UV finishing, please stop! I will post in the next few days what I have learned, and how it has worked for me.
Rick...please stay out of my threads, your not welcome and you know why. enough said.
Dave

Dave,

I had a complete UV system with booth and the whole nine yards for over three years. I am back to Automotive Clear Coat for the last 7 years.

Good luck in your quest in what your are seeking.

Please feel free to reject my offering and experience that I share with this forum from time to time.

The whole point to my post is that whatever type of finish you use everything is very complicated in details and there is no quick fix.

If one thinks they can duplicate the finish results Joey Gold achieves with downstream performance expectation with his high tech high buck system, they have a big experience and learning curve to understand. I found that my 300w American Ultoviolet UV light box for 1500.00 fell short of Joe's system and the finish performance of the cue down the road. :confused:

That's all Dave, over and out.

BTW, this is an open forum Dave. Take a deep breath. I did not sidetrack your thread. As I said good luck with your quest to improve the finish on your cues.

Ricky

BTW, it's not like I am suggesting using a battery charger to finish a cue! LOL :thumbup:
 
Last edited:
Does anyone want to share any pictures or descriptions of their own DIY UV curing booths? I am thinking on going this route instead of the finish I am currently using. I don't have $1000's of dollars to buy a pre-done unit. Any info/help regarding UV finishing is appreciated. I have done google searches and not really found a good source of info.
Dave

My buddy I play with just built a new curing booth for David Jacoby. I know the price of it is several thousand, but I'll ask him tomorrow night if he has any pics of it.. Maybe you can get a few DIY ideas from it...
 
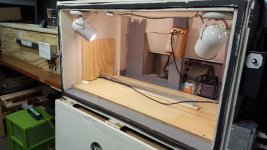
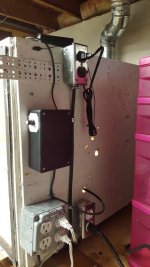
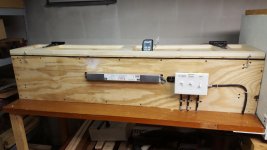
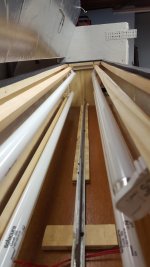
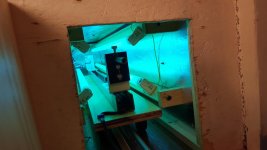
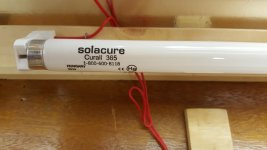
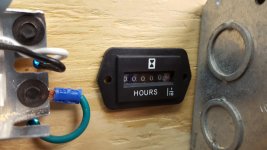
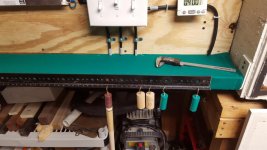
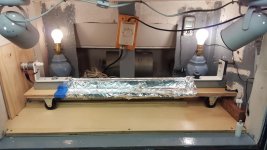
Here are pictures of my UV addition that I built to modify my original finish booth. The inside got covered with aluminum foil then the light bars were installed. The light bars are installed with one screw on each end so they can be positioned at the correct angles. The bulbs are from Solarcure and are made with a 180 degree reflector in the bulb to get the most UV going on to the cue. The lid allows for servicing the bulbs, and removing any brushes that get stuck to a bulb...has happened twice so far..lol. I have a thermometer to tell the temp inside the UV tunnel as the bulbs work best once they have reached a certain temp range. The counter next to the switch box is to keep track of the hours on the bulbs. The open area of the booth is where I apply the sealer / finish, then rotate the cue for about 30 minutes, with the exhaust fan running. There are holes cut into the door, and a filter placed over them so that the fan can pull filtered air in. The spinning motor is 12vdc and uses a ebay cheapo speed control that works great, I can go down to 1 rpm if I like. Then I remove the board that separates the 2 sections and just roll it into the UV 'tunnel' for curing. *** Please use UV glasses when the UV bulbs are on*** I then replace the board while the cue cures.
I use 4 lamps with a thermostat connected to control the heat in the booth, as the finish (most finishes) flowout better in about 85 degrees. The trolly is on a track so that it can only roll straight and not hit the bulbs when pushing it in or pulling it out. Made it out of a piece of ceiling grid main beam and a couple of nylon blocks with a slot cut into them. The cue support part is made using a piece of unistrut and angle brackets that can be loosened and slide closer together to accommodate shorter pieces. The spring loaded live center is adjustable also, and I have built small pieces to swap out the point with ends that fit a shaft with a tip/ferrule installed or a butt with a weightbolt hole drilled in it. Hope these pictures help someone to build theirs in the future. I didn't use any written plans, I did this on the fly as I went, With guidance from Dick Neighbors, so I cannot provide any drawings etc...sorry.
Thanks,
Dave

20151215_101333.jpg

20151019_161318.jpg

20151019_161422.jpg

20151019_161300.jpg

20151019_163716.jpg
 
Last edited:
Dave-
Really nice. I particularly like the hour meter for the UV lights.

If I may suggest one thing, I would install a switch that prevents the UV lights from being on when you could be exposed to them. Easy. Safer.

Great job.

Robin Snyder
 
It is a nice set up Dave ---like the carguy I like the meter also. I have a setup thats a whole lot simpler than yours ....I ll try to post some pics this weekend.

Joe
 
Looks like a great setup, Dave.

All that electrical cable and UV lamps and only plywood in between you and them scare me though.
Why does that scare you? The UV is reflected back towards the internals of the box by the aluminum foil coating the inner walls and then the wood and weatherstripping prevents any of it escaping. As far as I know UV does damage to the skin and eyes by actually shining on to them. As far as the electrical wires???? :confused:
Dave
 
This is the type of independent innovation that keeps the horizon bright.
Kudos to Mr Neighbors for his collaborative efforts. Dick is a smart guy.
Ya done good David. It doesn't have to be pretty and you can make refinements
as needed down the road. I believe the objective here was functionality
and you've accomplished that without breaking the bank. I'd call it a success.
BTW, your wire runs are fine. Lol

KJ
 
Back
Top