I must be doing something right for them to find me
")
My client said this to me yesterday: "I didn't want the
installer who just happened to be there for the job at the
brunswick dealer, who does not give a $h!t about the
installation, that was getting a flat fee and in and out in a hurry"
I am very thorough about all my sales, I inform my clients to the
best of my knowledge and I treat people how I want to be treated.
Must be a winning combination?
You and I both know I am far more thorough than the typical
installer that is "Brunswick Certified". You also know that
certification does not mean $h!t...
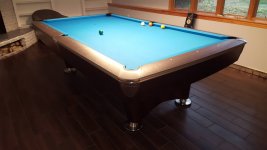
To re-clarify what went on over the 8 hours we were there, here it is again:
We carefully unloaded all of our tools and laid out blankets in our tool
area, then unloaded the table, unpacked everything, carefully
built the top(lining up the castings so they are square and flush
takes TIME), built the base/ frame, used a starrett 98-12" machinist
level to level the frame and then added the center slate/ leveled, then
leveled again with the end slates on, lined up our seams, then used
3 liquid dowels on each of the slate seams, prepped and bondo'd the
seams/ sanded them nice an smooth, laid out the Marine colored Simonis
bedcloth and installed it using your indexing method, used your french
fold w/ pipe strapping to finish the pockets, put the top on/ made sure
it was square and bolted it down, added lil ball storage box( which installs
weird, but, works!), put in the drop pockets with bosse set screws & star
washers, installed the rack holder & the bridge holders and finally added
the spot. Then checked the level again and made some very small left to
right adjustments.
TFT:wink: