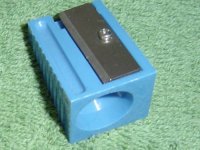
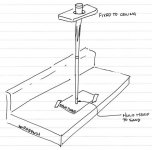
I’ve used the Porper Mushroom Grazer on a bunch of tip installations, but it’s tricky to get right. Best way I found is to clamp the tool to a workbench or tabletop and turn the shaft while keeping it aligned parallel. It’s also important to precisely set the depth stop to keep the blade from contacting the ferrule. Forget it for super hard tips like WB or Sumo. A much better way to go, IMO is what I’ll term the “Tape guide method”. Get yourself a 2 or 3 inch dia. Disc sanding mandrel with 100 to 120 grit discs. I use a drill press, but you can also use a hand drill motor with a trigger lock, clamped in a vise or to a tabletop. However you set it up, orient the disc so you can hold the shaft perpendicular to the disc and rotate it smoothly.
After cutting off the old tip and cleaning and squaring the ferrule, I wrap 2 layers of tape around the ferrule. First layer is Scotch tape, 2 laps around. Over that goes 2 layers of blue masking tape. Once all the tape is on, trim it all even to the tip end of the ferrule with a razor blade. Go ahead and glue on your tip. I use Gorilla Glue for all my installs, so the tape protects the ferrule from the inevitable glue squeeze-out. Once glue is set, you ready for tip sizing.
Set your drill for rpm in the 500-1000 area. Rotate the tip smoothly against the disc until you are lightly scuffing the blue tape all around. Go slow and keep the pressure light, so you don’t generate too much heat. Remove the masking tape, and clamp the shaft horizontally in a vise to a tabletop with the ferrule overhanging the edge. Cut a 1 inch wide strip of 320 to 400 grit sandpaper and loop it over the ferrule in an inverted “U”. Pull it back and forth “shoe shine style” to bring the tip down to the level of the scotch tape. Rotate the shaft about a quarter turn at a time and repeat as necessary, being careful not to sand through the scotch tape. Now you’re ready for the final steps.
Peel off the scotch tape, and repeat the above procedure with some 1500 to 2000 grit paper. You want to bring the tip down the last little bit in size to match the ferrule, and polish the ferrule in the same step. Grits this fine won’t remove any measurable amount from the ferrule, but will bring the softer tip material down to size. Spray a few drops of water on the paper and polish until dry. Wipe it down, shape the tip and you’re finished. Done well, you’ll have a burnished tip, nice and even with the now-polished ferrule. Total time to size and finish a glued tip is about 15-20 minutes. I can do it faster than it took to write this, and you can’t tell any difference from a job done on a lathe. If you have a usable drill, total investment of all the materials needed should still leave you change from a $20 bill. I hope this helps those who would like to do their own tips. Any questions, shoot me a PM.
Bill
 I feel it is well worth the investment!