You are using an out of date browser. It may not display this or other websites correctly.
You should upgrade or use an alternative browser.
You should upgrade or use an alternative browser.
Anyone else have this problem?
- Thread starter poolstixx
- Start date
what kind of glue are you using? Are you putting it on both sides or just one?...JER
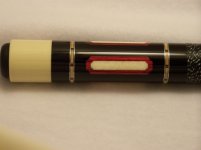
I am using a two part epoxy. Yes i am putting it on both sides. It looks like the glue is getting into the maple ring....
What brand and type of epoxy are you using? You can seal the ring with a very thin coat of epoxy to stop that problem, but it is usually not needed to be done unless you are using one of the thin slow epoxies.
Looks to me the nickel is oxidizing unto the maple.
I don't like brass and nickel rings on wood without a fiber or phenolic in between.
I don't like brass and nickel rings on wood without a fiber or phenolic in between.
Just a thought, but are you sure you aren't somehow getting ebony dust in the Maple. Epoxy dries clear.
I'm also thinking that if it were glue migration, it would be more evenly distributed to each section of the ring.
That's terribly unfortunate what's happened. I'm guessing it didn't show itself before the finish was applied?
Great pic BTW.
I'm also thinking that if it were glue migration, it would be more evenly distributed to each section of the ring.
That's terribly unfortunate what's happened. I'm guessing it didn't show itself before the finish was applied?
Great pic BTW.
ring work
looks like ebony dust got into the maple. hit it with a magic eraser and a little alcohol b4 u finish
Just a thought, but are you sure you aren't somehow getting ebony dust in the Maple. Epoxy dries clear.
I'm also thinking that if it were glue migration, it would be more evenly distributed to each section of the ring.
That's terribly unfortunate what's happened. I'm guessing it didn't show itself before the finish was applied?
Great pic BTW.
looks like ebony dust got into the maple. hit it with a magic eraser and a little alcohol b4 u finish
I also agree with some of the posters, it appears that some dust from the Ebony migrated into crevases in the Maple. Wiping the cue down with Acetone or other cleaner before applying finish and checking the cue carefully under a strong light should allow you to see this problem before it is too late. Next whenever, you are using light wood between dark it is a good idea to not put sealer on all at once. I would recommend applying sealer to the light woods and materials first allowing them to dry and then applying sealer to the rest of the cue even those parts sealed.
Take care
Take care
dave sutton
Banned
i use the 20 min slow cure epoxy from atlas and ive never had that problem.
Does it get worse in time or is it this way from the get-go?
The only time I see this happen is if the ring isn't cut smooth. The wood fibres are rough and the glue seeps into them. OR I have seen it if the glue is not mixed at equal proportions, causing an incomplete cure.
The only time I see this happen is if the ring isn't cut smooth. The wood fibres are rough and the glue seeps into them. OR I have seen it if the glue is not mixed at equal proportions, causing an incomplete cure.
dave sutton
Banned
Does it get worse in time or is it this way from the get-go?
The only time I see this happen is if the ring isn't cut smooth. The wood fibres are rough and the glue seeps into them. OR I have seen it if the glue is not mixed at equal proportions, causing an incomplete cure.
makes sense i was thinking about it. the color is not uniform at all. if it were dust from sanding i think it would be all over the ring not in one little area. also looks like if it were epoxy the seepage would be a little more uniform too. mixing seems like a good place to start
Looks to me the nickel is oxidizing unto the maple.
I don't like brass and nickel rings on wood without a fiber or phenolic in between.
Barring anything else you may be right. There can be an acid in the hardener of the epoxy that will react the the metal. I have seen this with some finish as well. It would turn the rings green like they had corroded.
bleeding????
Maybe I'm wrong, but it looks to me like when the ring was initially parted off there were some very small irregular tears in the maple wood fibers around the edge of the ring(this leaves small irregular valleys at the edge). We all pick up the parted rings and run our fingers around the edge to remove any lite burrs (loose fibers on the edge). The other ring appears much more cleanly cut (fewer valleys). When glue is applied, while mating the butt sleeve, some fills these valleys and when sanded show the discoloration common with excess epoxy at ring interfaces. It may have a very small amount of ebony dust that got smeared in but I really doubt it. Dust would have appeared on the other ring also, but it doesn't appear to be there from my view.
The only suggestion I have is double and triple check all surfaces and edges with a strong magnifying lens BEFORE applying any adhesive. It's surprising what you will see. Correct these imperfections and definitely wipe down and blow off surfaces to remove dusts BEFORE gluing.
Just my 2 cents. Take it for what it's worth.
Tom Gedris, Triple Cross Cues
tap tap tap Tom.
Lapping rings on 220 grit paper over granite and measuring 4 spots of the ring works for me.
Putting some Elmer's glue on wax paper and lapping the maple rings on that so the face gets sealed from hot epoxy might help with glue lines too.